A Step-By-Step Guide On How To Build A Sewing Kit

Sewing can be overwhelming, I know. Whenever ladies tell me that they want to learn how to sew, but don't know where to start, I always tell them the same exact thing. Just start with building a sewing kit.
Not only is building a sewing kit an easy, baby step to take.. But it's also absolutely essential when it comes to sewing. You can't do much sewing without a basic tool kit.
This week, I wanted to go back and recreate this most popular post of ours. Because it's fun and exciting to pick out beautiful machines and the sewing patterns that you'll be sewing up.. But no one really thinks about the logistics of it all. The scissors, the pins, the tracing wheel.
So that's where this post (and accompanying guide) comes in! As someone that hones in on scheduling (to a color coded, almost psycho degree) I strongly believe in getting the easy, not-so-fun tasks out of the way first.

And take your time when it comes to the fun stuff! I'm talking buying sewing machines, picking out sewing patterns, and finding the gorgeous fabrics you will soon be wearing.
(Btw, if in the market for a sewing machine or serger, we have reviews up on two of my very favorite machines: The Janome DC2010 & Brother 1034D Serger. AND we also just so happen to have two sewing patterns up in our shop: The Dany & the Jupiter. Oh, and we have a comprehensive fabric guide too! Like I said, the fun stuff.)
But first.. You will need to build a sewing kit with all of the essentials in it. Because you can't really do anything when it comes to sewing without a decent set of tools.
(Ready to learn how to build a sewing kit? Our new & highly improved step-by-step guide walks you through how to build your very own kit! Just click on the links to order each item and your tool kit will certainly be ready for at-home assembly in no time.)

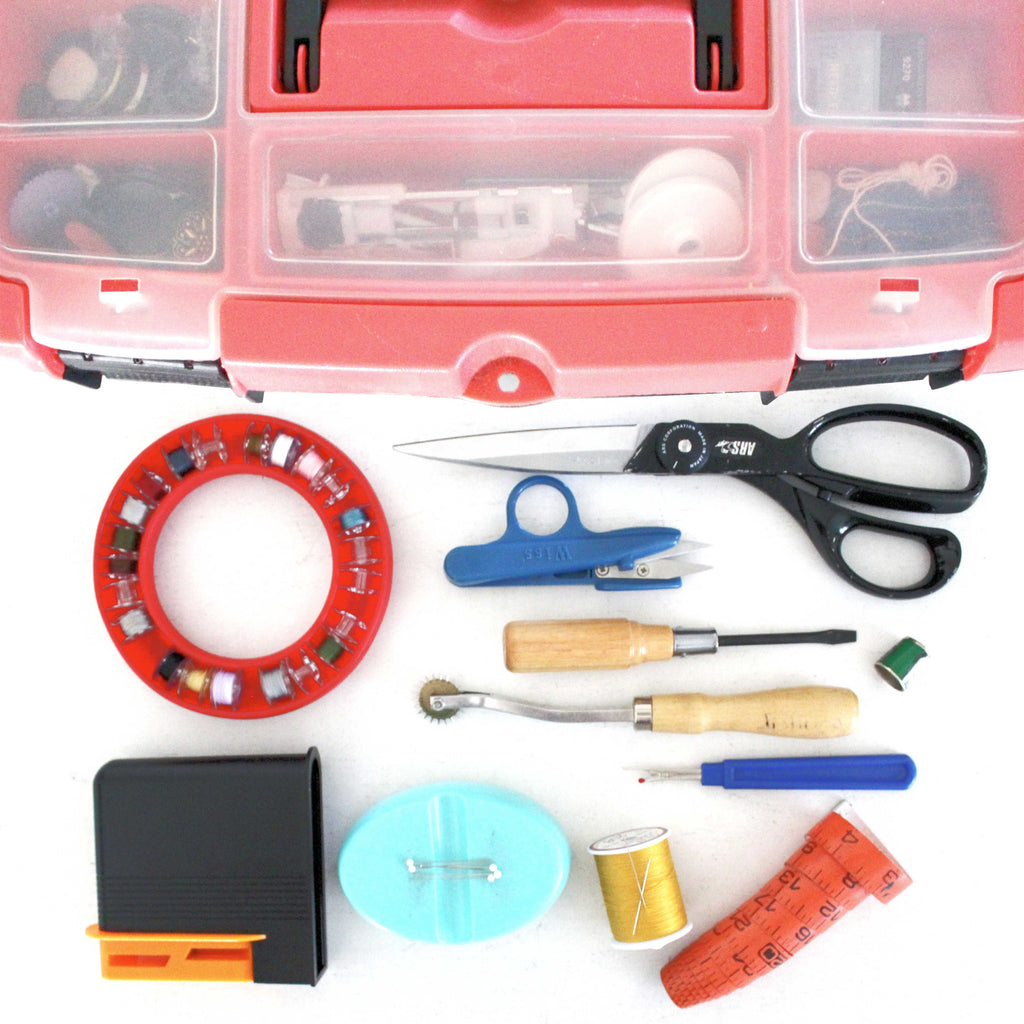
How to build your own sewing kit: The basics

To start, let's go over the basics. The basics of your sewing kit are the very foundation on which your tool set will be built--And I highly recommend getting every single one of these tools when building up your sewing kit.
These tools are the ones you will use with every. single. project. The most important of the most important. And those tools include:
- A Seam Ripper: A curved metal cutting blade that is used to rip stitches out.
- Fabric Scissors: Sharp scissors that are used ONLY for cutting fabric. And nothing else.
- Straight Pins: Metal pins that are used to hold pieces of fabric together as you sew.
- Thread Clipper: Tiny little scissors that are used for clipping loose threads.
- Measuring Tape: Typically measures 60" in length, and can be used for a variety of measuring purposes.
- Hand Sewing Needles: Needles that are used specifically for hand sewing.
In short, if on an absolute budget, these basic tools with get you through with most sewing projects. Keep reading below for additional details on each tool, and why each one is a definite necessity when building up a sewing kit.
(Ready to learn how to build a sewing kit? Our new & highly improved step-by-step guide walks you through how to build your very own kit! Just click on the links to order each item and your tool kit will certainly be ready for at-home assembly in no time.)
Sewing kit basic #1: Seam ripper

Oh, the seam ripper. It's a love/hate relationship.
A seam ripper is a curved metal cutting blade used to rip stitches out. On one end of the curved blade there is a sharp metal point, which is what actually rips the stitches out. The other end has a small plastic ball that prevents the ripper from slipping and damaging the fabric.
I love seam rippers because they quickly & efficiently rip stitches out without tearing fabric. On the other hand, I strongly dislike seam rippers because the only time you need to use them is when you're ripping stitches out.
And no one actually enjoys ripping stitches out. Still, you will absolutely have to rip something out at some point.. So for maximum damage control you will want a seam ripper.
(Ready to learn how to build a sewing kit? Our new & highly improved step-by-step guide walks you through how to build your very own kit! Just click on the links to order each item and your tool kit will certainly be ready for at-home assembly in no time.)
Sewing kit basic #2: Fabric scissors

Yes, you need scissors that are specific for cutting fabric. And only for cutting fabric. NOTHING ELSE. Not paper. Not for opening a package. Fabric only, my friends.
There are actually like 10 different types of scissors for sewing, but I've been able to get by with a great pair of straight sewing shears. These scissors are made to cut fabrics of all weight and thicknesses, and are ideal for general sewing.
If you buy a dull, cheap pair of scissors that are not meant to cut fabric.. The cut will not be clean. Which will result in the fabric fraying, or worse, will result in runs throughout the entirety of the fabric.
Also, cutting materials other than fabric with your fabric specific scissors will dull the blades quickly.
In addition, depending on what you're cutting, could even result in chips along the metal blades. Just stick to cutting fabric with these babes, and you'll be solid.
Sewing kit basic #3: Straight pins

Pins are used in every. single. sewing project out there. They are used to hold the fabric pieces together while you sew, to ensure your stitch lines are nice and straight.
Straight pins are typically made of stainless steel, with sharp, smooth, and rustproof ends. They bend without breaking, and can be used on a variety of fabric types. Some pins have a tiny plastic ball on the end, which are ideal for using with heavier fabrics.
Over the years though, I have actually started using these pins for all of my projects, no matter the weight-It's easier on my fingers, since I'm not capable of using a thimble when sewing. (See below for more detail on that slight misfortune.)
Grab a big box of these babies--You will lose them, and have your husband poke you with them when he steps on one of them nestled into the fibers of the rug. Oops.
(Ready to learn how to build a sewing kit? Our new & highly improved step-by-step guide walks you through how to build your very own kit! Just click on the links to order each item and your tool kit will certainly be ready for at-home assembly in no time.)
Sewing kit basic #4: Thread clippers

Thread clippers are tiny little scissors that are ideal for (you guessed it) clipping loose threads. Likewise, they can also be used to clip thread while sewing.
The small size of these clippers makes it much, much easier to cut threads as you're sewing--Rather than pulling out the giant fabric shears for cutting every single thread. These tiny scissors can also be used in lieu of a seam ripper, if needed.
However--I would still highly recommend using a seam ripper when ripping out stitches.
I got into the habit of using my thread clippers to rip out stitches, and ended up ripping off the tip of my little thread clippers when working with a thick fabric. That would never have happened with a seam ripper, and now I have to replace my trusty little clippers.
Sewing kit basic #5: Measuring tape

Measuring tapes typically measure 60" in length. They are ideal for taking body measurements, and are just handy for general measuring.
When I was working on the Emma Skirt sewing project, my measuring tape was my BFF when measuring the width of all my pleats. It was so much easier to just wrap the tape around my neck, and pull it out to check the width of my pleats as I went. Rather than pulling out a big, bulky ruler and lining it up every. single. time. to every. single. pleat.
Measuring tapes most definitely come in handy, especially if doing a lot of alterations or repairs.
(Ready to learn how to build a sewing kit? Our new & highly improved step-by-step guide walks you through how to build your very own kit! Just click on the links to order each item and your tool kit will certainly be ready for at-home assembly in no time.)
Sewing kit basic #6: Hand sewing needles

Hand sewing needles are essential (you guessed it) when sewing by hand.
There are tons of different hand sewing needles out there, but sharp needles are a pretty good option to start with and can be used with most general sewing. Sharp needles are a medium/long length needle with a round eye that has a size range able to accommodate most weights of fabric.
If working on a specific type of project, make sure to check out our guide on hand sewing needles. It tells you which needles work for which projects and fabrics--Because it absolutely matters which hand sewing needle you use. This guide is a must have if you are looking to do a lot of unique hand stitching!
And who doesn't love the therapeutic effect of hand sewing?
How to build your own sewing kit: Additional tools

So. You've ordered all of the basic tools for your sewing kit by now, right? As I said above--If on a budget, you should be able to get by with the basic tools. BUT there are also some additional tools I would also highly recommend investing in.
While these tools aren't absolutely necessary for actual sewing, they will definitely help you get organized and develop good sewing habits. (And we all know how hard it is to break bad habits.)
Some additional tools I would highly recommend getting when building up your sewing kit include:
- Pin Holder: An easy way to store and keep sewing pins organized.
- Thimble: A covering that slips over the fingertip to protect it from pinpricks developing callouses.
- Tracing Wheel: A serrated-edge wheel that is connected to a handle, used for transferring markings.
- Bobbin Holder: A round little container that keeps bobbins organized and untangled.
- Scissor Sharpener: A tool that helps to keep fabric scissors sharp over time.
- Screwdriver: Just your basic screwdriver, if there is ever an issue with your sewing machine.
- Sewing Basket/Toolbox: A container that holds the entirety of your sewing kit, keeping it organized.
I strongly believe that staying organized is a major key to success, which is mostly what these tools are all about. Keep reading to see why I think you should add each one to your sewing kit!
(Ready to learn how to build a sewing kit? Our new & highly improved step-by-step guide walks you through how to build your very own kit! Just click on the links to order each item and your tool kit will certainly be ready for at-home assembly in no time.)
Sewing kit additional tool #1: Pin holder

Pin holders are the easiest to keep your pins and needles organized in a pretty convenient way.
There are two different kinds of pin holders: The traditional pincushion in which you push the needles into the stuffed "tomato", which cleans and sharpens the points as well as providing storage. OR there is the magnetic pin holder.
When first starting out, I used a traditional pincushion. But a few years back I converted to the magnetic pin holder.. And I will NEVER go back. There is a small little storage container for sewing needles under the magnet, and the magnet just grabs needles from my hand as I sew.
For me, the magnet is a BIG bonus.. Because I'm terrible about dropping my pins into the rug, which is pretty painful. Magnets for the win!
(Ready to learn how to build a sewing kit? Our new & highly improved step-by-step guide walks you through how to build your very own kit! Just click on the links to order each item and your tool kit will certainly be ready for at-home assembly in no time.)
Sewing kit additional tool #2: Thimble

Thimbles are a small cover that can be made of metal, rubber, or plastic that slips over the index or middle finger. It is designed to protect the fingertip from pinpricks, and helps push the needle through thick fabric while hand sewing.
I have heard wonderful things about thimbles, but I have never been able to get used to wearing one. Oh, how I truly wish I could wear a thimble--It would have saved me from many a painful callous.
Remember what I said above about how hard it is to break bad habits? Not using a thimble to protect my sweet fingers is a habit I just cannot break. No matter how hard I try, a thimble just feels bulky and slows me down.
However this can be different for you! Try using one, I hope it will be magic for your fingers.
Sewing kit additional tool #3: Tracing wheel

I have used this tool more often with pattern drafting, but it can also be useful when sewing. The tool itself is a serrated-edge wheel that is connected to a handle, and is most often used to transfer markings from patterns to fabric.
Tracing wheels are particularly useful if you struggle to follow a consistent seam allowance (raises hand slowly). With a tracing wheel, you can just trace the seam allowance from the pattern to your fabric piece. However, it also works well when marking darts, pleats, pockets, etc. etc.
This tool is a great option because it leaves a good impression on the fabric without making massive holes. It is also a great alternative to fabric markers or chalk, which sometimes leave traces and don't actually disappear entirely.
(Ready to learn how to build a sewing kit? Our new & highly improved step-by-step guide walks you through how to build your very own kit! Just click on the links to order each item and your tool kit will certainly be ready for at-home assembly in no time.)
Sewing kit additional tool #4: Bobbin holder

Having a bobbin holder is essential if you want to keep your sewing kit organized. It holds all of the different bobbins in one place, keeping them from unraveling and creating a terrible tangled mess.
Since it's pretty rare to finish up with a bobbin as you finish a sewing project, you will often have many different half filled bobbins that need a home. Give those bobbins a home and keep your sewing kit organized, all at the same time!
Having all of your bobbins organized with a holder also gives you easy access to the bobbins.
This way you can see which colors you already have threaded, rather than just threading a new one and ending up with 5 bobbins all in the same color. Literally just typing that sentence stresses me out.
Sewing kit additional tool #5: Scissor sharpener

Having a scissor sharpener in your sewing kit is essential in making sure that your scissors stay sharp.
As we went over above--Dull scissors won't cut correctly, and can ruin your fabric before you even get started with a sewing project. Keep them sharp, and you will have a great start to your next project.
NOTE: At some point you will HAVE to take your scissors in to get sharpened by a professional. But sharpening them with a little tool like this one over the years prolongs how often you will need to go into a professional. Which is always a good thing, am I right?
(Ready to learn how to build a sewing kit? Our new & highly improved step-by-step guide walks you through how to build your very own kit! Just click on the links to order each item and your tool kit will certainly be ready for at-home assembly in no time.)
Sewing kit additional tool #6: Flathead screwdriver

This tool is for your sewing machine itself.
While most machines come with some sort of tool so that you can open it up and clean it, it's always good to have a small screwdriver in case your machine doesn't come with one, or you lose the tool they give you.
That is to say, there is nothing worse than having something go wrong with your machine and not being able to open it up. Imagine: You're already upeset because your machine isn't working, then you have to go to the store to get a screwdriver, just to open the damn thing up.
Avoid all that dysfunction and just keep one in your sewing kit. Take care of your sewing machine, and it will take care of you.
Sewing kit final tool: Sewing basket/toolbox

So I guess that the last thing you would really need would be something to hold all of your new tools in, right?
There are sewing baskets of all kinds available. What I use is what I received when I was at FIDM--My toolbox! This thing is durable as all hell. It went to school with me every day, and has moved across the country with me. It went to work with me in New York, and is out every day when I'm working on projects for the blog.
You definitely don't need something this big--But it gives you room to grow. Your kit will definitely continue to grow as you become a more experienced seamstress.
Just pick something with a little bit of organization to it, and you will figure it out from there.
(Ready to learn how to build a sewing kit? Our new & highly improved step-by-step guide walks you through how to build your very own kit! Just click on the links to order each item and your tool kit will certainly be ready for at-home assembly in no time.)
So. Are you ready to build your very own sewing kit?

That's not too bad, am I right? Like I said before--Baby steps.
To sum up, getting all of these tools is a great way to start your sewing education. Not only will they get you started with sewing right away, but they will ensure your kit stays fresh and organized for years to come.
A lot of these tools are actually ones that I still have from when I built my own sewing kit, 12 years ago now. When I was a senior in HIGH SCHOOL. That's how long the bulk of this kit has lasted me.
Why would I need to build a sewing kit in high school? Well. For my senior project, I decided to make my own prom dress. And the inspiration for my prom dress was a sunflower.

For our senior projects, we were required to have a mentor--One who knew the theme of our project inside and out. And for me, my mentor was an old family friend that had helped my mom make our baby clothes.
The first thing she told me to do when we set out to start my flowery prom dress? You guessed it: To build myself a sewing kit.
In short, it worked for me--So I know it can work for you. Is there anything you think I'm missing? Or maybe there's something in your sewing kit that you think is essential, that I didn't mention above?
Let me know below, I'd love to chat about it!
(Ready to learn how to build a sewing kit? Our new & highly improved step-by-step guide walks you through how to build your very own kit! Just click on the links to order each item and your tool kit will certainly be ready for at-home assembly in no time.)


![]()
![]()
![]()