The Step-By-Step Guide On How To Repair Your Own Clothes

And we are finally getting to a topic that so many of you have asked about: How to repair your own clothes. Last week, we went over my 5 fav reasons on WHY you need to learn how to repair your own clothes. And this week are are getting in to the HOW.
In case you haven't checked out last week's post yet, my 5 reasons WHY are:
- Repairs generate less overall waste.
- Repairing clothing yourself is free.
- Favorite pieces of clothing will last longer with repairs.
- Working with repairs can improve hand stitching techniques.
- & You could even start a side hustle by repairing others' clothing.
So let's break that down.
You can save money, MAKE money, keep wearing your favorite pieces longer, AND get better at sewing?

The majority of the repairs that I cover in this week's step-by-step tutorial (8 out of 9, to be exact) were all done using hand stitching. No sewing machine needed.
The last repair in the tutorial does require a sewing machine, but only because it was a more extreme repair. So if you have a needle and thread, you can do 8 out of 9 of the repairs covered with this week's tutorial.
Sounds like pretty good odds to me, am I right?

And don't worry, my little dove. I can already hear it: "But I'm terrible at hand sewing!" "I don't know how to hand sew. How could I ever repair anything?" We have got you covered.
So far, we have two hand stitching tutorials that cover how to sew 8 different hand sewing techniques. You can check out the tutorials below:
And while knowing how to hand sew is an invaluable skill when it comes to learning how to repair your own clothes, I really only used one basic hand stitch for the majority of my hand sewing repairs.
What stitch might that be, you ask? Why, the slip stitch, of course!
It is my BFFL when it comes to hand sewing, and you can find it in Part One of our hand sewing tutorials. #nomoreexcuses
(Ready to learn how to repair your own clothes? Our printable step-by-step guide covers how to sew an additional FOUR MORE repairs not covered here. The perfect guide to help you tackle that ever growing pile of repairs!) 
How to repair your own clothes: An introduction
This post is going to cover how to sew 5 of the 9 repairs that are covered in the step-by-step guide. Those 5 repairs include how to fix:
- Your basic torn seam.
- A tear that is not along any type of seam line.
- A medium sized hole on a garment.
- Torn belt loops on a pair of jeans.
- A torn center back seam along a pair of pants.
Keep in mind: These are all repairs that my family has given me over the past few months. So they are common repairs that REALLY happen, and have probably happened to you at some point.

So. Curious about what repairs are not included in this post, but are included in the downloadable (& printable!) step-by-step guide? I knew you would be!

Those repairs include how to fix:
- A tear where a trim has become disconnected from the garment. (Think: Lace, ribbon, etc. Trims are often much more delicate than fabric, and can detach themselves fairly easily.)
- Small holes when working with very lightweight, sheer fabrics.
- A hole in the pocket bag of your pants.
- Tears along the seam where a pocket is attached to the garment.
My hope with this step-by-step guide is that it will start to change your mindset from, "I can just go buy another one" to "Hey, I think I can fix that!"
Because it really is a mind shift, and one that we don't really think about until we are presented with it. So. Let's get started, shall we?
(Ready to learn how to repair your own clothes? Our printable step-by-step guide covers how to sew an additional FOUR MORE repairs not covered here. The perfect guide to help you tackle that ever growing pile of repairs!)
How to repair your own clothes: Repair #1

This first repair covers how to fix the basic torn seam. This is an extremely common repair, and can be fixed very easily.
And while this tutorial covers how to fix a torn seam using a pillow, the same steps could be applied to anything.. A dress, pants, shirts, skirts. Literally any-thing.
To close up torn seams, I prefer to hand stitch them closed using the slip stitch.


To start, backstitch a few times along the seam line, about 1/4" before the seam starts to unravel.
Next, push the needle to the underside of the fabric. About 1/4" from where you pushed the needle down, push it back up to the right side of the fabric. Cross over to the other side of the seam, going backwards about 1/4", then repeat the process.
Going backwards slightly ensure that there are no gaps along the seam line. Gaps are not good when it comes to repairs, and you don't want them. Avoid them.
Repeat the process with going back and forth across the torn seam until the seam is fully closed off and repaired. Backstitch at the end to secure your stitching. And that's it!
(Ready to learn how to repair your own clothes? Our printable step-by-step guide covers how to sew an additional FOUR MORE repairs not covered here. The perfect guide to help you tackle that ever growing pile of repairs!)
How to repair your own clothes: Repair #2
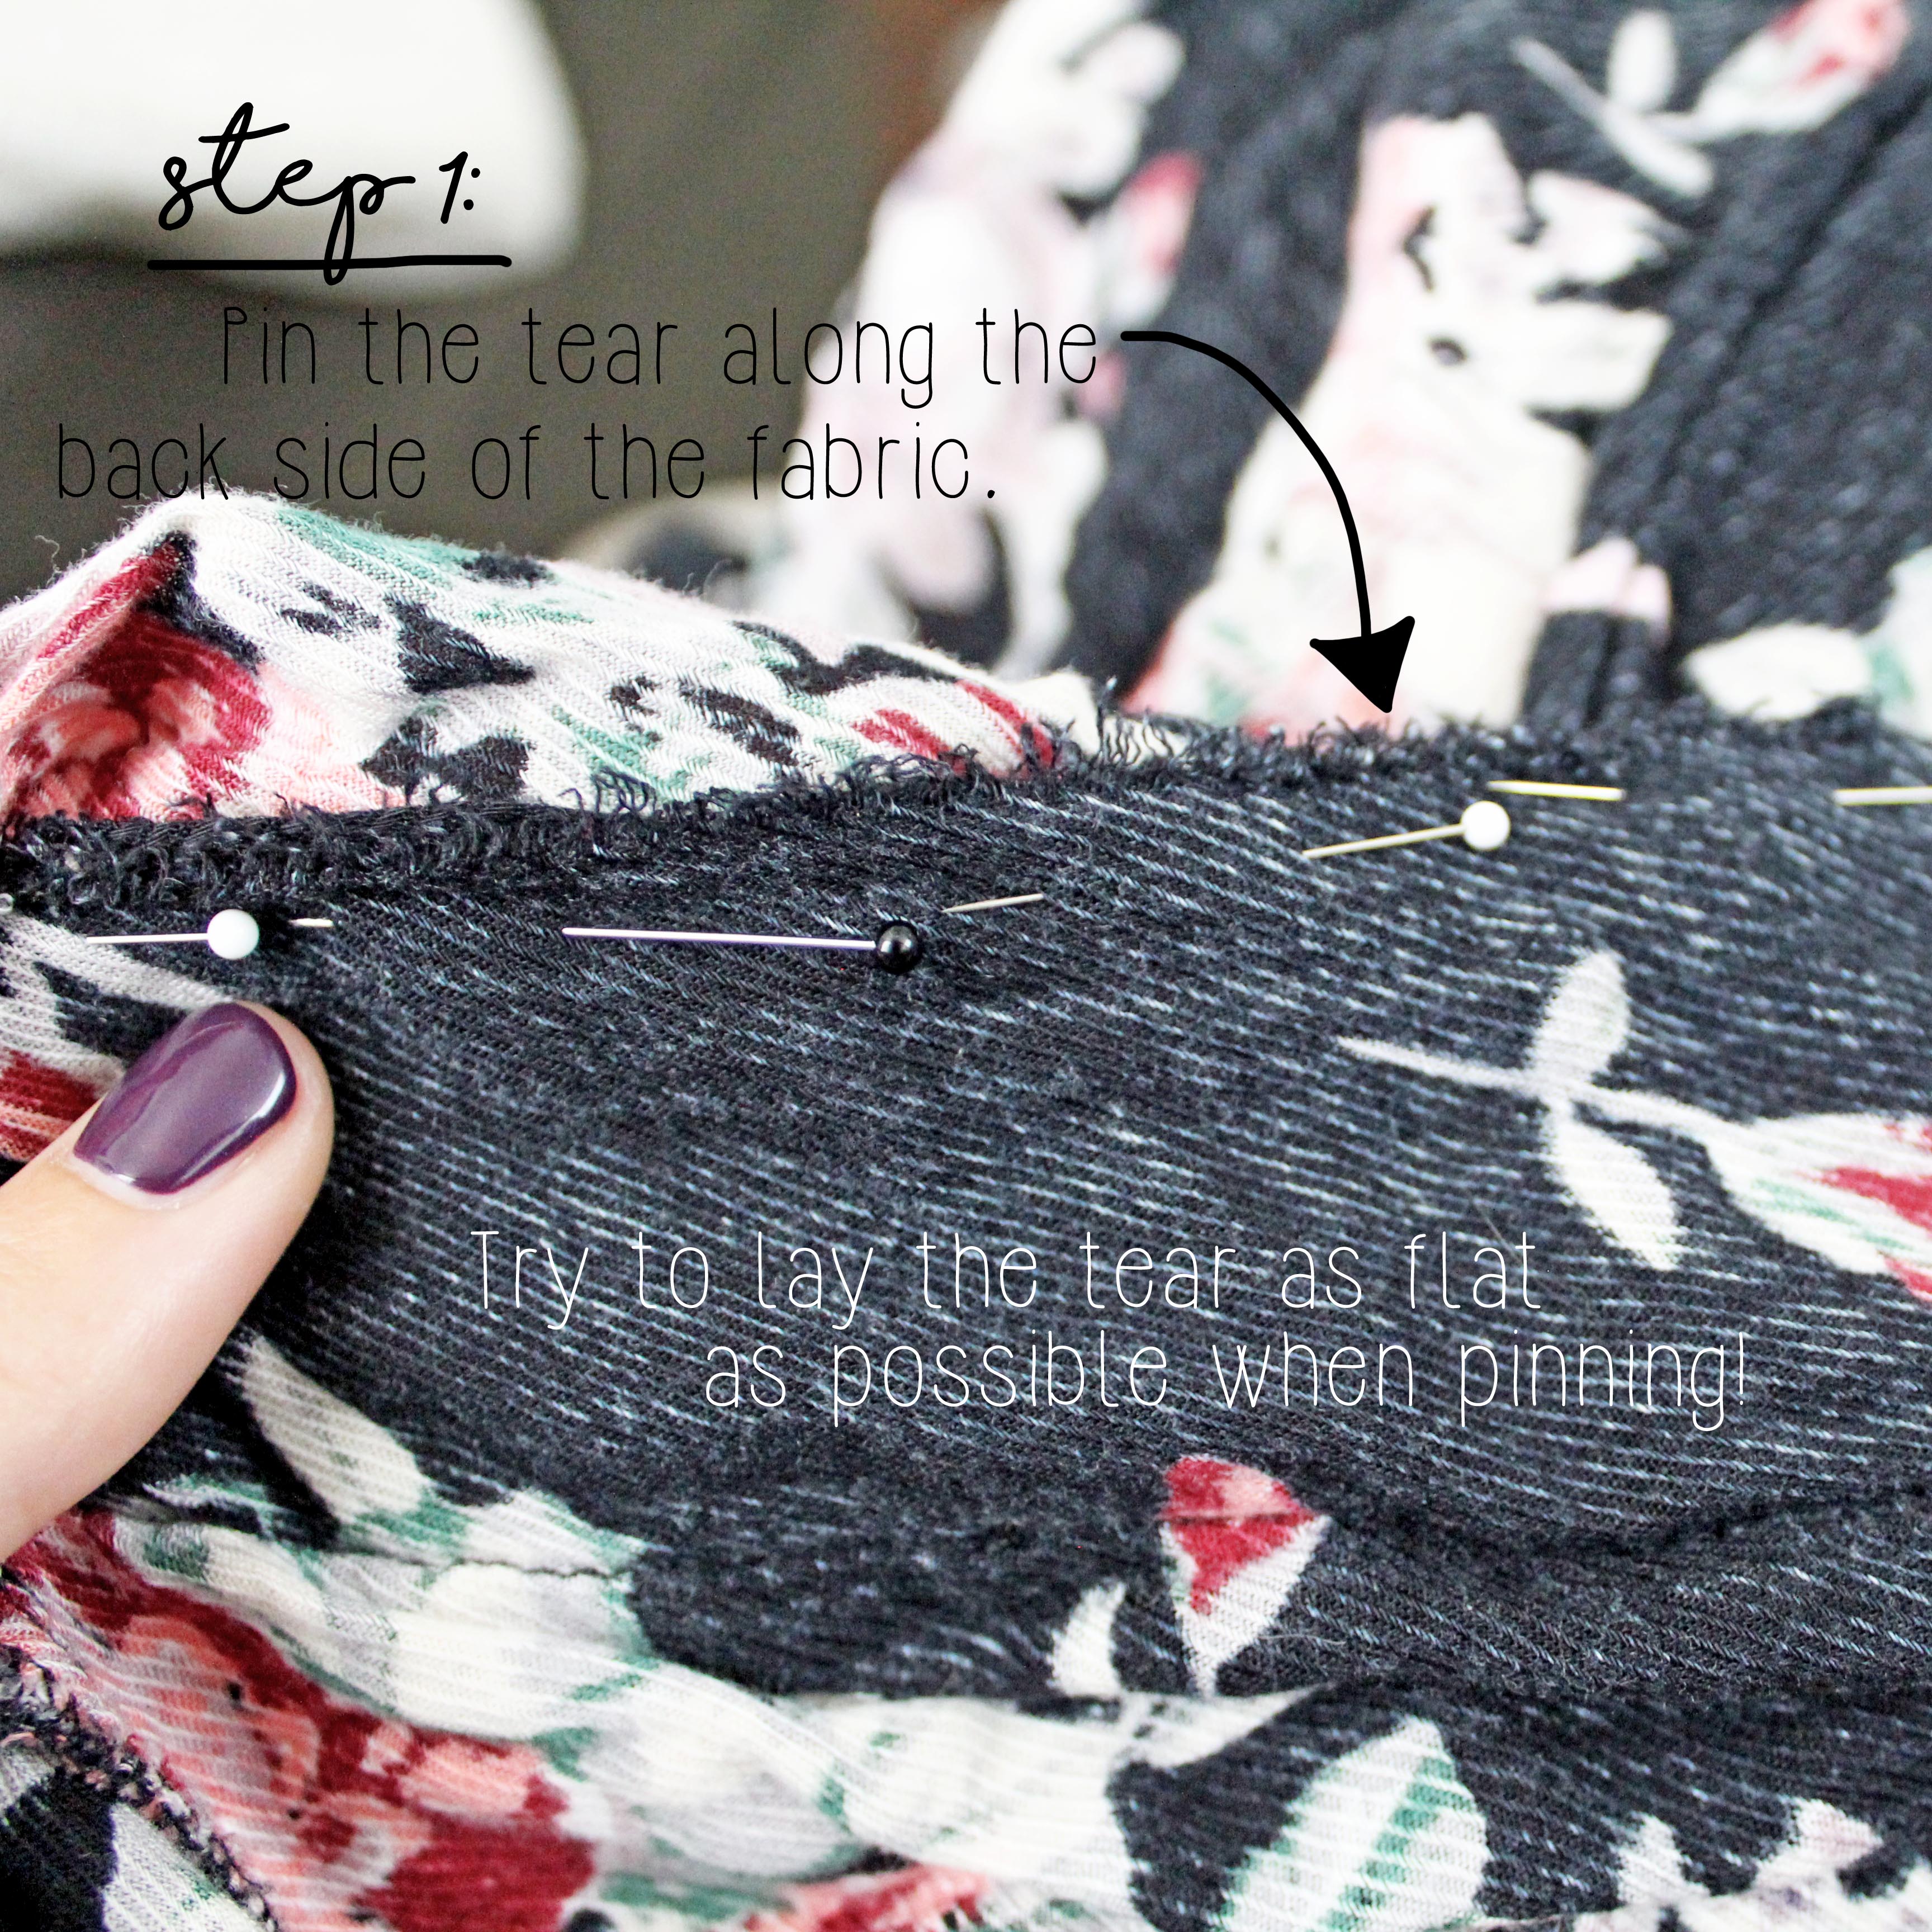
This second repair covers how to fix a tear that is not along any type of seam line. It is a bit more difficult than a tear along a seam line, but it can usually still be fixed!
With the case of this example, the tear was along a center back pleat of a loose, flowing cardigan.
To start, clean up all of the loose threads using small thread clippers. This helps to keep the stitching area clean and tidy. (No one likes loose threads!)


Pin the tear back together along the back side of the fabric. Try to pin it as flatly as possible, so that there are no funky bulges or bumps near the end of the tear. We want it flat and as smooth as possible.
Next, from the right side of the garment, start to close the tear up using the slip stitch. As with repair #1, first backstitch in place, then push the needle to the backside of the fabric.
About 1/4" from that point, push the needle back up to the right side of the fabric. Cross over to the other side of the tear, and repeat the process. Make sure to keep the needle along the folded seam. We are essentially creating a seam to stitch in to.
And if needed (as with this repair) finish off with some topstitching. This could be done using a machine, but I preferred to just hand stitch it.
Topstitching adds some additional support to keep a repaired torn together, but isn't always right or necessary, depending on the project.
(Ready to learn how to repair your own clothes? Our printable step-by-step guide covers how to sew an additional FOUR MORE repairs not covered here. The perfect guide to help you tackle that ever growing pile of repairs!)
How to repair your own clothes: Repair #3
This third repair covers how to fix a medium sized hole in a garment. This particular hole was randomly placed, meaning it wasn't along a seam line or anywhere special. It was just along the back somewhere, minding its own business.
The fabric for this particular cardigan was slightly heavier, which helps when repairing holes.
It is always more challenging to repair holes in lightweight, sheer fabrics. So we lucked out with this one! It also always helps when a fabric is busier with a print.. It helps to disguise the repaired hole much easier than with a solid, single color fabric.
So. To start, clip any loose threads using small thread clippers.


Cut out a small piece of fusible interfacing, slightly bigger than the hole itself. Iron the interfacing on to the wrong side of the garment, over the hole. The fusible essentially acts like a little patch, covering up the hole.
This particular hole was only along black threads, so I chose to go over the hole with some hand sewing. I used just a basic backstitch to cover up the fusible and blend it in with the fabric.
Doing this also helps to attach the interfacing to the garment, so that it doesn't fall off once the garment gets washed. If a hole is covers an area with multiple colors of thread, this last step might be a bit trickier and take some more time.
But I always think it's worth it to blend the hole back in with the garment.
(Ready to learn how to repair your own clothes? Our printable step-by-step guide covers how to sew an additional FOUR MORE repairs not covered here. The perfect guide to help you tackle that ever growing pile of repairs!)
How to repair your own clothes: Repair #4
This fourth repair covers how to fix torn belt loops on a pair of denim jeans. You know how this happens: A pair of jeans is just a tiiiny bit too snug, so you grab the loops and pull them on.
Do this enough times, and you're going to have torn belt loops.
For this repair, you're going to need a thick, heavy duty sewing needle. Regular sewing needles do not work with thick denim. And if you do get them to work, your fingers will not be happy.


To start, close up the tear itself. This doesn't need to be perfect, since the belt loop should cover any stitching that you would see from the right side of the garment.
On the wrong side of the pants, start to stitch the tear back up using a basic backstitch all along the tear. Again, doesn't need to be pretty, it just needs to hold. I would go over the tear 2-3 times, to keep it secure.
Once the tear is closed up, you'll want to reinforce the bottom of the belt loop. On the front side of the pants, about 1/4" from the bottom of the loop, hand stitch it to the pants. Make your way around the bottom of the loop, until you reach the other side. Go over this twice, for additional security.
I wouldn't go up any higher than 1/4" from the bottom of the loop, otherwise you might not be able to fit a belt inside the loops. Oh, and don't pull your jeans on using belt loops.
(Ready to learn how to repair your own clothes? Our printable step-by-step guide covers how to sew an additional FOUR MORE repairs not covered here. The perfect guide to help you tackle that ever growing pile of repairs!)
How to repair your own clothes: Repair #5
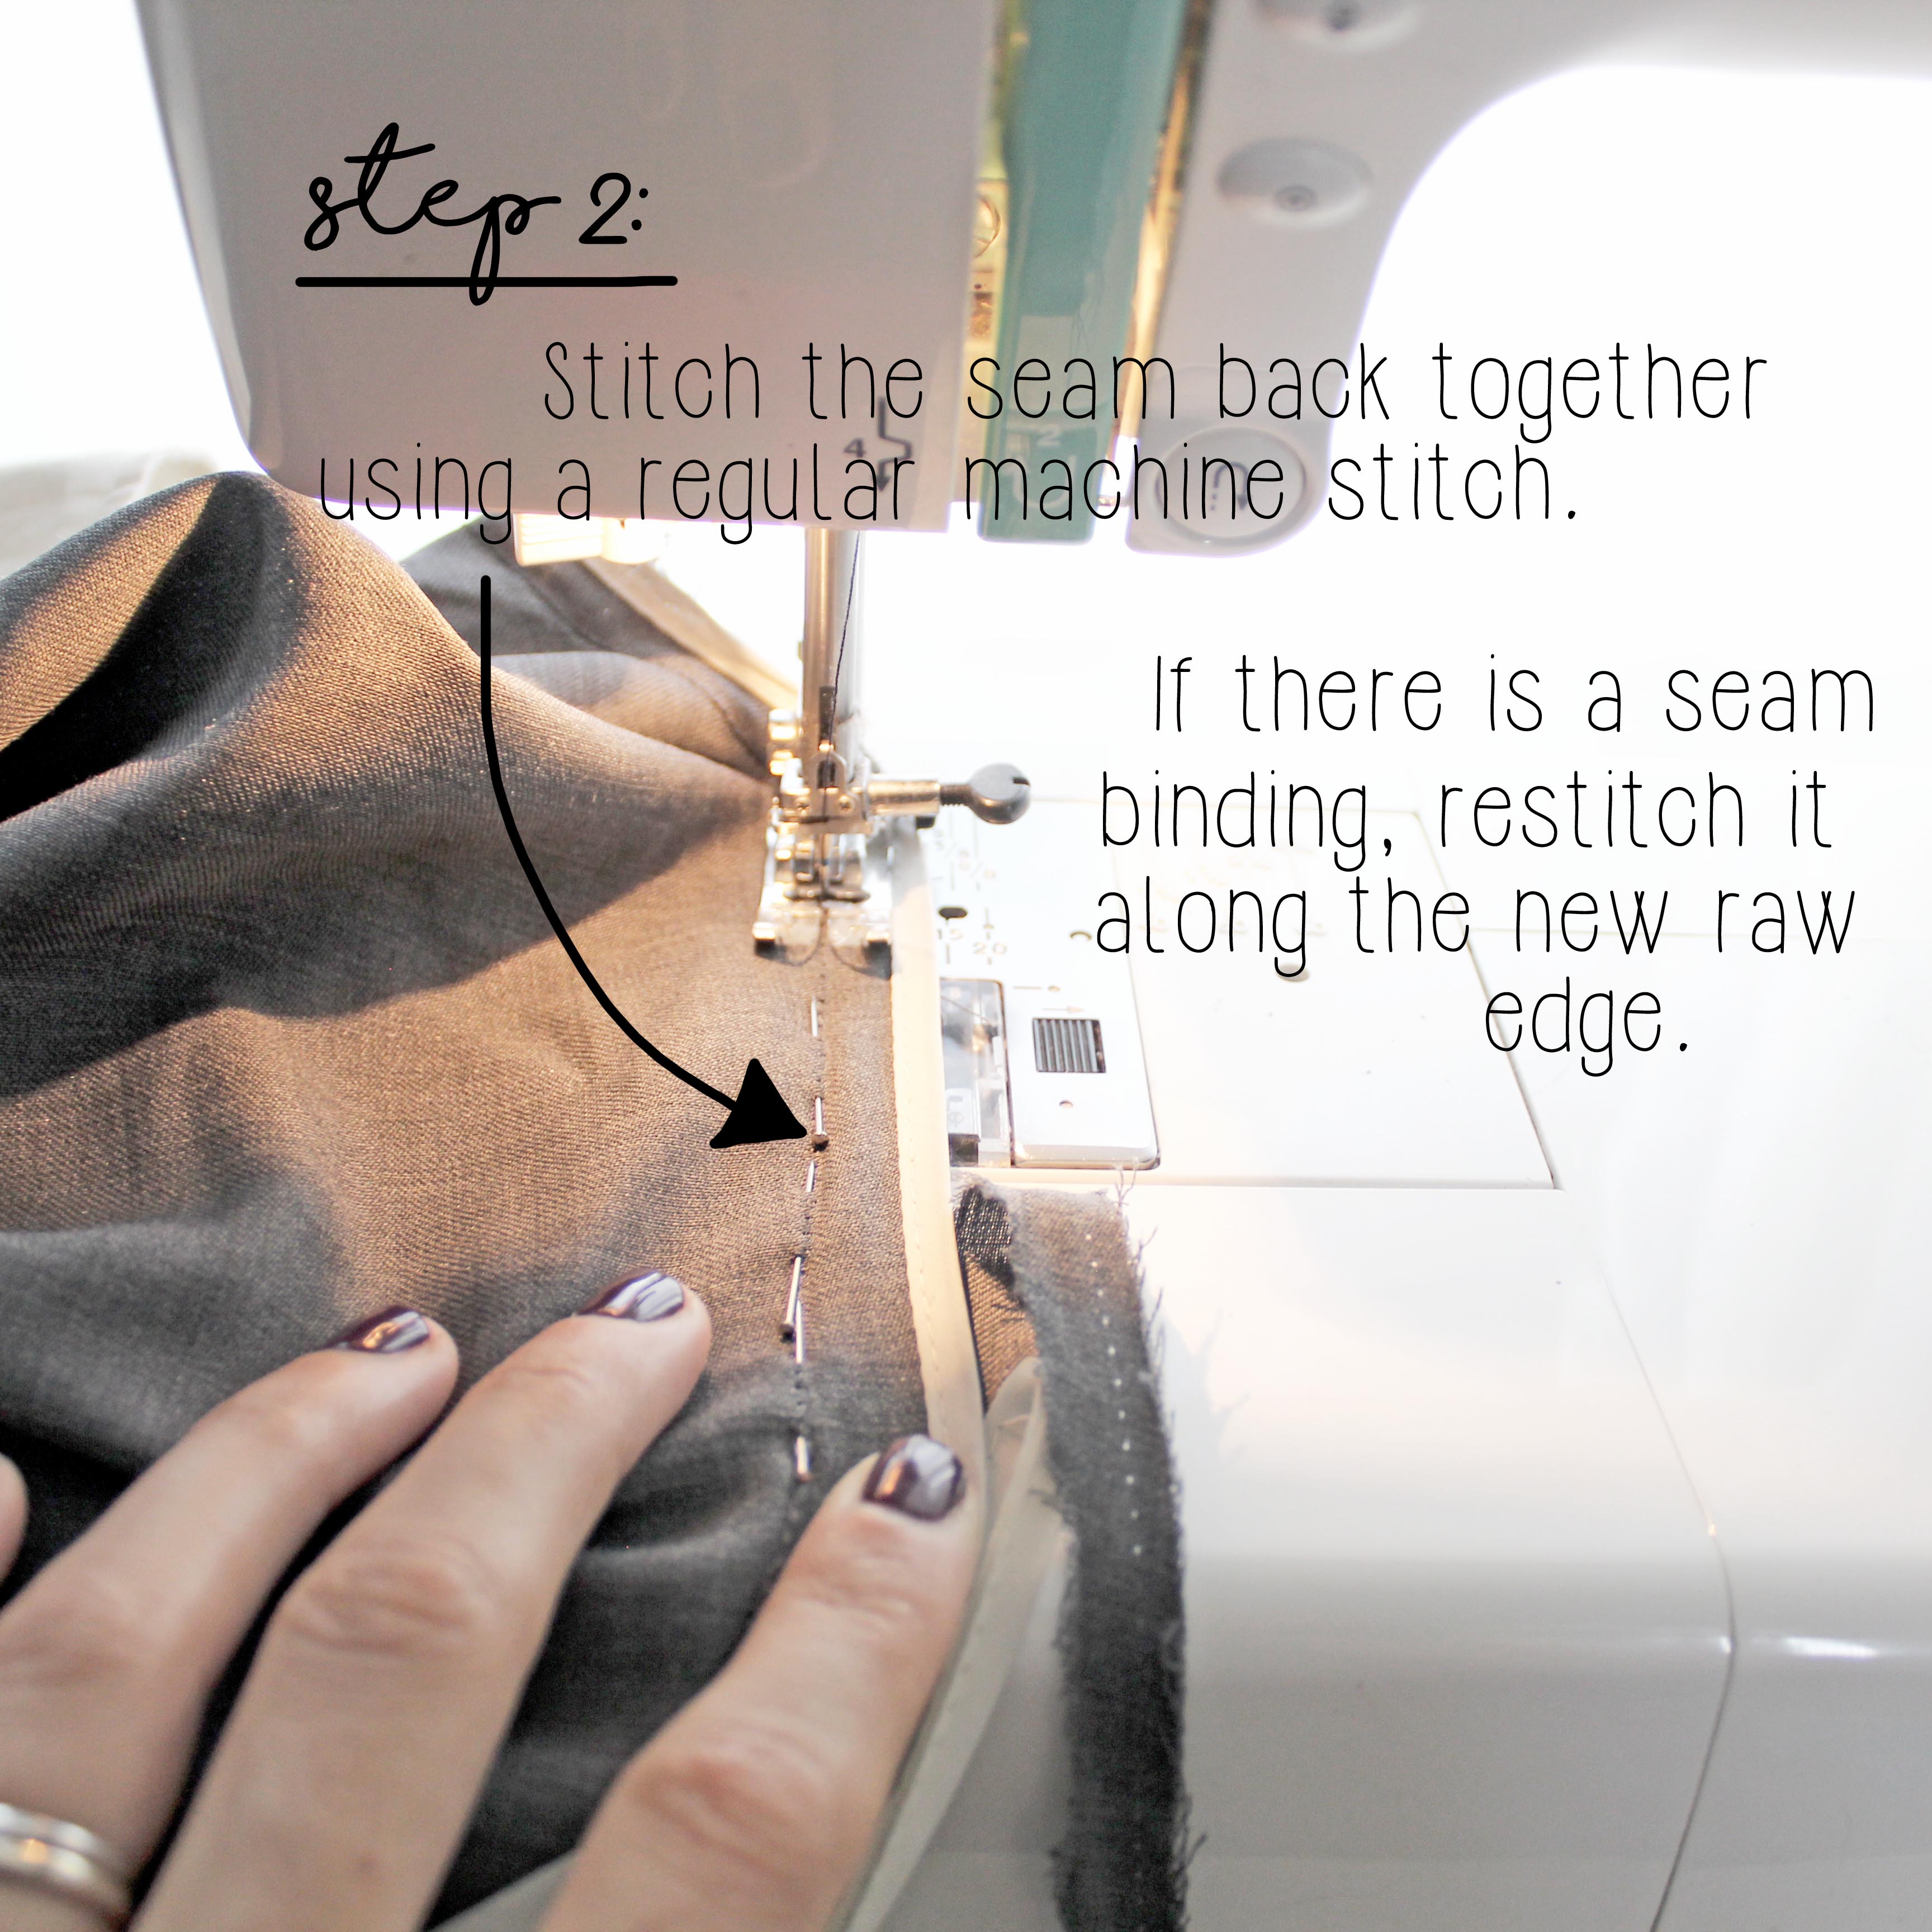
And finally, I used a sewing machine for this repair because the tear along the center back seam of the pants was pretty large.
Also, I wanted to make sure that the seam itself was ultra secure, and the best way to do that is with a sewing machine stitch.
This is a pretty common tear with mens pants when they are worn day in and day out. (These are my brother-in-law's pants, and he wears them weekly.)


To start, cut all loose threads from the tear. These pants had a binding along the raw edge of the seam allowance, so I also had to rip that out. You may need to do this, you may not.
Once everything is cleaned up, pin the seam back together, right side to right side. Stitch the seam back together using a basic sewing machine stitch. If needed, reattach the seam binding along the new raw edge.
Because this is a pair of mens pants, there was a triangular flap of fabric that I needed to reattach to the new seam. You might not need to do this with your particular pair of pants, but just pay attention to what you rip out.
NOTE: Make sure that you have the extra room to fix the pants. I had to take in about a 1/2" of fabric, but if the pants were already fitted, then taking in that 1/2" would have made the pants too fitted. With this case, my brother-in-law had some extra room, so it wasn't a problem.
(Ready to learn how to repair your own clothes? Our printable step-by-step guide covers how to sew an additional FOUR MORE repairs not covered here. The perfect guide to help you tackle that ever growing pile of repairs!)
How to repair your own clothes: Are you in?
And that's it! Not too bad, right?
Learning how to repair your own clothes is an invaluable skill, and can be applied to so many different things. And as I mentioned in last week's post, the only way to really learn and get better at it is by practicing.
No more wasting money by taking your repairs to an alterations shop. Grab a needle and thread, and just start practicing. And if it doesn't work, readjust and try again.

I never took a class on how to do repairs, I just figured it out as they came along and practiced.
And don't forget to download our step-by-step guide on how to repair your own clothes.. It goes in to even further detail with instructions on how to do another FOUR repairs.
Those include how to fix:
- A tear where a trim has become disconnected from the garment.
- Small holes when working with lightweight, sheer fabrics.
- A hole in the pocket bag of your pants.
- Tears along the seam where a pocket is attached to the garment.
But really, I hope that this tutorial on repairs has been useful for you guys. Are there any other repairs that you'd like to learn, the weren't covered here? Let me know!
(Ready to learn how to repair your own clothes? Our printable step-by-step guide covers how to sew an additional FOUR MORE repairs not covered here. The perfect guide to help you tackle that ever growing pile of repairs!)


Julia Russ — April 2 2021
Thank you so much for the note Sandra! I totally agree — and while not everything can be repaired, there truly is so much we can do to prolong the life of our clothes. I’m actually looking to add more to this post — stay tuned!
Sandra — April 2 2021
I thank you for your repair post. It is a good reminder just how easy repairs can be. We live in a world don’t repair / buy new. But we all need to be more frugal as time to goes on. Thanks again for all your Step bye steps insight on Repair. 😊