How To Sew Belt Loops: The Clark Crop Pant Sewing Tutorial

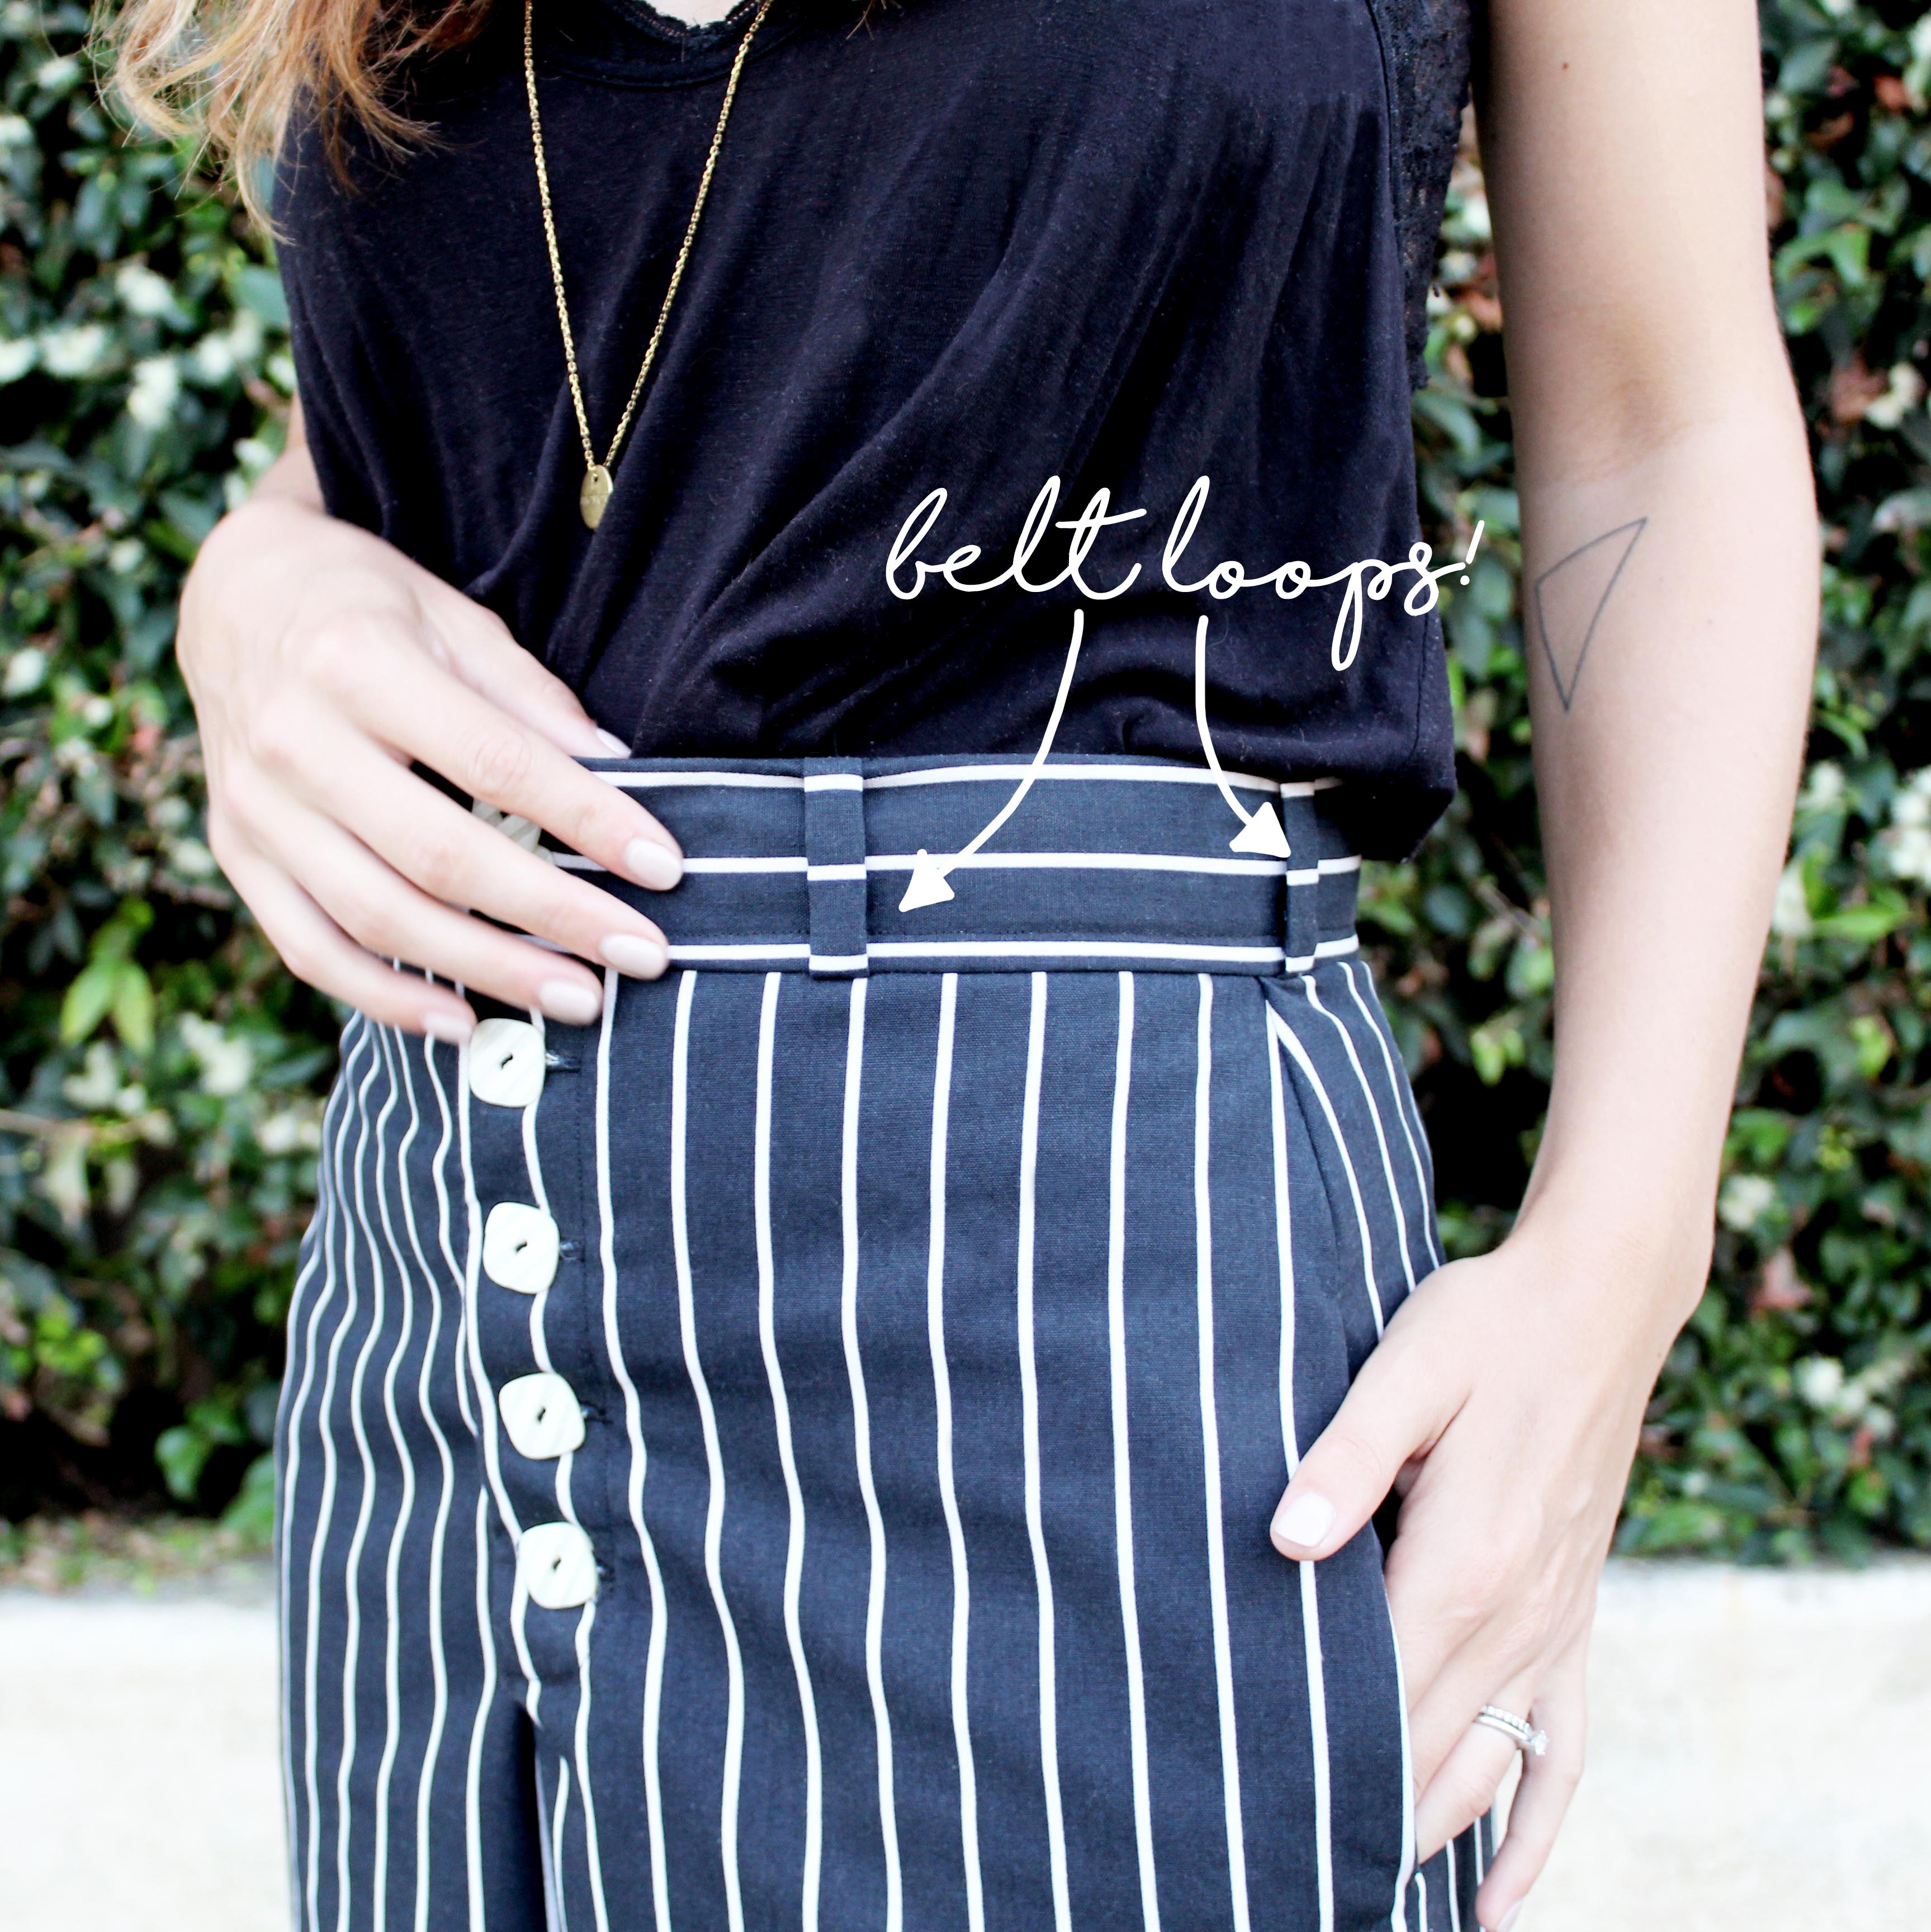
And we have a brand new sewing tutorial up: How to sew belt loops on a pair of pants! Belt loops are one of those construction details that you don't ever THINK about making, or really even notice.. Until you see a pair of pants without them. Or go to wear a belt and realize that the pants don't actually HAVE belt loops.
Prior to this month's sewing project, the Clark Crop Pant, I had never actually sewn up belt loops. I don't know why, it just never really happened. And I have actually only sewn up one pair of pants prior to the Clark.. Because I was forced to do so while at FIDM.
So. If you read last week's post all about the Clark Crop Pant, then you'll know that pants are NOT easy to sew. It seems like they would be--Just two legs, and that's it. Right?

Not only is getting the fit for a pair of pants incredibly difficult, but there are just so many tiny details that go in to a pair of pants.
I'm talking: The fly closure (whether buttons or a zipper, both are difficult to sew), belt loops, pockets, etc. If you are wearing a pair of pants right now, look down at them, and say "thank you".
Because they were not easy to sew.


So I don't really know why it came as a surprise how difficult it was to sew the belt loops for this month's sewing tutorial. The overall process of creating & sewing the belt loops was fairly simple.. But as the saying goes, the devil is in the details. And pants are ALL about the details.
So. With this month's sewing tutorial, I am going to show you how to sew belt loops on a pair of pants. And hopefully, you will be able to avoid allll the mistakes that I made. (Because trust me, there were many.)
But keep in mind: You don't have to be sewing a brand new pair of pants (like I did with the Clark Crop Pant) to use this sewing tutorial. You can simply be adding belt loops to pants that didn't have them, but need them. Or repairing broken belt loops on an old fav.
So. Ready to get started?
(Ready to learn how to sew belt loops on a pair of pants? It’s definitely not as easy as it sounds, so make sure to grab your downloadable sewing tutorial below!)
How to sew belt loops: The different methods

But first. There are basically two different methods on how to sew belt loops:
- Method 1: Hand stitch the belt loops on to the waistband. (Keywords here: HAND stitched, ON to the waistband.)
- Method 2: Machine stitch the belt loops in to the waistband. (Keywords here: MACHINE stitch, IN to the waistband. This is the method we will be covering with this sewing tutorial!)
Now, method 1 is pretty simple. You follow the same steps for prepping the belt loops as shown in this sewing tutorial, but just hand stitch the loops on to the outside of the waistband. This method is ideal when simply repairing some belt loops on a pair of pants, and if you don't want to have to open the waistband up.
I actually did a sewing tutorial on how to repair belt loops in our step-by-step repair guide from a few months back. So if you're looking to just quickly repair some belt loops, make sure to check out that post!
But alas, this sewing tutorial will be covering the more difficult (but way more secure) second method on how to sew belt loops. And while it does require more work, the loops will end up being WAY more secure.


I also happen to think it looks way better, but that's just my opinion.
This sewing tutorial will go through all the steps involved on how to sew belt loops.. Including the prepping of the loops & the waistband that secures them. If your waistband is already prepped, or the loops are already made, then you can just go ahead and skip those steps.
So. Let's get started, shall we?
(Ready to learn how to sew belt loops on a pair of pants? It’s definitely not as easy as it sounds, so make sure to grab your downloadable sewing tutorial below!)
How to sew belt loops sewing tutorial: Step 1
First, the waistband of the pants will need to be prepped. At this point, you should have two separate pieces for the waistband: A front and a back piece.
Press fusible interfacing on to BOTH pieces of the waistband, on the WRONG side of the fabric.
Some people prefer to only press fusible on to one side of the waistband.. But I prefer to do both sides. I feel it allows for a more secure & stable waistband, that will last much longer.

REMEMBER: The wrong side of the fabric is the side that nobody sees when the garment is being worn.
How to sew belt loops sewing tutorial: Step 2
With the waistband of the pants prepped, it's time to prep the actual belt loops.
I prefer to create actual sewing patterns for my belt loops (it allows me to cut everything quicker) but the choice is yours. If you simply want to draw the loops out on the fabric and cut, that also works perfectly fine.
Measure the width of the waistband (including the seam allowance) and add an extra 1/4" to each end.

So make sure to add those extra measurements in, it will 100% make a difference. And most belt loops are 1/4" wide, so I would just stick with that basic measurement.

FOR EXAMPLE: The waistband for the Clark was 2" wide, and my seam allowances were each 1/2". So the length of my loops should have measured 3 1/2". (2" Length of the waistband + 1/2" Seam allowance + 1/2" Seam allowance + 1/4" Additional seam allowance + 1/4" Additional seam allowance.)
The width of my loops was 3/4" (1/4" Loop + 1/2" Seam allowance + 1/2" Seam allowance) which worked out perfectly. Cut out the loops, making sure to match up any patterns or stripes.
(BTW. Not sure how to sew with stripes or how to match patterned fabric? We've got you covered on both counts. Check out the full posts for step-by-step sewing tutorials on each.)
(Ready to learn how to sew belt loops on a pair of pants? It’s definitely not as easy as it sounds, so make sure to grab your downloadable sewing tutorial below!)
How to sew belt loops sewing tutorial: Step 3
Press the long sides (both sides!) of the belt loops along the seam allowance.

FOR EXAMPLE: The side seam allowance for the belt loops on the Clark was 1/2", so that's the point at which I pressed the seams. Repeat for each belt loop!
How to sew belt loops sewing tutorial: Step 4
With the side seam allowance of each belt loop pressed, serge each raw edge closed using a serger.
Make sure not to serge past the pressed seam allowance line.

NOTE: If you don't own a serger sewing machine, then you can also use an imitation serger stitch on your regular sewing machine. It will work just fine for the purposes of this sewing tutorial--We simply just want the raw threads closed off, so that the belt loops don't unravel with regular wear & tear.
An alternative option would be to double fold the sides of the belt loops and topstitch them closed. I preferred not to go this route--I like clean belt loops. But if your design has lots of topstitching, then this could be a good option! It would also work well with the overall look & style of denim jeans.
(Ready to learn how to sew belt loops on a pair of pants? It’s definitely not as easy as it sounds, so make sure to grab your downloadable sewing tutorial below!)
How to sew belt loops sewing tutorial: Step 5
Now that the raw side edges of the belt loops are closed off, it's time to finish up the individual belt loops.

Fold the sides of the loops in, wrong side to wrong side, following the pressed seam allowance from step 2. And at this point, the belt loop should be its finished size. (i.e. 1/4" Wide on the belt loops for the Clark.)
Hand stitch (using a basic slip stitch) the upper seam allowance to the other side of the belt loop. (Not sure how to hand stitch? No worries my friend! We've got you covered with two different hand sewing tutorials: Part One & Part Two.)
Repeat until all of the individual belt loops are completed!
How to sew belt loops sewing tutorial: Step 6
Alright! Now it's time to sew the individual belt loops in to the waistband of the pants.
If you haven't already, make sure to mark the placement of the individual belt loops on the waistband with tiny little notches.
Theoretically, you could eyeball it.. But I wouldn't recommend it. Measuring out where each loop goes ensures that they are spaced evenly. So, find the notches for each belt loop, and pin each loop in place, along the top & bottom of the waistband.

NOTE: You should be pinning the belt loops to the FRONT/OUTER waistband. (i.e. The side of the waistband that will be seen while wearing the pants.)
(Ready to learn how to sew belt loops on a pair of pants? It’s definitely not as easy as it sounds, so make sure to grab your downloadable sewing tutorial below!)
How to sew belt loops sewing tutorial: Step 7
Along the top & bottom of each belt loop, machine stitch them to the waistband.
This ensures that the loops won't move around when attaching the back waistband to the front. This is ESPECIALLY important when sewing with a printed/striped fabrics. It keeps everything matching, as well as keeping the loops in their rightful place.

NOTE: There should be a slight gap between the loops & the waistband. (i.e. It should NOT be laying completely flat.) That is a mistake that I made when sewing my belt loops (you can see that my loop is completely flat against the waistband) and it took a while to correct.
HENCE the extra 1/4" added to both the top & bottom of each belt loop.
How to sew belt loops sewing tutorial: Step 8
And at this point, each belt loop should be attached to the front waistband, along both the top & bottom of each loop.
Right? Cool. Pin the back waistband to the front waistband, right side to right side. Stitch the layers together along the two sides, as well as the top of the waistband.
DO NOT stitch the bottom of the waistband yet.

REMEMBER: The right side is the side that everyone sees when the garment is being worn.
(Ready to learn how to sew belt loops on a pair of pants? It’s definitely not as easy as it sounds, so make sure to grab your downloadable sewing tutorial below!)
How to sew belt loops sewing tutorial: Step 9
Press the seams from step 8 open, as much as possible. (It IS slightly difficult with the corners, but do what you can.)
Next. trim all three seams down by about half. (I trimmed my 1/2" seams down to about 1/4".) Make sure to snip the two corners of the waistband as close as possible without damaging the seam line.

And with the waistband pressed & trimmed, push the tips of the waistband out as much as possible, using a seam ripper.
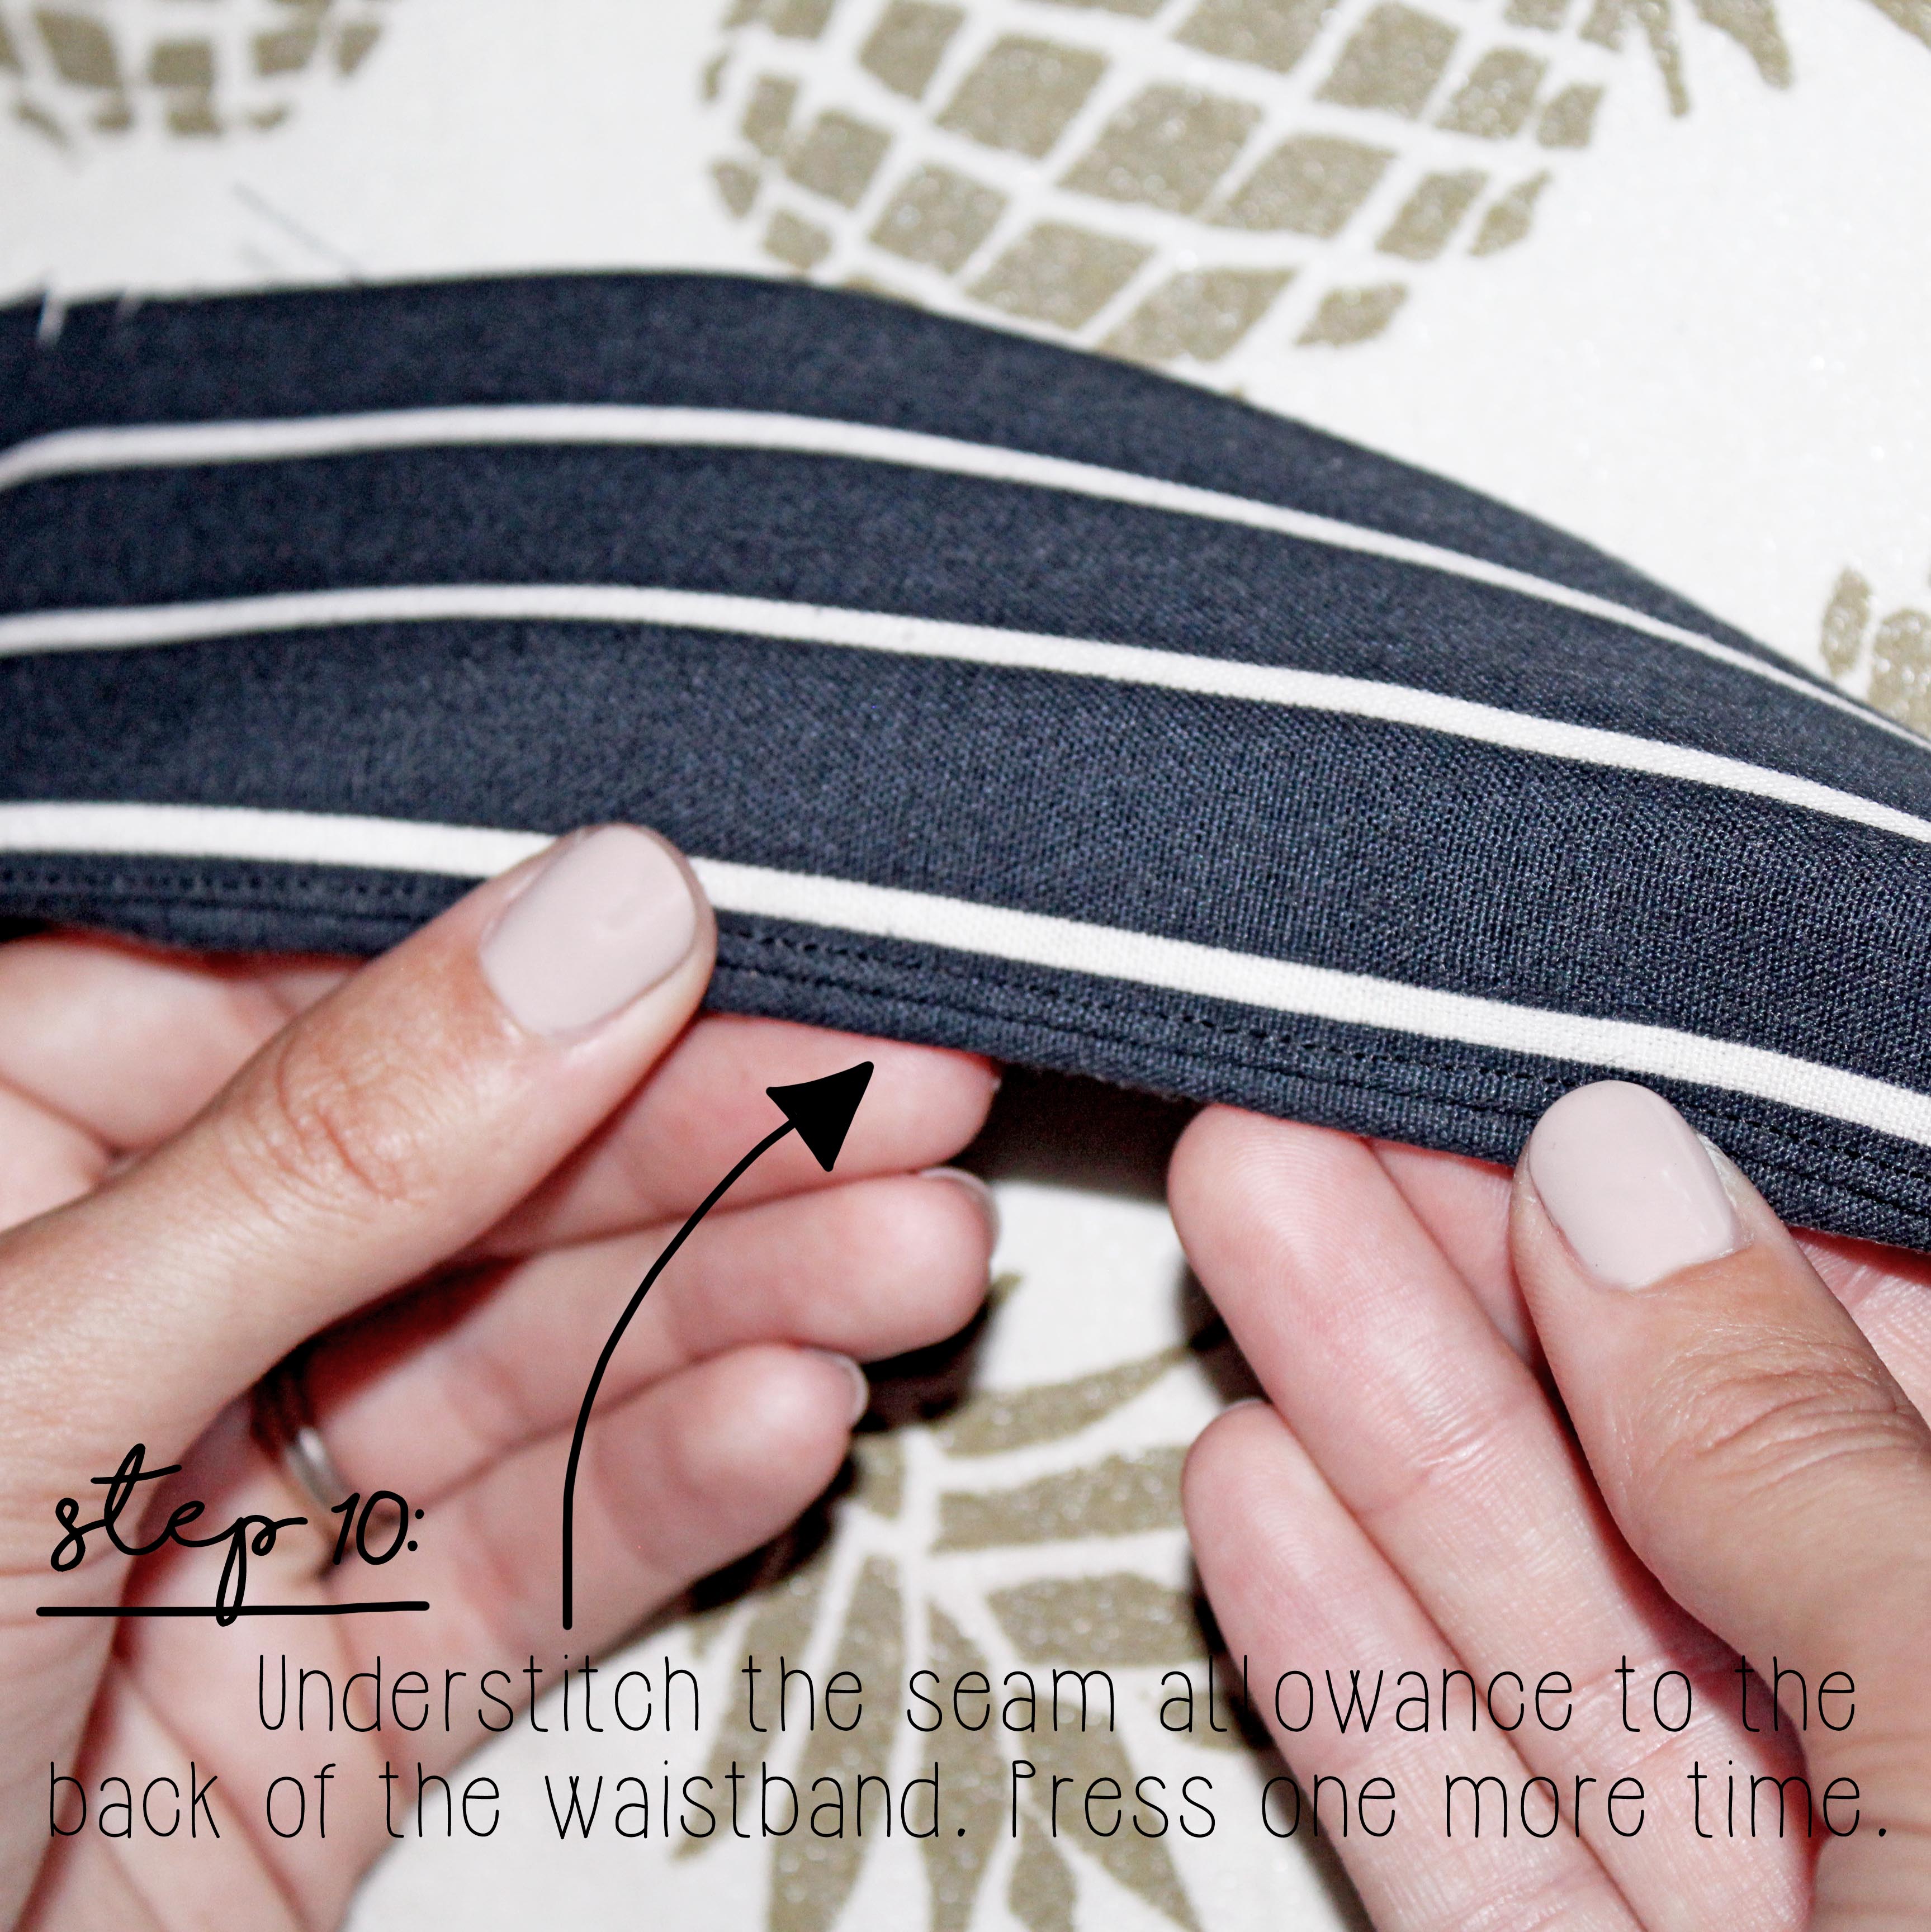
How to sew belt loops sewing tutorial: Step 10
Understitch the seam allowance to the back of the waistband. (i.e. The side of the waistband that will NOT be seen from the outside.)
Stitch as closely to the seam line as possible, and as close to the two corners as possible. I chose to only understitch the top of the waistband, but it's always an option to also understitch the sides of the waistband. To me, it's too small of an area to really make a difference.. But the choice is yours.

Press one more time.
(Ready to learn how to sew belt loops on a pair of pants? It’s definitely not as easy as it sounds, so make sure to grab your downloadable sewing tutorial below!)
How to sew belt loops sewing tutorial: Step 11
And finally, it's time to attach the waistband to the pants.

Pin the front waistband (the side with the loops on the outside) to the raw waistline of the pants, right side to right side.
Stitch the layers together, and press open once finished.
How to sew belt loops sewing tutorial: Step 12
And finally.. It's time to close up the waistband of the pants, securing the belt loops inside.
Fold the final seam allowance underneath the waistband, then pin it closed, from the outside of the waistband. (i.e. The side that the loops are on.) This requires some careful pinning & pressing, to ensure that your stitch lines will be even.
Topstitch the seam closed, again from the OUTSIDE of the waistband. This requires a bit of stopping & starting (I did not want to stitch OVER the belt loops) but if you want to stitch over the loops, then you can.
Again, I wouldn't recommend it, but the choice if yours.

Stitch slowly. Stop stitching when you get to a loop, pick up the needle & move it to the other side of the loop, then continue the topstitching. A bit of work, but 100% worth the cleaner finish, IMHO.
Stitch all the way from one side of the waistband to the other, and you're done!
(Ready to learn how to sew belt loops on a pair of pants? It’s definitely not as easy as it sounds, so make sure to grab your downloadable sewing tutorial below!)
How to sew belt loops: Let's get sewing!
As I mentioned above.. When it comes to sewing pants, every detail is a bit difficult.
Definitely not the easiest of sewing projects out there, but when you get it right, it can look ON POINT. (And I think the Clark Crop Pant looks pretty on point, am I right?)
When sewing a pair of pants you may be tempted to just skip the belt loops altogether.. Especially if you don't really wear belts. (i.e. ME) But I promise you that adding that little bit of detail will make all the difference in the world.


Because who wants to wear clothes that ACTUALLY look homemade? #notme
And again, if you are just wanting to add belt loops to a garment that is lacking them.. Just go ahead and skip the steps relating strictly to the waistband, and stick to the steps specifically about the loops.
OR if you just want a quick, easy solution, check out our step-by-step repair guide that includes a sewing tutorial on how to stitch belt loops by hand.
Would LOVE to see any pant related sewing projects you guys may be working on.. Show me below!
(Ready to learn how to sew belt loops on a pair of pants? It’s definitely not as easy as it sounds, so make sure to grab your downloadable sewing tutorial below!)


