How To Sew An Easy Pet Bed: DIY Sewing Tutorial

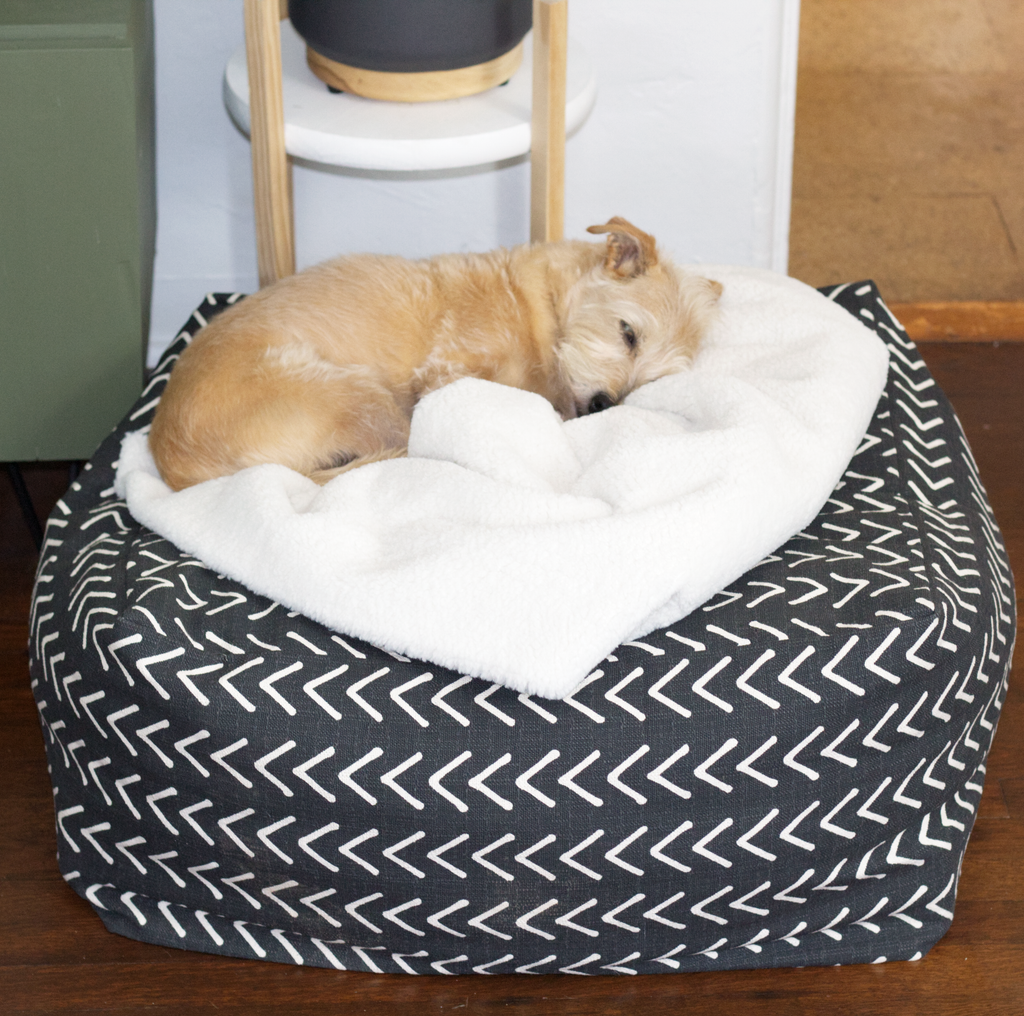

I don't know about your pup--but mine is incredibly picky when it comes to her bed. (As she should be, right?) And while the perfect bed for her may be comfy and cozy, most dog beds aren't super cute--which is why I figured it was high time to create a DIY sewing tutorial on how to sew an easy pet bed!
While my little Terrier is only about 12 pounds, the steps for this tutorial can be applied to any dog--10 pounds or 100 pounds. You'll just have to adjust accordingly with how much material you use. (Or maybe you want to make a bed fit for a 100 pound pup for your 10 pound Terrier? Girl, no judgement here.)
I actually used some materials from Teri's pre-existing bed when making this new pet bed, so you can either do the same or make an entirely new bed from scratch.

However--if you've got a fresh new pup (congrats!) then this tutorial will also work just fine for you.
Our fur babies are the light of our lives, right? So they deserve the absolute best when it comes to where they sleep and rest those sweet little paws. My little one's favorite spot in the house is in her bed right in front of the open door. She can people watch, feel the breeze in her face--and of course, bark incessantly at other dogs--all while being comfy and cozy.
And pet beds are more than just a bed--they can provide your pup with a sense of love and security. I feel like they are pretty similar to humans in that regard--it just feels so good to have a soft, safe place to call home and rest your head. (Or paws!)
(This post on how to sew an easy pet bed is the first in our DIY home project series--a full guide with all of the tutorials is coming soon! Get on the list now and be the first to receive the guide straight to your inbox once it's released.)

How to sew an easy pet bed: What you need

As I mentioned above, I made Teri's new bed using both old and new materials. No matter what kind of materials you may be using, here's what you need to make a DIY pet bed:
- Fabric: I would recommend using something slightly more durable, since the bed will be getting quite a lot of wear. Textiles are an incredibly easy way to update your space, so make sure you pick a fabric that goes with your home. For Teri's bed, I picked up this amazing mudcloth-like fabric on Etsy--the fabric is thick, durable (almost like a canvas), and the print is super cute. I used about 2.5 yards of fabric for Teri's bed.
- Thread: I just used a basic cotton thread, since my fabric was 100% cotton. Pick a thread that goes with the type of fabric you will be working with.
- Lining Fabric: This is what I pulled from Teri's old pet bed--It was the stuffing bag that filled her old bed. Since both the lining and the stuffing were in good shape, I just pulled that out and used it for her new bed. If starting from scratch, just get the same amount of lining fabric that you do for the outer shell--something lightweight and inexpensive.
- Stuffing/Foam Cushion: This is also material that I pulled from Teri's old bed--but you can use anything. Buy stuffing, pull stuffing from old pillows, whatever you can to stuff the bed and make it fluffy, lightweight, and soft. I also ended up using some spare foam cushioning for the bottom of the bed, just to help stabilize it.
- Buttons: While there are multiple ways to close up the pet bed (we will go over that more later) I chose to finish it off with buttons and loops. Unless you have an incredibly thick, chunky zipper, I would definitely recommend going the button route. Or, if you don't think you'll need to wash the bed (or you have a front loading washer) then you can just stitch the whole thing closed, and you don't need either buttons or a zipper.
(This post on how to sew an easy pet bed is the first in our DIY home project series--a full guide with all of the tutorials is coming soon! Get on the list now and be the first to receive the guide straight to your inbox once it's released.)
How to sew an easy pet bed: Prepping the project

There aren't too many tools that you need to pull out in order to make a DIY pet bed. Here's what you'll need to grab:
- Sewing machine
- Fabric scissors
- Sewing pins
- Ruler
- Measuring tape
- Hand sewing needle
And that's it, really! This project truly is pretty straight forward.
The pet bed we are making in this tutorial is definitely one of the easiest design options out there. It's basically just a square--top, bottom, and a side panel--that encases another square filled with foam and stuffing. It's possible to get crazy with pet beds, but this is the one I have found my Teri loves the most, and the one she actually uses.
So. Ready to get started on that pet bed?
(This post on how to sew an easy pet bed is the first in our DIY home project series--a full guide with all of the tutorials is coming soon! Get on the list now and be the first to receive the guide straight to your inbox once it's released.)
How to sew an easy pet bed DIY sewing tutorial: Step 1

The first thing you need to do is figure out how big the bed needs to be. If you have an existing bed, pull the measurements from that--either keep them the same or adjust to make them bigger/smaller depending on what your dog needs. If you are starting from scratch, simply lay your pup down and measure around them a comfortable distance. (Make sure that they are spread out comfortably--you don't want the bed to be too small.)
Decide how tall you want the bed to be--Is your pup older and needs a bed low to the ground? Or are they a queen and want to be perched up on a throne? (i.e. Teri) Figure out the general measurements and then write them down. For reference, the measurements for Teri's bed are as follows:
- Top/Bottom: 22" x 22"
- Height: 12"
Make sure to add 1/2" measurements on all sides to account for the seam allowance.
(This post on how to sew an easy pet bed is the first in our DIY home project series--a full guide with all of the tutorials is coming soon! Get on the list now and be the first to receive the guide straight to your inbox once it's released.)
How to sew an easy pet bed DIY sewing tutorial: Step 2

As I said above, there are three pieces that make up our DIY pet bed:
- The top
- The bottom
- The side panel
I chose to just do an even square to make my measurements and cutting easy, but you can do a rectangle if desired, or if it works with your space better. Here are my final cutting measurements, for reference:
- The top/bottom: 23" x 23" (22" on all sides + 1/2" seam allowances)
- The side panel: 89" (22" x 4 + 1/2" seam allowances) x 13" (12" height + 1/2" seam allowances)
Once you have your measurements marked accurately, cut the three pieces out. If making the lining from scratch, repeat the process. NOTE: If sewing the loops for buttons, don't throw away the spare shell fabric--you can use the scraps!
How to sew an easy pet bed DIY sewing tutorial: Step 3


With all of the pieces cut out, it's time to start sewing!
Grab the top of the bed and pin the side panel to one side, right side to right side. Stitch the length of the side, until about 1/2" from the next corner. Pull the needle up, maneuver the side panel so that it matches up with the next square side, then snip a diagonal notch along the corner of the side panel piece.
Pin the side panel to the next side, then repeat the process for the next two corners.
(This post on how to sew an easy pet bed is the first in our DIY home project series--a full guide with all of the tutorials is coming soon! Get on the list now and be the first to receive the guide straight to your inbox once it's released.)
How to sew an easy pet bed DIY sewing tutorial: Step 4

Pin the last side of the square, then stitch--again just up to the 1/2" point at the final corner you started with. Pin the edges of the side panel together, then stitch.
At this point, the top should be completely sewn to the side panel.
How to sew an easy pet bed DIY sewing tutorial: Step 5

Repeat the process with the bottom, sewing THREE of the four sides.
Make sure to leave the last side open--this will be where the bed closes, so make sure the closure is on the side that you want it to be on.
(This post on how to sew an easy pet bed is the first in our DIY home project series--a full guide with all of the tutorials is coming soon! Get on the list now and be the first to receive the guide straight to your inbox once it's released.)
How to sew an easy pet bed DIY sewing tutorial: Step 6

Now it's time to close up the raw edges of both the side panel and the bottom. Pin the seam allowance inside the bed and under, so that no raw seams are exposed, then topstitch closed. Do this for both the side panel and the bottom.
NOTE: You are not stitching the bottom of the bed to the side panel--there should still be an opening in between the two. This is so that you can insert the bed lining and stuffing. If you don't want or need access to the inner lining (in order to wash the outer shell on its own) then you can go ahead and skip this step.
How to sew an easy pet bed DIY sewing tutorial: Step 7

To make the pet bed lining, repeat the process of sewing the bed together--steps 3-5. Once all of the panels are sewn together (with the last one still open) then stuff all of the stuffing inside of the lining. Make it as full or soft as you want--I highly recommend letting your fur baby test is out to see if they like it prior to the next step.
NOTE: If you would like to add a firm, sturdy bottom to your bed (as we did) then simply cut out a chunk of your foam cushion and fit it inside the lining while stuffing it.
(This post on how to sew an easy pet bed is the first in our DIY home project series--a full guide with all of the tutorials is coming soon! Get on the list now and be the first to receive the guide straight to your inbox once it's released.)
How to sew an easy pet bed DIY sewing tutorial: Step 8

With the lining of the bed stuffed, topstitch the last opening closed. Unlike in step 6, with this step you are fully attaching the sides of the lining, closing it up entirely.
Stuff the lining inside of the pet bed outer shell. If you added solid foam onto the bottom of the lining, make sure the solid foam is on the bottom when stuffing the lining inside of the shell.
How to sew an easy pet bed DIY sewing tutorial: Step 9

Now it's time to close up the opening in which you just stuffed the pet bed lining. As I mentioned above--I chose to use buttons because I didn't have a thick chunky zipper. But I had some pretty giant buttons. I have used zippers to close pillows before, and it doesn't work as well as I would like.. So I chose to go the button route.
Mark the button placement evenly along the pet bed opening, then stitch the buttons to the side panel of the bed. (Not sure how to sew a button properly? Girl, we've got you.)
NOTE: If not going the button route, skip this step (as well as the next one) and just stitch the bottom and side panel together, effectively closing the lining within the bed. Alternatively, if you want to go the zipper route, check out this tutorial we did on how to sew a pillow.
(This post on how to sew an easy pet bed is the first in our DIY home project series--a full guide with all of the tutorials is coming soon! Get on the list now and be the first to receive the guide straight to your inbox once it's released.)
How to sew an easy pet bed DIY sewing tutorial: Step 10


To make the loops to securely close the buttons, you will first need to determine the length. Grab your measuring tape--starting at the hem on the bottom panel, loop the tape measure around the button, then back down to the hem. That's your measurement for the loops. (My loops were about 1" wide and 4.5" long.)
Cut out however many loops you need (I needed 3) then fold the seam allowances in and topstitch the loops closed. Stitch the ends of the loops along the inside of the pet bed bottom, according to where the buttons have been stitched.
Wrap the loops around the buttons to close the bed. And that's it!
So. Ready to make your own DIY pet bed?


And that's all there is to it! This is definitely one of the easiest pet bed tutorials I have ever come across--and I actually didn't have a single issue while sewing it up. (Which is pretty unusual for me!)
Perhaps the best part about this pet bed? You can absolutely customize it for your own fur baby. Whether they're big or small, love a firm bed or a soft bed, love pillowy Sherpa fabric or a soft, light linen.. The customizable possibilities really are endless.
And, another bonus--when you make your own pet bed, you can customize it to your home space too. Pick a print that you love or a color that goes well with your home, all while making your little love as comfortable and happy as can be. I would absolutely LOVE to see any beds that you make for your pups--and, as always, don't hesitate to let me know if you have any questions. Cheers to our fur babies!
(This post on how to sew an easy pet bed is the first in our DIY home project series--a full guide with all of the tutorials is coming soon! Get on the list now and be the first to receive the guide straight to your inbox once it's released.)


![]()
![]()
![]()