How To Sew A Shirt Collar: The Mauve Shirt Dress Sewing Tutorial

And we have a brand new sewing tutorial up! This week we are covering an incredibly simple construction detail that can often be overlooked: The shirt collar. With this post I am going to show you how to sew a shirt collar, one step at a time.
And keep in mind: You don't have to be sewing a shirt dress for this tutorial to work for you. (Although, why wouldn't you want to? I am absolutely in love with this month's sewing project, the Mauve Shirt Dress. Literally going to be wearing this baby ALL summer long. And all fall. And winter. Then spring.)
But really. This sewing tutorial on how to sew a shirt collar could apply to any number of sewing projects. Think: A regular button down shirt, a vest, a shirt dress (like the Mauve!), or even a coat.

A collar is a separate piece of fabric that is attached to the neckline of a garment.


There are 3 main characteristics that make up a collar:
- The Collar Stand: The stand is the height of the collar that rises above the neckline to which it is attached. Basically, it's what holds the collar up.
- The Roll Line: This is the line at which the collar is turned back onto itself at the top of the stand. (That's a mouthful, am I right?) It's basically just how the collar naturally rolls and falls.
- The Collar Style Line: The style line is the outside edge of the collar that is not connected to the neckline. Style lines come in a wide variety of shapes & sizes.
While pretty much all collars maintain those 3 different characteristics, there are a HUGE variety of collars out there.
The main differences among all of the different collars out there is the way in which they encircle the neck. (Go figure, right?)
(SO. Ready to learn how to a shirt collar? Grab your free, printable tutorial today! Another easy construction detail that works for both dresses & button down shirts.) 
How to sew a shirt collar: Different types of collars

So. The majority of collars can be further divided into 3 main categories:
- Flat Collar: This collar has a concave shape that lies against the garment, rising only slightly above the neck edge. Think: A Peter Pan collar, which is the most popular flat collar style.
- Roll Collar: This collar has a convex shape that stands up around the neckline in back, then falls against the garment in the front. This is the collar we will be covering how to sew with this sewing tutorial. And as I mentioned above, it can be used in a WIDE variety of sewing projects: Dresses, shirts, coats.. The list goes on and on.
- Stand Up Collar: This collar has a straight line to it and stands up all around the neckline. Mandarin & turtleneck collars are both variations of the stand up collar, and are probably the most well known styles.

Furthermore, those categories can be even further divided down into particular styles.

Now, we definitely can't cover how to sew every single type of collar in a single blog post. But I still wanted to go over all of the different types of collars out there.
To name a few of the more popular collar designs:
- Convertible Collar
- Tailored Shirt Collar (The collar that we will be covering with this sewing tutorial!)
- Peter Pan Collar
- Mandarin Collar
- Tie Collar
- Revere Collar
- Notched Collar
- Turtleneck Collar
- Sailor Collar
- Shawl Collar
That's a whole lot of collar, am I right? It's pretty incredible how many different types of collar designs there are out there.
I'm hoping we will eventually cover how to sew each one.. But for now, we are going to start with learning how to sew a shirt collar.
(SO. Ready to learn how to a shirt collar? Grab your free, printable tutorial today! Another easy construction detail that works for both dresses & button down shirts.) 
How to sew a shirt collar sewing tutorial: Step 1
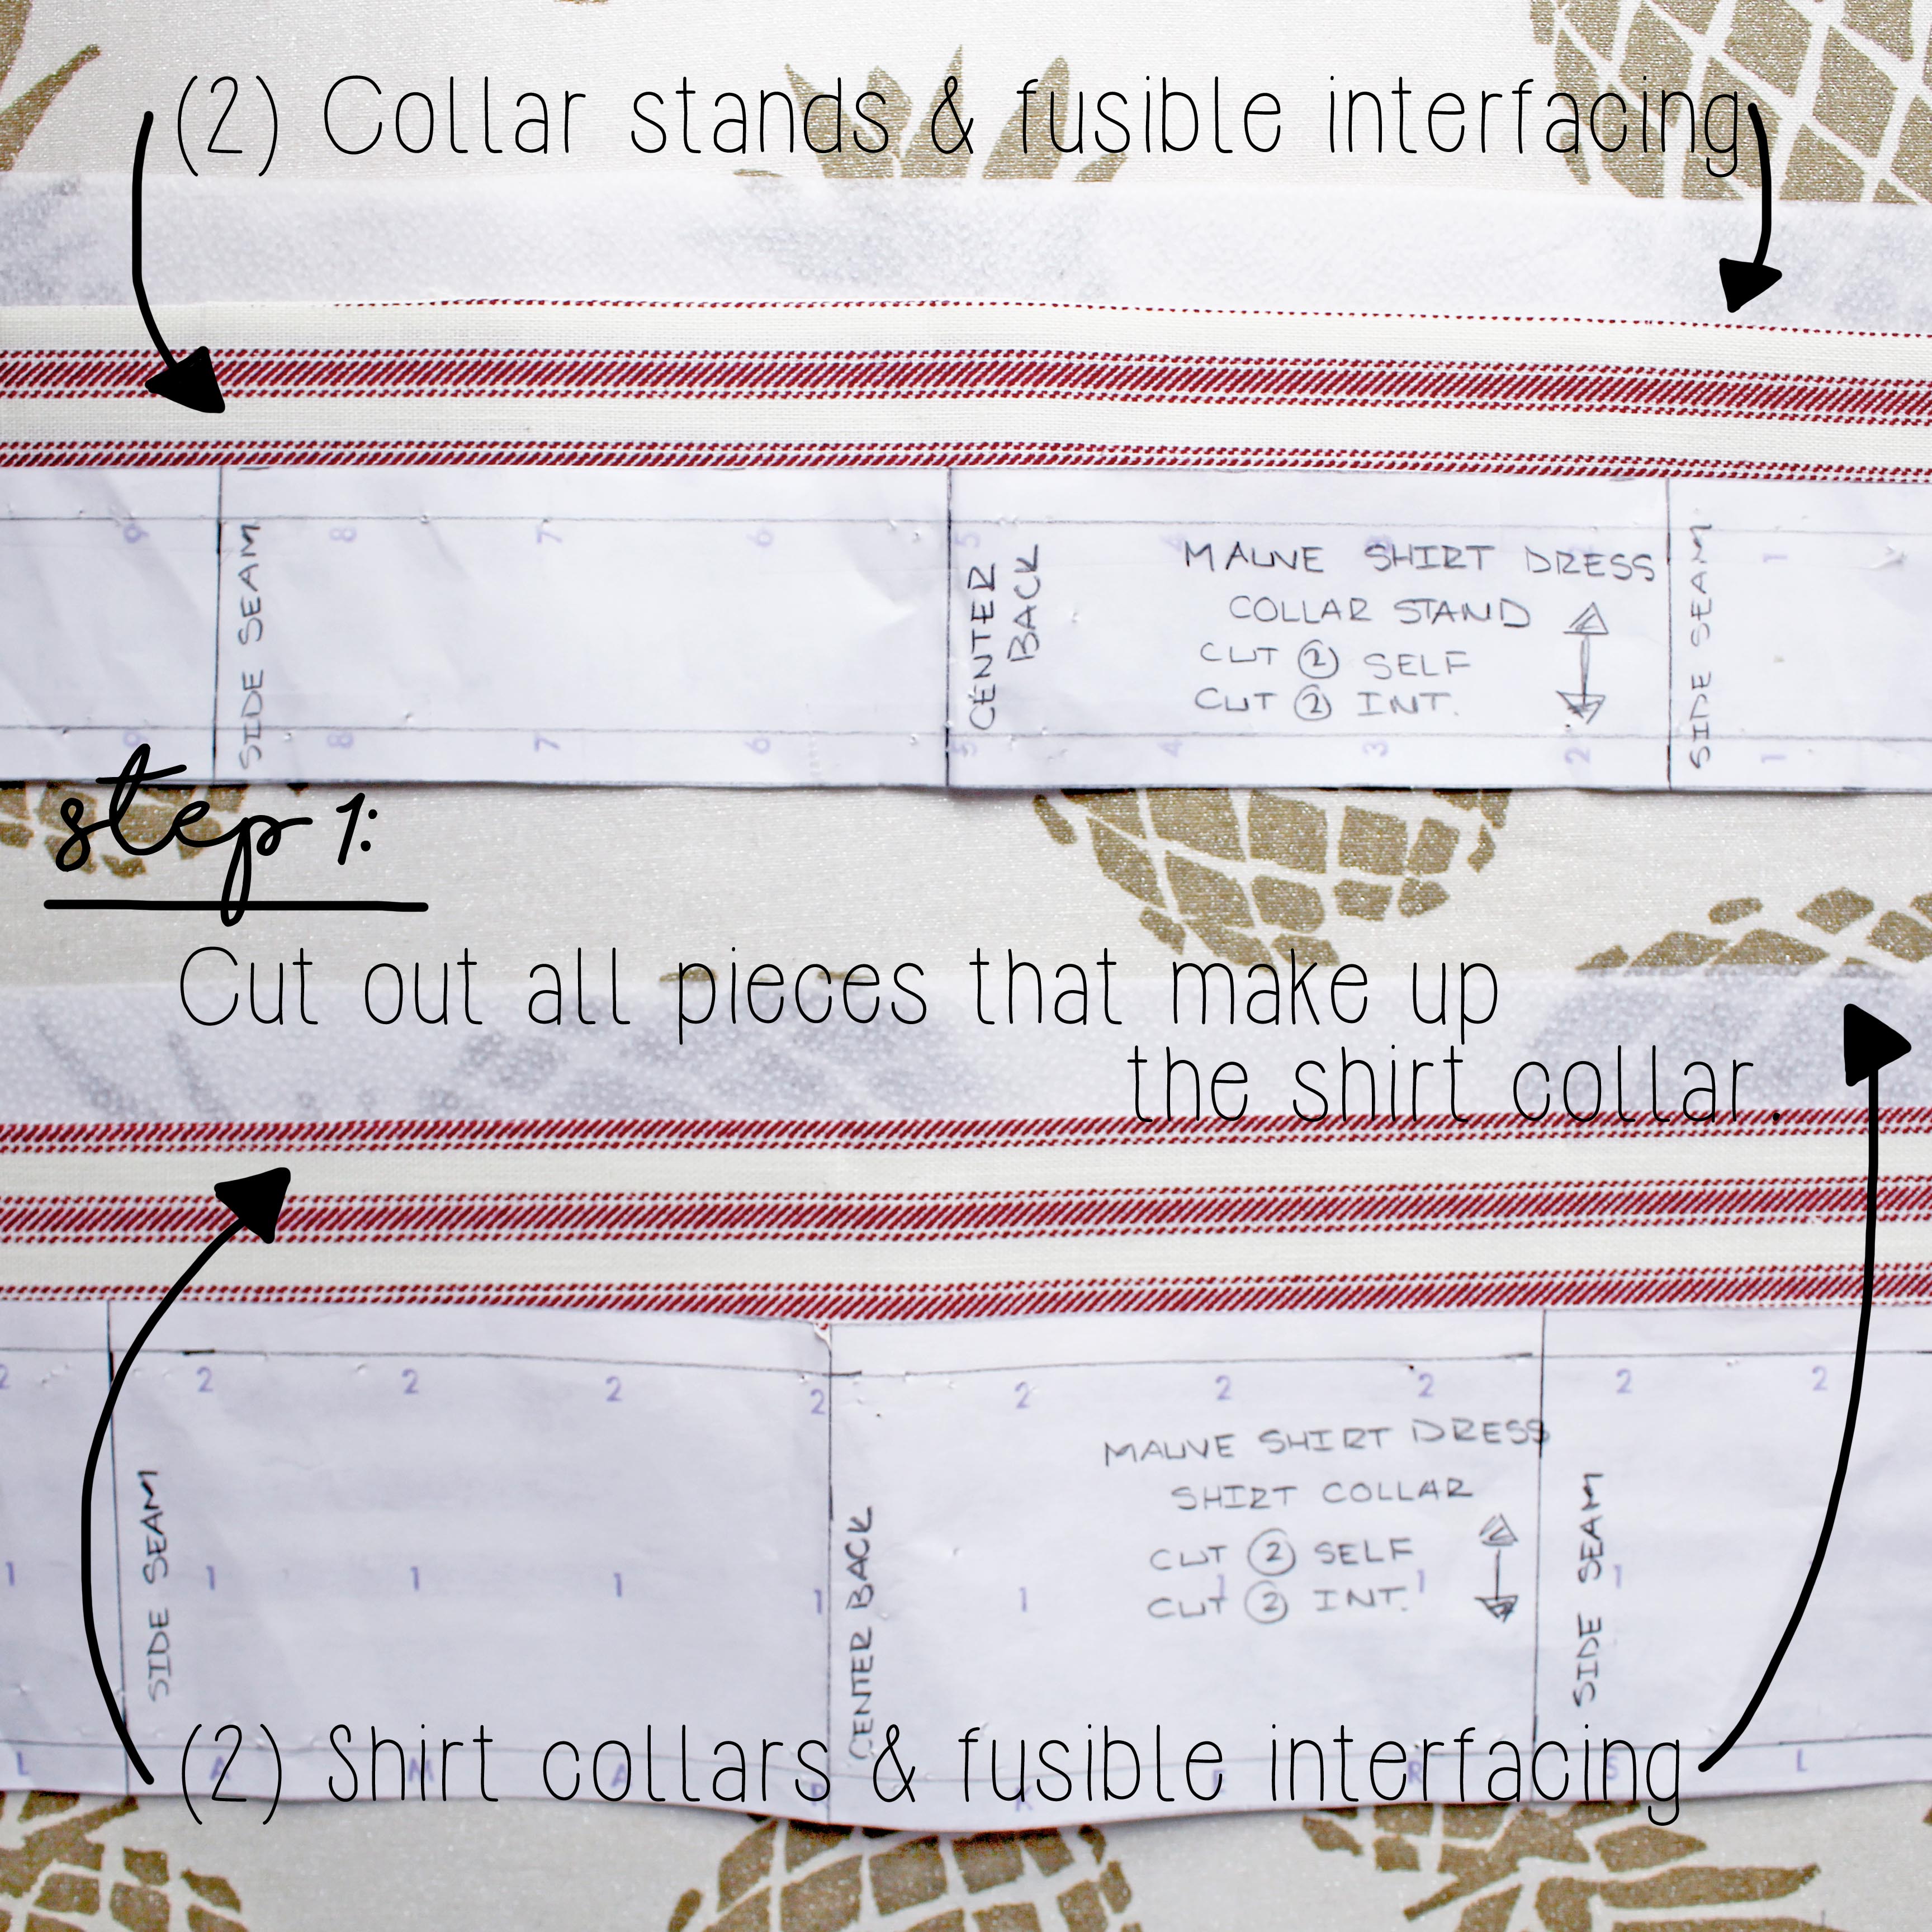
First of all, cut out all of the different pieces that make up the collar. That includes:
- (2) Shirt collars
- (2) Collar stands
- (2) Fusible interfacing for shirt collars
- (2) Fusible interfacing for collar stands

While not everyone prefers to use fusible interfacing on both sides of the collar & collar stand, I do. It gives the collar a stiffer feel, and will hold its shape better.
When cutting out the fusible, make sure it is slightly smaller than the collar & stand. I prefer to cut my fusible about 1/8" smaller on all sides, but the choice is yours. This helps to avoid bulk when sewing, especially when fusing both sides of the collar & collar stand.
NOTE: Make sure to cut out the collars & collar stands properly, if working with a print. Pay attention to what direction you want the print to go!
How to sew a shirt collar sewing tutorial: Step 2
With all of the collar pieces cut out, press the fusible interfacing onto the back side of the collars & collar stands.

REMEMBER: The back side of the fabric is the side that nobody sees when the garment is being worn.
(SO. Ready to learn how to a shirt collar? Grab your free, printable tutorial today! Another easy construction detail that works for both dresses & button down shirts.) 
How to sew a shirt collar sewing tutorial: Step 3
Grab the shirt collar pieces and pin them together, right side to right side. Only pin the three sides of the collar that DO NOT attach to the neckline. (AKA the bottom of the shirt collar.)
With the three sides pinned, stitch them together, following the seam allowance measurements carefully.
I always choose to stitch my collars with a 1/4" seam allowance, to help avoid bulk.

NOTE: If working with a print (or a stripe, like on the Mauve) make sure to match the print accordingly when pinning & sewing.
There is nothing worse than having a mismatched print.. Especially when it comes to stripes. (Not sure how to sew with stripes? We've got you covered! Check out the Dany Sheath sewing tutorial, a step-by-step guide on how to sew with stripes.)
How to sew a shirt collar sewing tutorial: Step 4
With the three sides of the collar stitched together, it's time to trim the seam allowance.
First, clip the two corners of the collar, making sure to stay OUTSIDE of the stitch line. Then trim the rest of the seam allowance, by about half.

This essentially helps with avoiding bulk in the collar, and ensuring that the tips of the collar will be nice and pointy.
(SO. Ready to learn how to a shirt collar? Grab your free, printable tutorial today! Another easy construction detail that works for both dresses & button down shirts.) 
How to sew a shirt collar sewing tutorial: Step 5
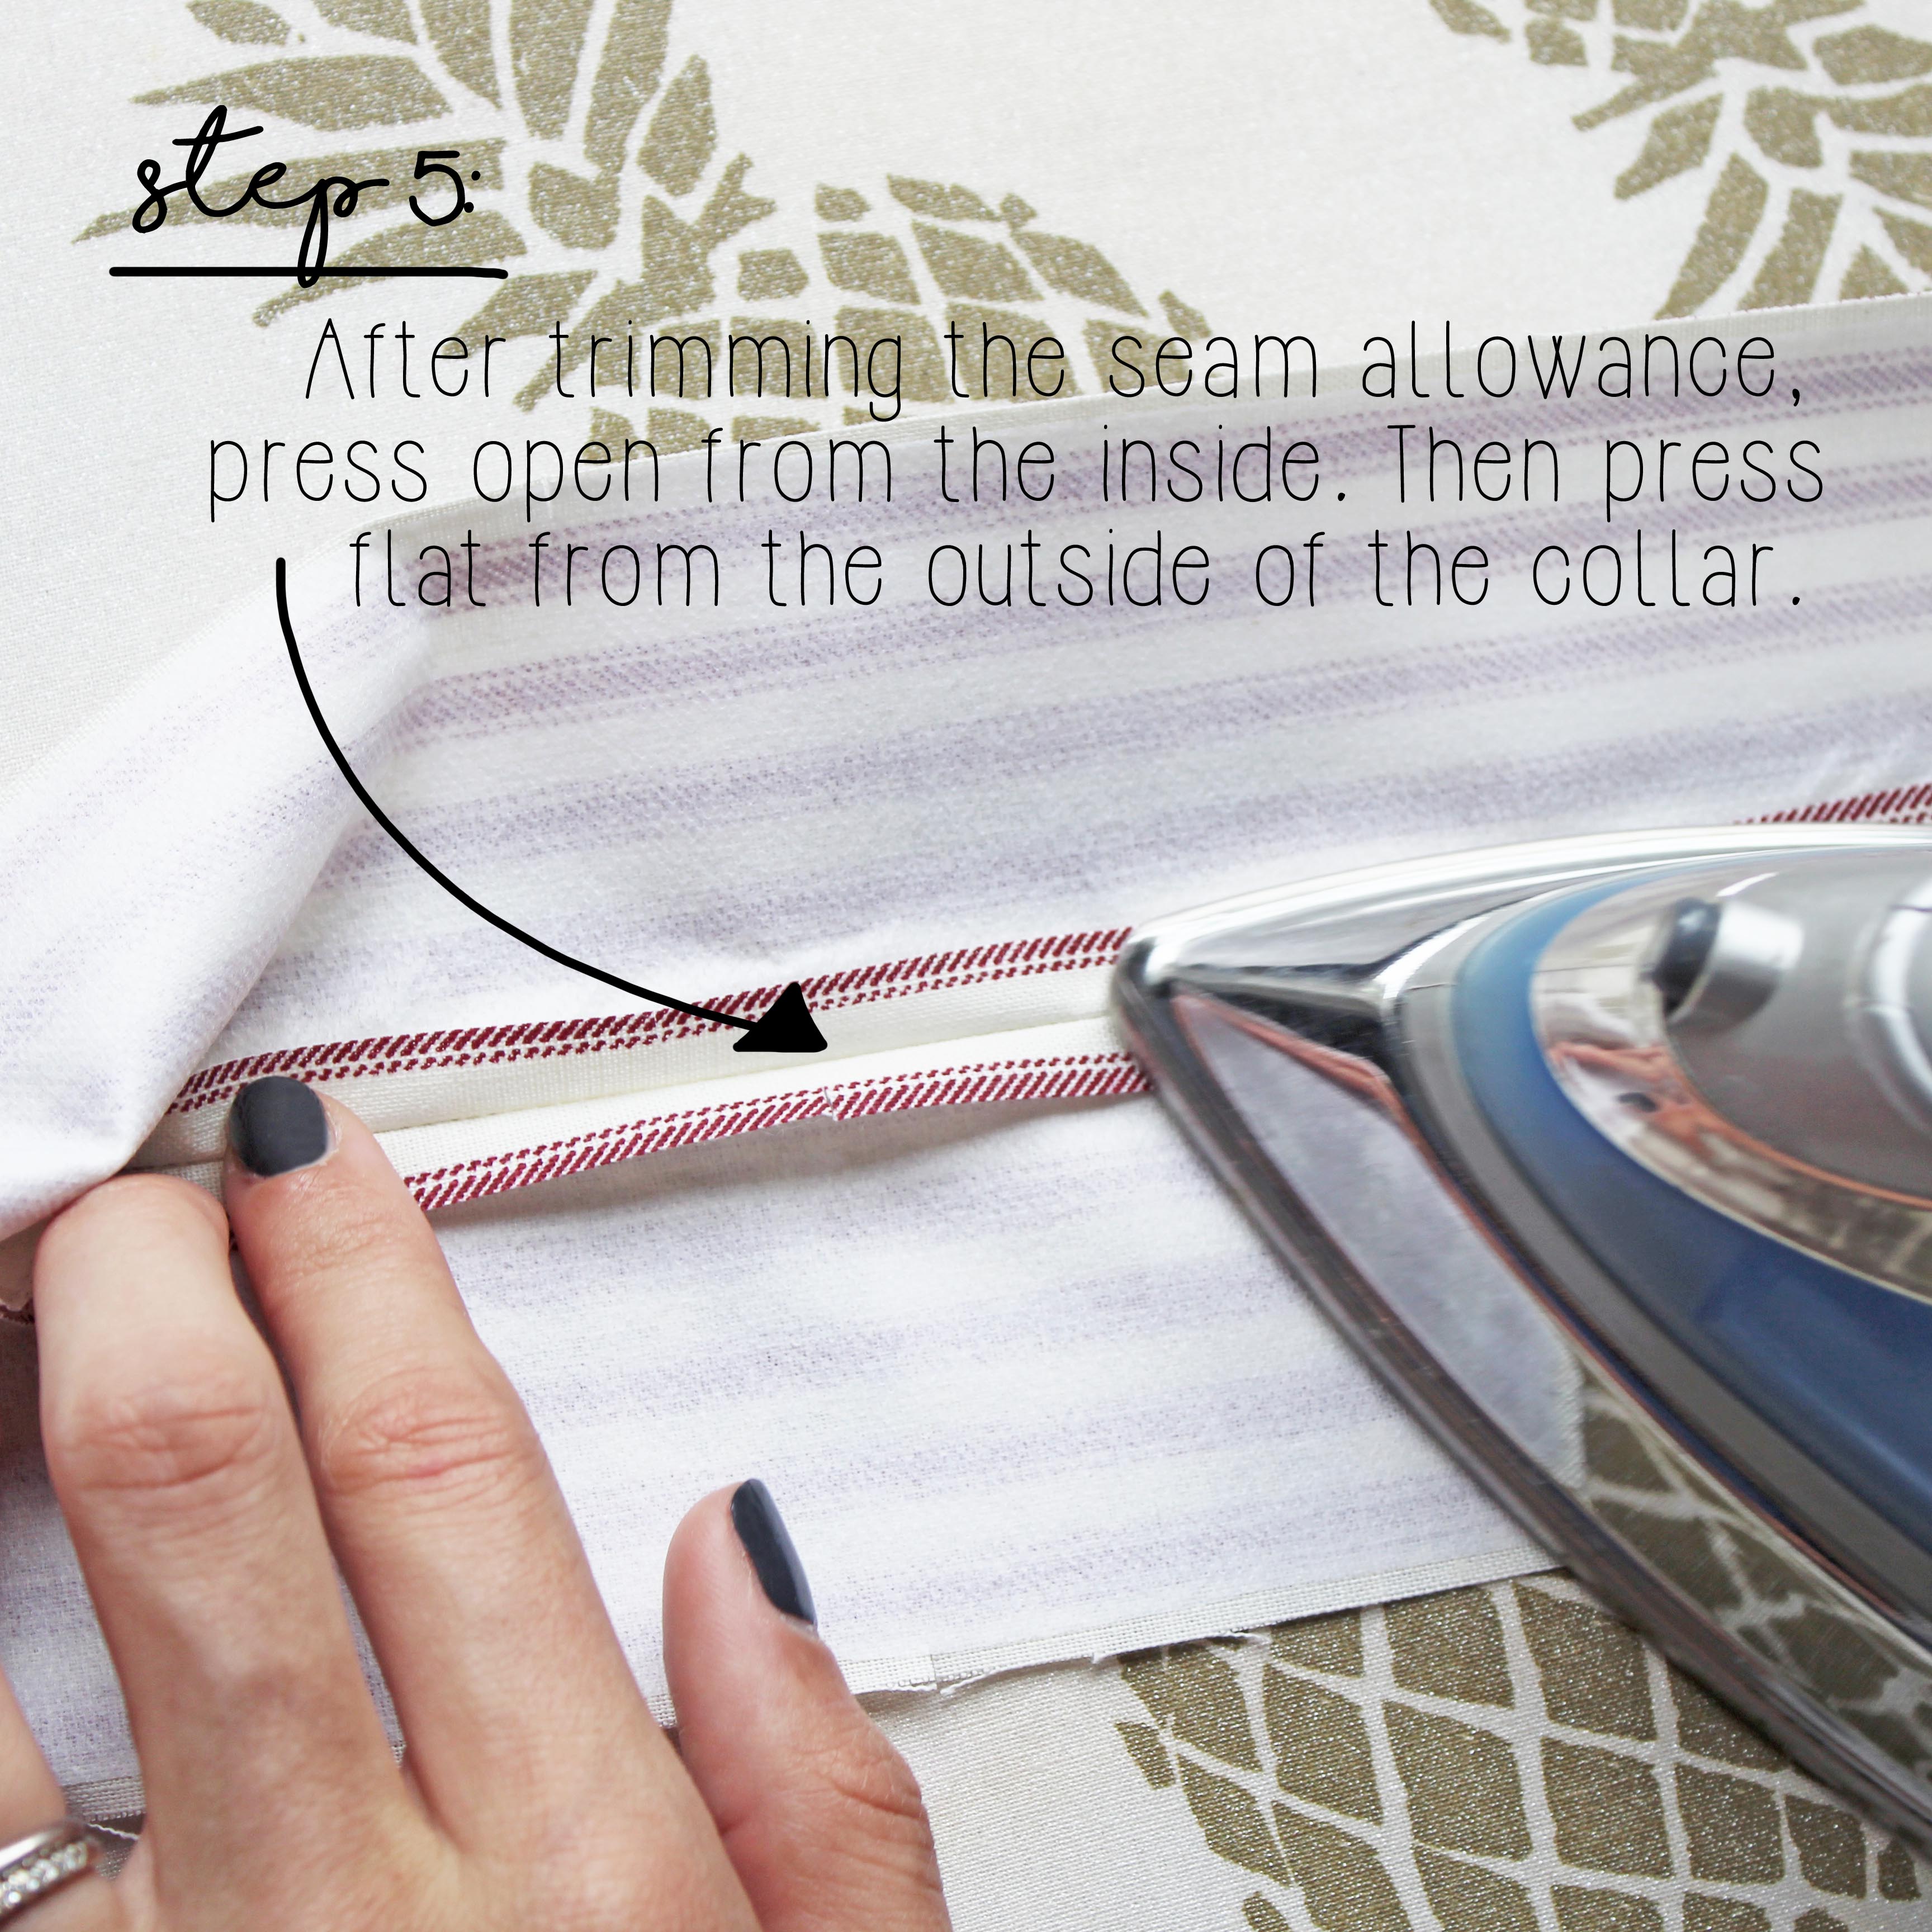
After trimming the seam allowance of the collar, press the seams open from the inside, as much as possible. This can be a bit difficult because the collar is so small, and because of those pointed corners.
But once the seams have been pressed from the outside as much as possible, press the collar flat from the outside as well.

VERY IMPORTANT: Don't forget to push the corners of the collar out using a seam ripper, so that they are nice and pointy. No doughy, rounded corners here!
How to sew a shirt collar sewing tutorial: Step 6
With the collar pressed flat, topstitch along the three sewn edges of the collar, sewing through both layers of the collar.
I chose to topstitch the collar using a 1/4" seam allowance, but the choice is yours. If you would like a stitch closer to the edge of the collar, that would also totally work too!

Topstitching the collar worked well for the Mauve Shirt Dress, since I really wanted that detailed look. But that might not work for every design.
So as an alternative, if you don't want that topstitching detail, understitching the lower collar would also work just fine for this step.
Understitching a collar is slightly more difficult because of those pointed corners, but it's definitely doable. Just make sure to do one or the other!
(SO. Ready to learn how to a shirt collar? Grab your free, printable tutorial today! Another easy construction detail that works for both dresses & button down shirts.) 
How to sew a shirt collar sewing tutorial: Step 7
And now it's time to attach the shirt collar to the collar stands. Sandwich the collar in between the two collar stands, matching the unstitched fourth edge of the collar to the tops of the collar stands.
Pin & stitch all of the layers together, making sure to stitch together the rounded edges of the collar stands.

NOTE: When pinning & sewing the edges of the collar stands together, and if working with a print or a stripe, make sure the pattern matches.
How to sew a shirt collar sewing tutorial: Step 8
With the collar stands attached to the collar, trim the seam allowance of the collar stand.
As with the shirt collar, I prefer to trim the seam allowance by about half. Since I sewed the collar stand with a 1/4" stitch, that means I trimmed the seam down to about 1/8".

Again, this just helps to avoid bulk in the collar.
(SO. Ready to learn how to a shirt collar? Grab your free, printable tutorial today! Another easy construction detail that works for both dresses & button down shirts.) 
How to sew a shirt collar sewing tutorial: Step 9
With the seam allowance of the collar stand trimmed, press it flat from the outside of the collar.

I don't even try to press the collar stand from the inside, it's entirely too difficult with the rounded edges of the stand.
Just make sure to press firmly and accurately, ensuring there are no rolled edges in the collar stand.
How to sew a shirt collar sewing tutorial: Step 10
Once the collar stand is pressed flat, topstitch along the three sewn edges of the collar stand.
While I used a 1/4" stitch when topstitching the shirt collar, I preferred to use a much tighter, closer topstitch for the collar stand. Since the collar stand is so much smaller than the shirt collar, it just looks funny with a 1/4" topstitch.
Stitch close to the edge, less than 1/8" away.

And again. If you don't want that topstitching detail on the collar or collar stand, you can understitch the lower collar, so that it won't be seen from the front.
But again, this is going to be difficult because of the collar stand curves. Yet it is definitely doable. The choice is yours!
(SO. Ready to learn how to a shirt collar? Grab your free, printable tutorial today! Another easy construction detail that works for both dresses & button down shirts.) 
How to sew a shirt collar sewing tutorial: Step 11
And with that, we have a finished shirt collar!
Now it is time to attach the collar to the neckline of the garment. Pin one side of the collar stand to the neckline of the garment right side to right side, matching notches.
I prefer to match the center back notches, and then go on from there.

Once the collar fits the neckline, stitch the two together. And with that, the collar is attached to the garment!
How to sew a shirt collar sewing tutorial: Step 12
Finally, it is time to close up the collar.
Press the seam from step 11 up, towards the collar and away from the garment. Fold the seam allowance of the remaining collar stand down, matching the seam just pressed up. Pin the seam allowance to the neckline, and topstitch all layers together.
This is the absolute easiest way to close up a collar, but if you really don't want any topstitching, then it could also be hand stitched closed. (Scared to do a little bit of hand stitching? Don't be! We have not one but TWO hand stitching tutorials to help you out.)

(SO. Ready to learn how to a shirt collar? Grab your free, printable tutorial today! Another easy construction detail that works for both dresses & button down shirts.) 
How to sew a shirt collar: That's it!
So. Not too bad, right?
When sewing a shirt collar for the first time, it does require some inside out, backwards thinking. But once you've got it, you've got it for life.

And again, you don't need to be sewing a shirt dress like the Mauve for this sewing tutorial to be effective.
Because it will work on ANY type of sewing project that involves a basic shirt collar. Think: A button down shirt, a vest, a coat.

OH. I almost forgot to mention. Shirt collars also typically have a button & buttonhole in that little rounded corner.. But I hate those.
Because no one (especially women) actually use that stupid little button. So I decided not to include one. But you can if you want to!
Are there any other collars that you guys would like to learn how to sew? Tell me!
(SO. Ready to learn how to a shirt collar? Grab your free, printable tutorial today! Another easy construction detail that works for both dresses & button down shirts.) 


