How To Make A Shower Cap: DIY Sewing Tutorial


As I'm sure you know, every month here on The Flora Modiste we have a brand new sewing tutorial that covers how to sew some detail of that month's sewing project. To name a few tutorials, we have covered: How to sew with stripes, how to sew patch pockets, and how to sew knit seam bindings.
This new post series is going to be a DIY sewing tutorial from start to finish, showing you how to sew helpful little projects from around the house. So, what's the difference between the tutorials, really?
The monthly sewing projects are too big and too diverse to cover in a single post. Which is why I only cover how to sew ONE aspect from a particular project.
Teaching you how to sew an entire project from start to finish just wouldn't be feasible, since I don't have the actual patterns that I'm using for sale. (Yet!) But by showing you how to sew a single detail from each project, I'm hoping that you can apply the same techniques to your own sewing projects.
This new DIY sewing tutorial series is different in that I am going to show you how to create a sewing project from start to finish. That includes how to cut the pattern, as well as what materials are needed.

I'm thinking that these DIY projects will be small little things from around the house that would be easy to make in an afternoon.
Something that you could potentially create from scrap fabric, or a small project you can test out your skills with before working on a full blown sewing project with zippers and buttons and seams.


I'm hoping that this DIY sewing tutorial series will not only increase your sewing knowledge, but will also help get you in the habit of buying less and sewing more. To get you in the mindset of "Hey, I think I could make that" rather than "Put that on the list for Target".
So. The first project in this DIY sewing tutorial series is going to be how to make a shower cap!
For anyone with A LOT of thick ass hair (like myself) you know that a shower cap can be a lifesaver. I can't wash my hair every day, it just doesn't work. I typically try to wash it every 3-4 days.. But I still need to shower in between then.

I have had my current shower cap for like 7+ years now, and the elastic no longer works on it. So when I put my shower cap on, I'm pretty much just putting a waterproof hat on my head.
It keeps the majority of the water off my head, but it's also not entirely effective. In comes the DIY sewing tutorial on how to make a shower cap. So. Ready to get started?
DIY sewing tutorial: How to make a shower cap, materials list
But first things first. What materials do you need to make a shower cap?
- 1/2 Yard printed, waterproof/water resistant fabric.
- 1/2 Yard clear, waterproof fabric. (Think: Shower liner.)
- 1 Yard thin elastic.
- Matching thread. (Obvi!)

The printed fabric is what will be seen on the outside of the shower cap, and the clear fabric will just be another barrier to protect your hair from getting wet in the shower.
More often than not, the clear fabric that you'll find is the material that is *actually* waterproof, but it's really not that pretty.

You can choose the width of the elastic, but I prefer a thinner width. It's easier (& quicker) to sew with, since you only really need to make the one stitch line. With a thicker elastic, you may need to stitch on both sides of the elastic, which can get messy.
The color of the thread is your choice as well! You can use contrasting thread for the stitch line and the edge stitch as well, if you'd like. You do you.
DIY sewing tutorial: How to make a shower cap, step 1
First, we need to figure out how big your head is. Grab a measuring tape and measure from the crown of your forehead, under the nape of your neck, and back around to the crown of your forehead.
Jot this measurement down--It's essentially the circumference of your head.

We want the measurement to be snug: Not too tight, but not too loose.
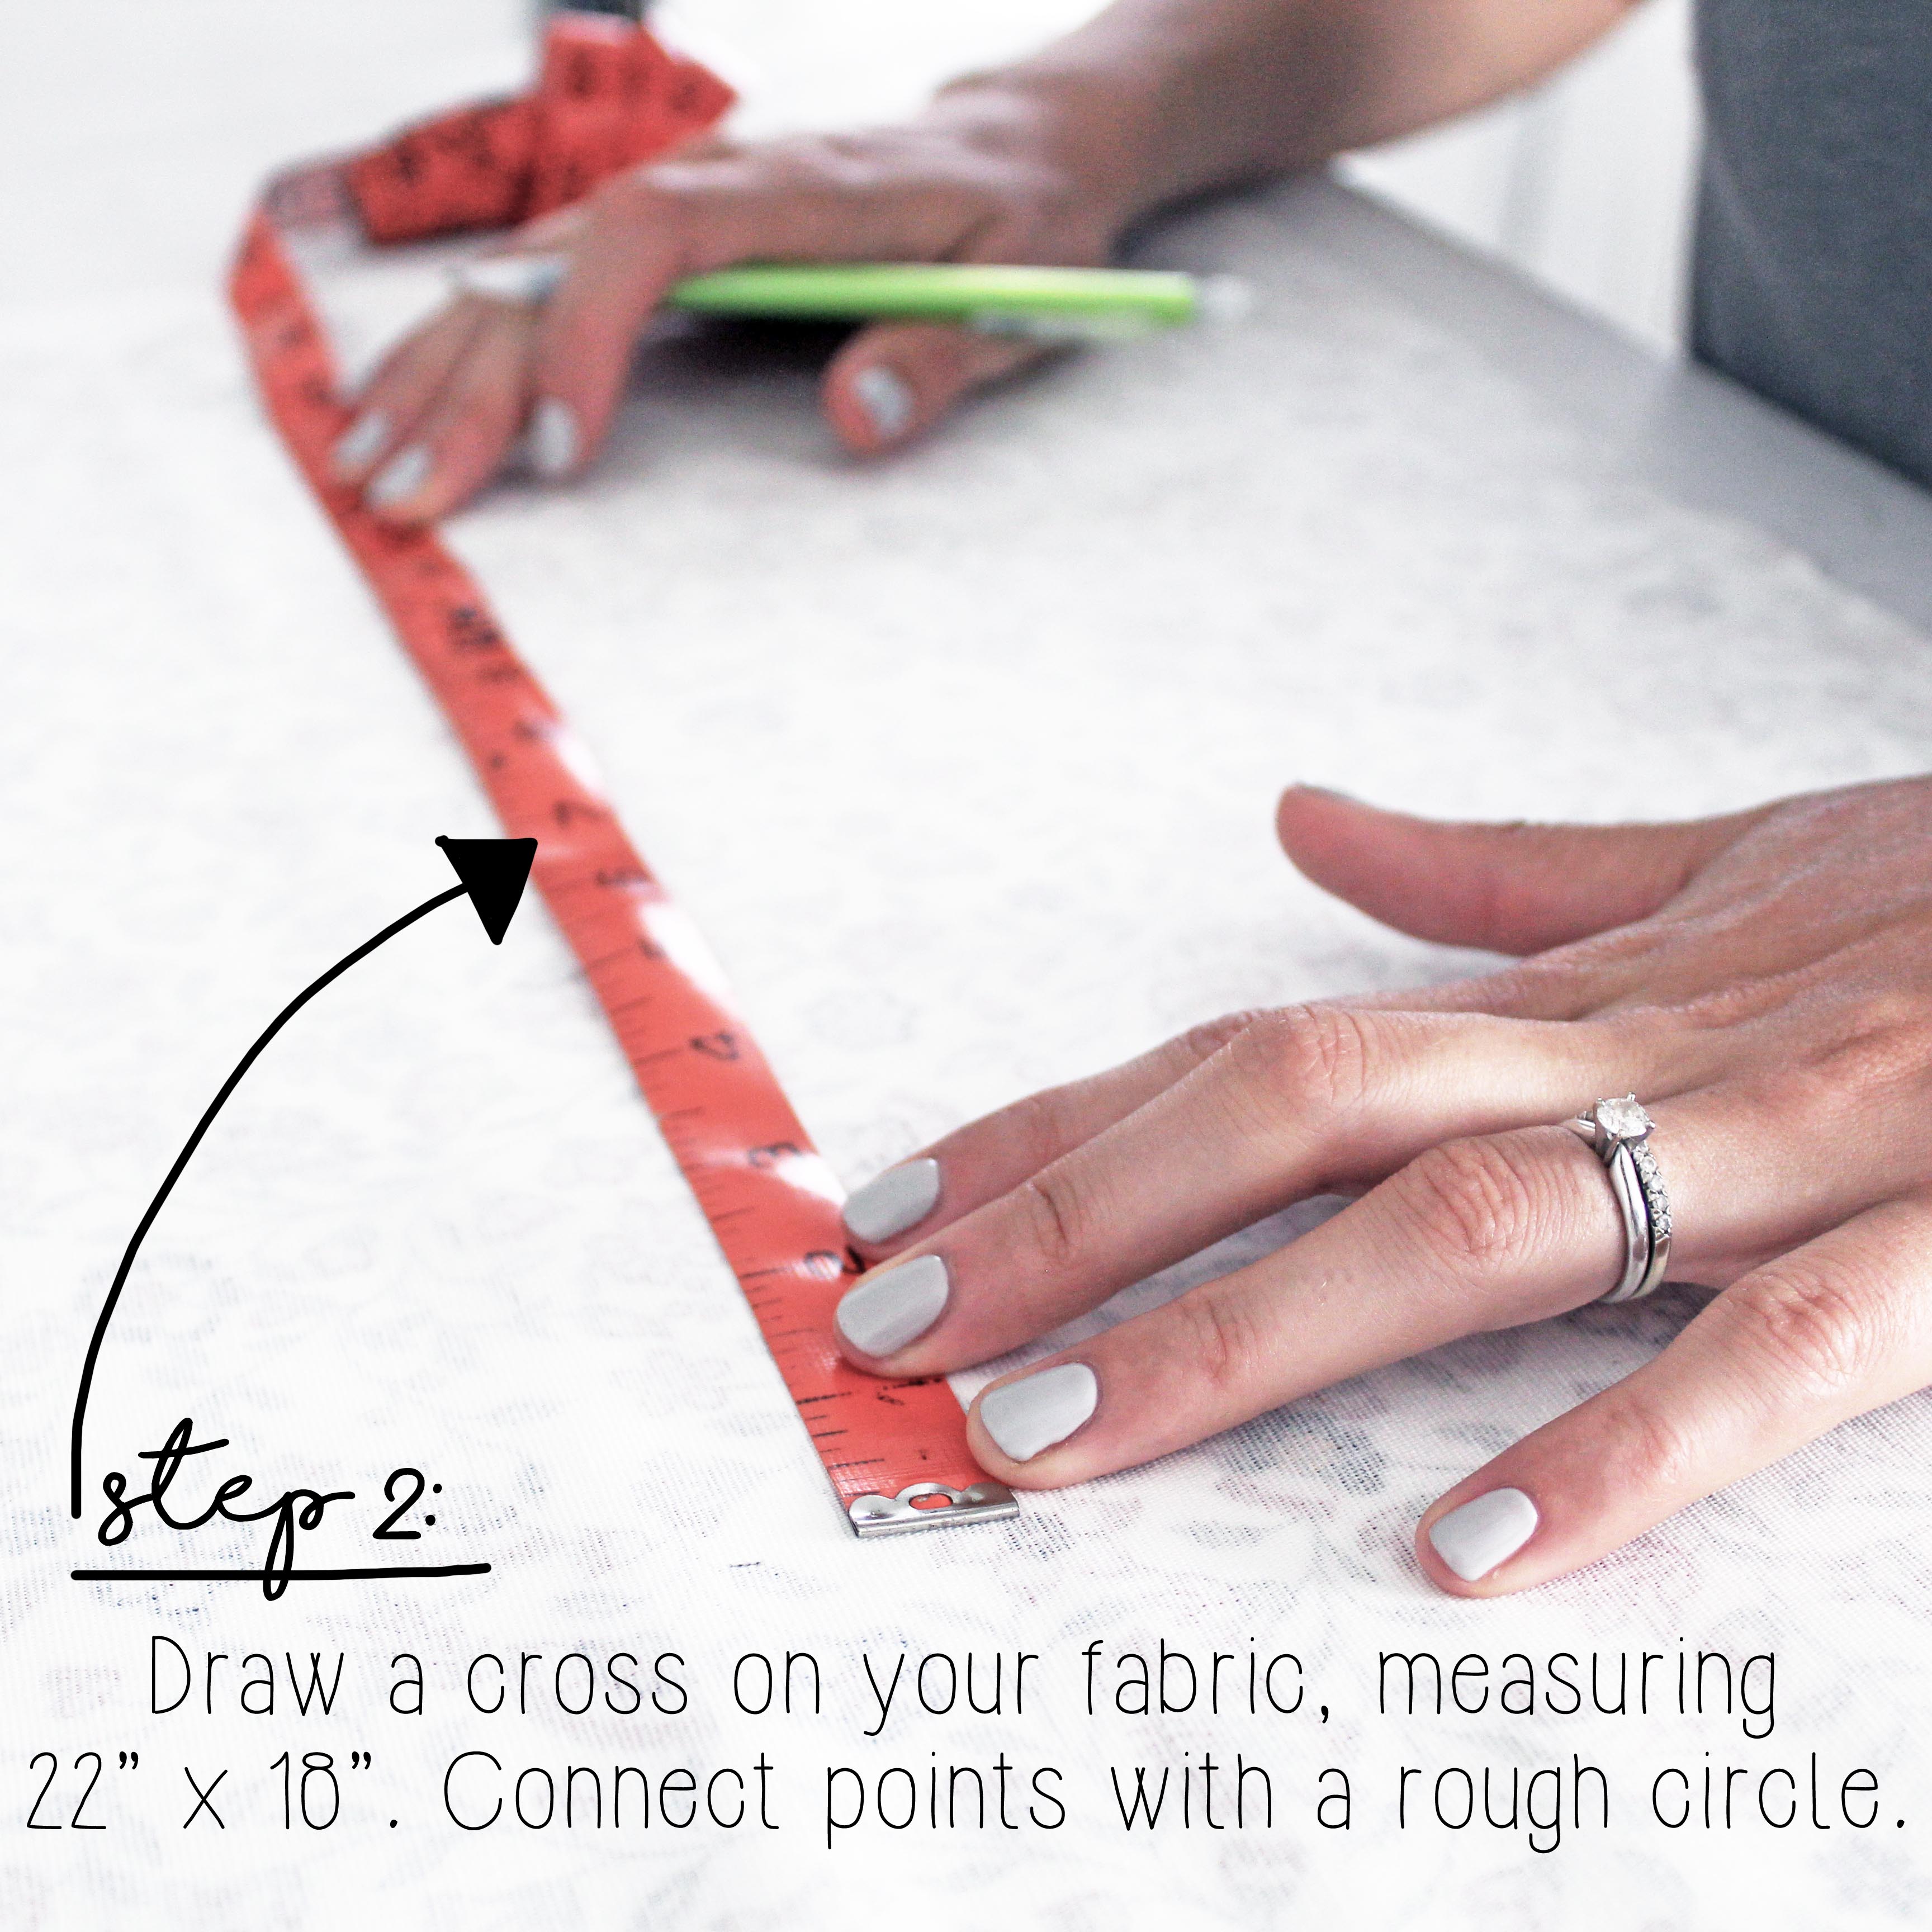
DIY sewing tutorial: How to make a shower cap, step 2
Using a pencil, draw a cross on your fabric with one line measuring 22" and the other line measuring 18". (I came up with these measurements after much trial and error. If you have am abnormally large head, add a few inches to each line. If you have an unusually small head, subtract a few inches.)
Next, draw a large circle, connecting all four points of the cross. This initial circle doesn't need to be perfect--We just want to get the general circle shape down.

Once you have a decent looking and even circle, smooth out the edges with a curved ruler so that you have a nice, even circle.
NOTE: Draw your circle on the BACK side of the fabric, so you won't see any of the pencil marks once the cap is finished.
DIY sewing tutorial: How to make a shower cap, step 3
Once you have a smooth, even circle, it's time to add seam allowances to your shower cap. (I used 1/2" seam allowances! Just to be safe.)
You really only need to add the seam allowance along one quarter of the full shower cap. Once it has been added to that first quarter, cut out that quarter, following the seam allowance line.


Fold the cut quarter over, and trace. Once again, cut the second quarter out, then fold the full half over, and trace. Once the bottom half has been traced, finish cutting out the full shower cap.
Can you just draw the seam allowance around the entirety of the shower cap? Yes. But it might not be even. This way, it is.
DIY sewing tutorial: How to make a shower cap, step 4
At this point, you should have a fully cut out shower cap.
Pin the cut out of the printed cap on top of the clear, waterproof fabric, and cut it out.


And now you should have the two circles that make up your shower cap!
DIY sewing tutorial: How to make a shower cap, step 5
Now, we want to cut the elastic for the shower cap.
Lay your measuring tape flat out on table, so that your measurement from step 1 is within easy reach. Gently stretch the elastic, from the beginning of the tape measure to your measurement from step 1.
Cut the elastic at that point.

Once the elastic is laid flat again, it should measure within an inch or two of your step 1 measurement.
DIY sewing tutorial: How to make a shower cap, step 6
Pin the outer, printed shower cap layer to the clear, waterproof layer. (Make sure to pin wrong side to wrong side!)
Next, pleat the layers together. Each pleat should be about 1" wide, with about 1 1/2" in between one pleat and the next.
Once you fold a pleat, pin it back in place. Repeat the process until the entire shower cap is pleated and pinned.


NOTE: At this point, I would CAREFULLY try your shower cap on. If it is at all too loose or too tight, now is the time to make adjustments. If the cap is too tight, let out some of the pleats.. But if the cap is too loose, you'll have to add more fabric into the fold of the pleat.
Either way, you want the cap to fit snugly, so adjust as necessary.
DIY sewing tutorial: How to make a shower cap, step 7
With the pleats of your shower cap pinned, it's time to stitch them together.
Based off of your seam allowance, stitch the pleats together, one at a time. GO SLOWLY.


When I sewed up my shower cap, that pesky little waterproof shower liner kept slipping and sliding everywhere. So take your time!
DIY sewing tutorial: How to make a shower cap, step 8
With the shower cap layers stitched together, we need to close up that raw edge.
I prefer to serge the raw edge, and then fold it over, to be finished with the elastic in the next step.

Theoretically, the edge could just be finished off with a serger stitch, and the elastic attached separately. But IMHO, matching up the stitch line from step 7 and the stitch line for attaching the elastic in step 9 just seems a bit difficult. BUT finishing the cap off that way WOULD allow for more elasticity.
It just depends what you're going for. My cap fit me pretty perfectly, so I didn't need a ton of elasticity. You do you, girl.
DIY sewing tutorial: How to make a shower cap, step 9
Now it's time to stitch the elastic to the shower cap layers.
First, fold the edge of the cap over and pin. Then backstitch the end of the elastic to the cap, and start stitching! If you have a thin layer of elastic, I would simply stitch down the middle of that. (Which is what I did here.)


But if you have a thicker elastic, you may need to stitch along one side of the elastic, and then do the same with the other side. This is a little trickier because you will have two lines side by side.. So if either is at all crooked, it will be much more noticeable than it would be with a single stitched line.
Either way, stitch to the end (pulling ever so lightly on the elastic) and GO SLOW. Try the cap on one more time.. And that's it!It's really a pretty simple project, and definitely one that can be done in an afternoon. And it's just so handy, am I right?
For the girl that can't live without a shower cap, this little DIY is going to be your new BFFL.
Any other small household projects that you've been dying to make, but have no idea how to? I'd love to hear what you want to create, because I'm sure I need it too--I just don't know it yet.


![]()
![]()
![]()


