Quilting For Beginners: How To Sew A Quilt Binding, Part Four


Need to catch up on our quilting for beginners series before learning how to sew a quilt binding? We got you:
- My First DIY Constellation Quilt, PART ONE
- DIY Constellation Quilt Embroidery Stitches Tutorial, PART TWO
- DIY Constellation Quilt Tips & Tricks, PART THREE
- How To Sew A Quilt Binding, PART FOUR (This post!)
And alas, we have come to the final post in our series on quilting for beginners. All of the constellations & stars have been hand stitched to twinkling perfection.. And now, this week, we are covering the final, FINAL step in any quilting project: How to sew a quilt binding.
Now, for some reason, I thought this final step was going to be easy. It couldn't be any harder than spending 180+ hours hand stitching constellations and 500 French knots, right? RIGHT? So, so wrong.
I struggled pretty intensely with figuring out how to sew a quilt binding. Because this was my first quilting project EVER, I was really walking into this final step blindly. I figured it would be similar to sewing a neckline or an armhole binding, and treated it as such.

And I already struggle with sewing bindings on clothing.. So you can imagine my struggle with sewing a binding on this massive DIY constellation quilt of mine. So. If reading this prior to sewing your own quilt binding, I would highly recommend starting with the mindset that this is NOT EASY.
I think that if I would have went into this final step with that mindset I would have had a much different experience.
But of course, I figured I would get the quilt binding done in an hour or two, and would finally be finished with this massive project. Sooo yah. Learning how to sew a quilt binding was THAT kind of project for me.
(Ready to learn how to sew a quilt binding, and FINISH that quilt once and for all? Grab your free, printable tutorial below and learn from all of my mistakes!) 


And tbh, I'm still not entirely sure that I did it "right". Yes, I was able to finish the binding and close up my quilt successfully. But I struggled so much with it, that I feel like there HAS to be an easier way to do it.
Yet, I have no idea what that way would be. I looked up a few sewing tutorials after finishing my binding, and they all seemed pretty similar for the most part. Or even more complicated.
So I honestly think that sewing a quilt binding is overall just a pretty difficult task. And what makes it difficult is just how BIG the quilt itself is, and how long the binding pieces are.

The biggest issue that I had with my quilt binding was that the binding strips would start to twist, towards the end of the strips. I think that if I had been able to cut the binding strips on the bias, that the pieces may have twisted less.
But I didn't have enough leftover fabric to cut the strips on the bias, and after spending $250 on this project, I was NOT about to go and buy more fabric. Or buy pre-made binding. Just no. SO I made do with what I had.
I was able to press the twists out and flatten them for the most part. But I also had to stitch the bindings to the quilt SO slowly because of the twisting. And I was constantly re-pinning & restitching as I went. BUT no matter. I am going to walk you through how to sew a quilt binding--At least, the method in which I did mine.
My hope is that this tutorial will help prepare you for sewing your own quilt binding, and will get you in the right mindset. Because even though this part of the process is a bit difficult, it means you are almost done!
(Ready to learn how to sew a quilt binding, and FINISH that quilt once and for all? Grab your free, printable tutorial below and learn from all of my mistakes!)
How to sew a quilt binding sewing tutorial: Step 1

First, you will need to create your binding strips. Measure out all 4 sides of the quilt, and take note of the measurements. I recommend numbering each side (1, 2, 3, & 4) and then writing out what each side measures out to be.
In an ideal world, if sewing a square quilt, all 4 sides would be the same measurement. But if your finished quilt is anything like mine, then all 4 sides will measure out differently. And it is VERY important to know which measurement corresponds to which side.
(Ready to learn how to sew a quilt binding, and FINISH that quilt once and for all? Grab your free, printable tutorial below and learn from all of my mistakes!)
How to sew a quilt binding sewing tutorial: Step 2

Now that you have the measurements of your quilt, it's time to create the actual binding strips. Grab the leftover fabric from your quilt, and fold it in half. (The leftover fabric that I had from my quilt was the bottom piece, so I literally just folded that in half.)
With a straight ruler, draw the length of the binding strips taken from step 1. For my strips, I drew a straight line along the bottom of the ruler, then continued on in 10" increments. This helps ensure that the line is straight the entirety of the binding.
Add 1" to the length of the binding--This is for the 1/2" seam allowance on each side of the binding. Then also add another 1": 1/2" For each side of the binding, to create the corner seams. In total, add an additional 2" to the step 1 measurement, for each binding strip.
With the final length drawn out, also measure out the desired width of the binding strips. I chose to have my finished bindings measure 1" wide. Add 1/2" top & bottom to account for the seam allowance.
NOTE: As mentioned above, cutting the binding strips on the bias may help to alleviate twisting of the binding strips.
How to sew a quilt binding sewing tutorial: Step 3

Okay! With all 4 of the binding strips fully drawn out on the RIGHT side of the fabric, pin the two layers of folded fabric together. I would recommend pinning the strips together pretty closely, to alleviate any slipping of the fabric.
Cut all 4 of the binding pieces out, resulting in 8 total binding strips. (2 Strips for each side of the quilt.) I
would also recommend marking which side (1, 2, 3, or 4) of the quilt that each binding strip belongs to. Mark this on the WRONG side of the fabric. But again, if all of your sides are even (I applaud you!) then this wouldn't be necessary.
(Ready to learn how to sew a quilt binding, and FINISH that quilt once and for all? Grab your free, printable tutorial below and learn from all of my mistakes!)
How to sew a quilt binding sewing tutorial: Step 4

With all of the binding strips cut out, press each one flat. Pin & stitch the two strips for a side together, RIGHT side to RIGHT side.
Only stitch the length of one side of the binding, leaving the other three sides of the binding open. Repeat the process for all four of the bindings.
How to sew a quilt binding sewing tutorial: Step 5

Press open the seams of the bindings. Next, pin & understitch the seam allowance to the BACK of each binding strip.
Make sure to pay attention to which binding side you are stitching (1, 2, 3, or 4) as this will determine which side of the binding you understitch in this step. In the end, the visible understitching just needs to match the backside of the quilt.
NOTE: This is VERY important, so make sure to pay attention and match the bindings to the quilt before stitching. 70+" Is a whole lot to have to rip out, if you understitch to the wrong side of the binding.
Press flat once more, once the understitching is complete.
(Ready to learn how to sew a quilt binding, and FINISH that quilt once and for all? Grab your free, printable tutorial below and learn from all of my mistakes!)
How to sew a quilt binding sewing tutorial: Step 6

After pressing the understitched seam on the quilt bindings flat, also make sure to press the raw seam allowance on the upper quilt binding UNDER. (i.e. The binding side that does NOT have the seam allowance understitched to it.)
Repeat for each of the 4 quilt bindings.
NOTE: While this step isn't 100% necessary, I would recommend it. It really helped me when I was pinning & stitching the final seam of the quilt. But of course, the choice is yours!
How to sew a quilt binding sewing tutorial: Step 7

The binding strips are almost fully prepped now!
Measure 1/2" & 1" in from the sides of the binding strips. Draw vertical lines on the WRONG side of the fabric, along both pieces of the binding strip. Measure 1/2" in from the length of the strips, along the 1" line, and mark two dots along the line just drawn.
Next, draw diagonal lines connecting the dots just drawn to the tip of the understitched seam from step 5. Repeat for both sides of the binding.
Once complete, you should have 4 triangles on both sides of the quilt binding strips. Repeat for all 4 binding strips.
(Ready to learn how to sew a quilt binding, and FINISH that quilt once and for all? Grab your free, printable tutorial below and learn from all of my mistakes!)
How to sew a quilt binding sewing tutorial: Step 8

Pin & stitch one of the binding strips to the corresponding side of the quilt. Make sure to pin the RIGHT understitched side of the binding to the WRONG side of the quilt.
Also make sure to only stitch to 1/2" from the corners, with 1/2" of fabric extending past the corner. (This extra fabric will be used to connect the triangles in the next step.)
Press the seam open. Repeat the process for all 4 sides of the quilt, making sure to match the correct binding to the correct side of the quilt.
How to sew a quilt binding sewing tutorial: Step 9

With all 4 sides of the binding attached to the quilt, it's time to close the corners.
Pin & stitch the triangles for each corner together. (Easier said than done, I know. But that's basically all there is to it.) Repeat the process for all 4 corners, then press flat.
(Ready to learn how to sew a quilt binding, and FINISH that quilt once and for all? Grab your free, printable tutorial below and learn from all of my mistakes!)
How to sew a quilt binding sewing tutorial: Step 10
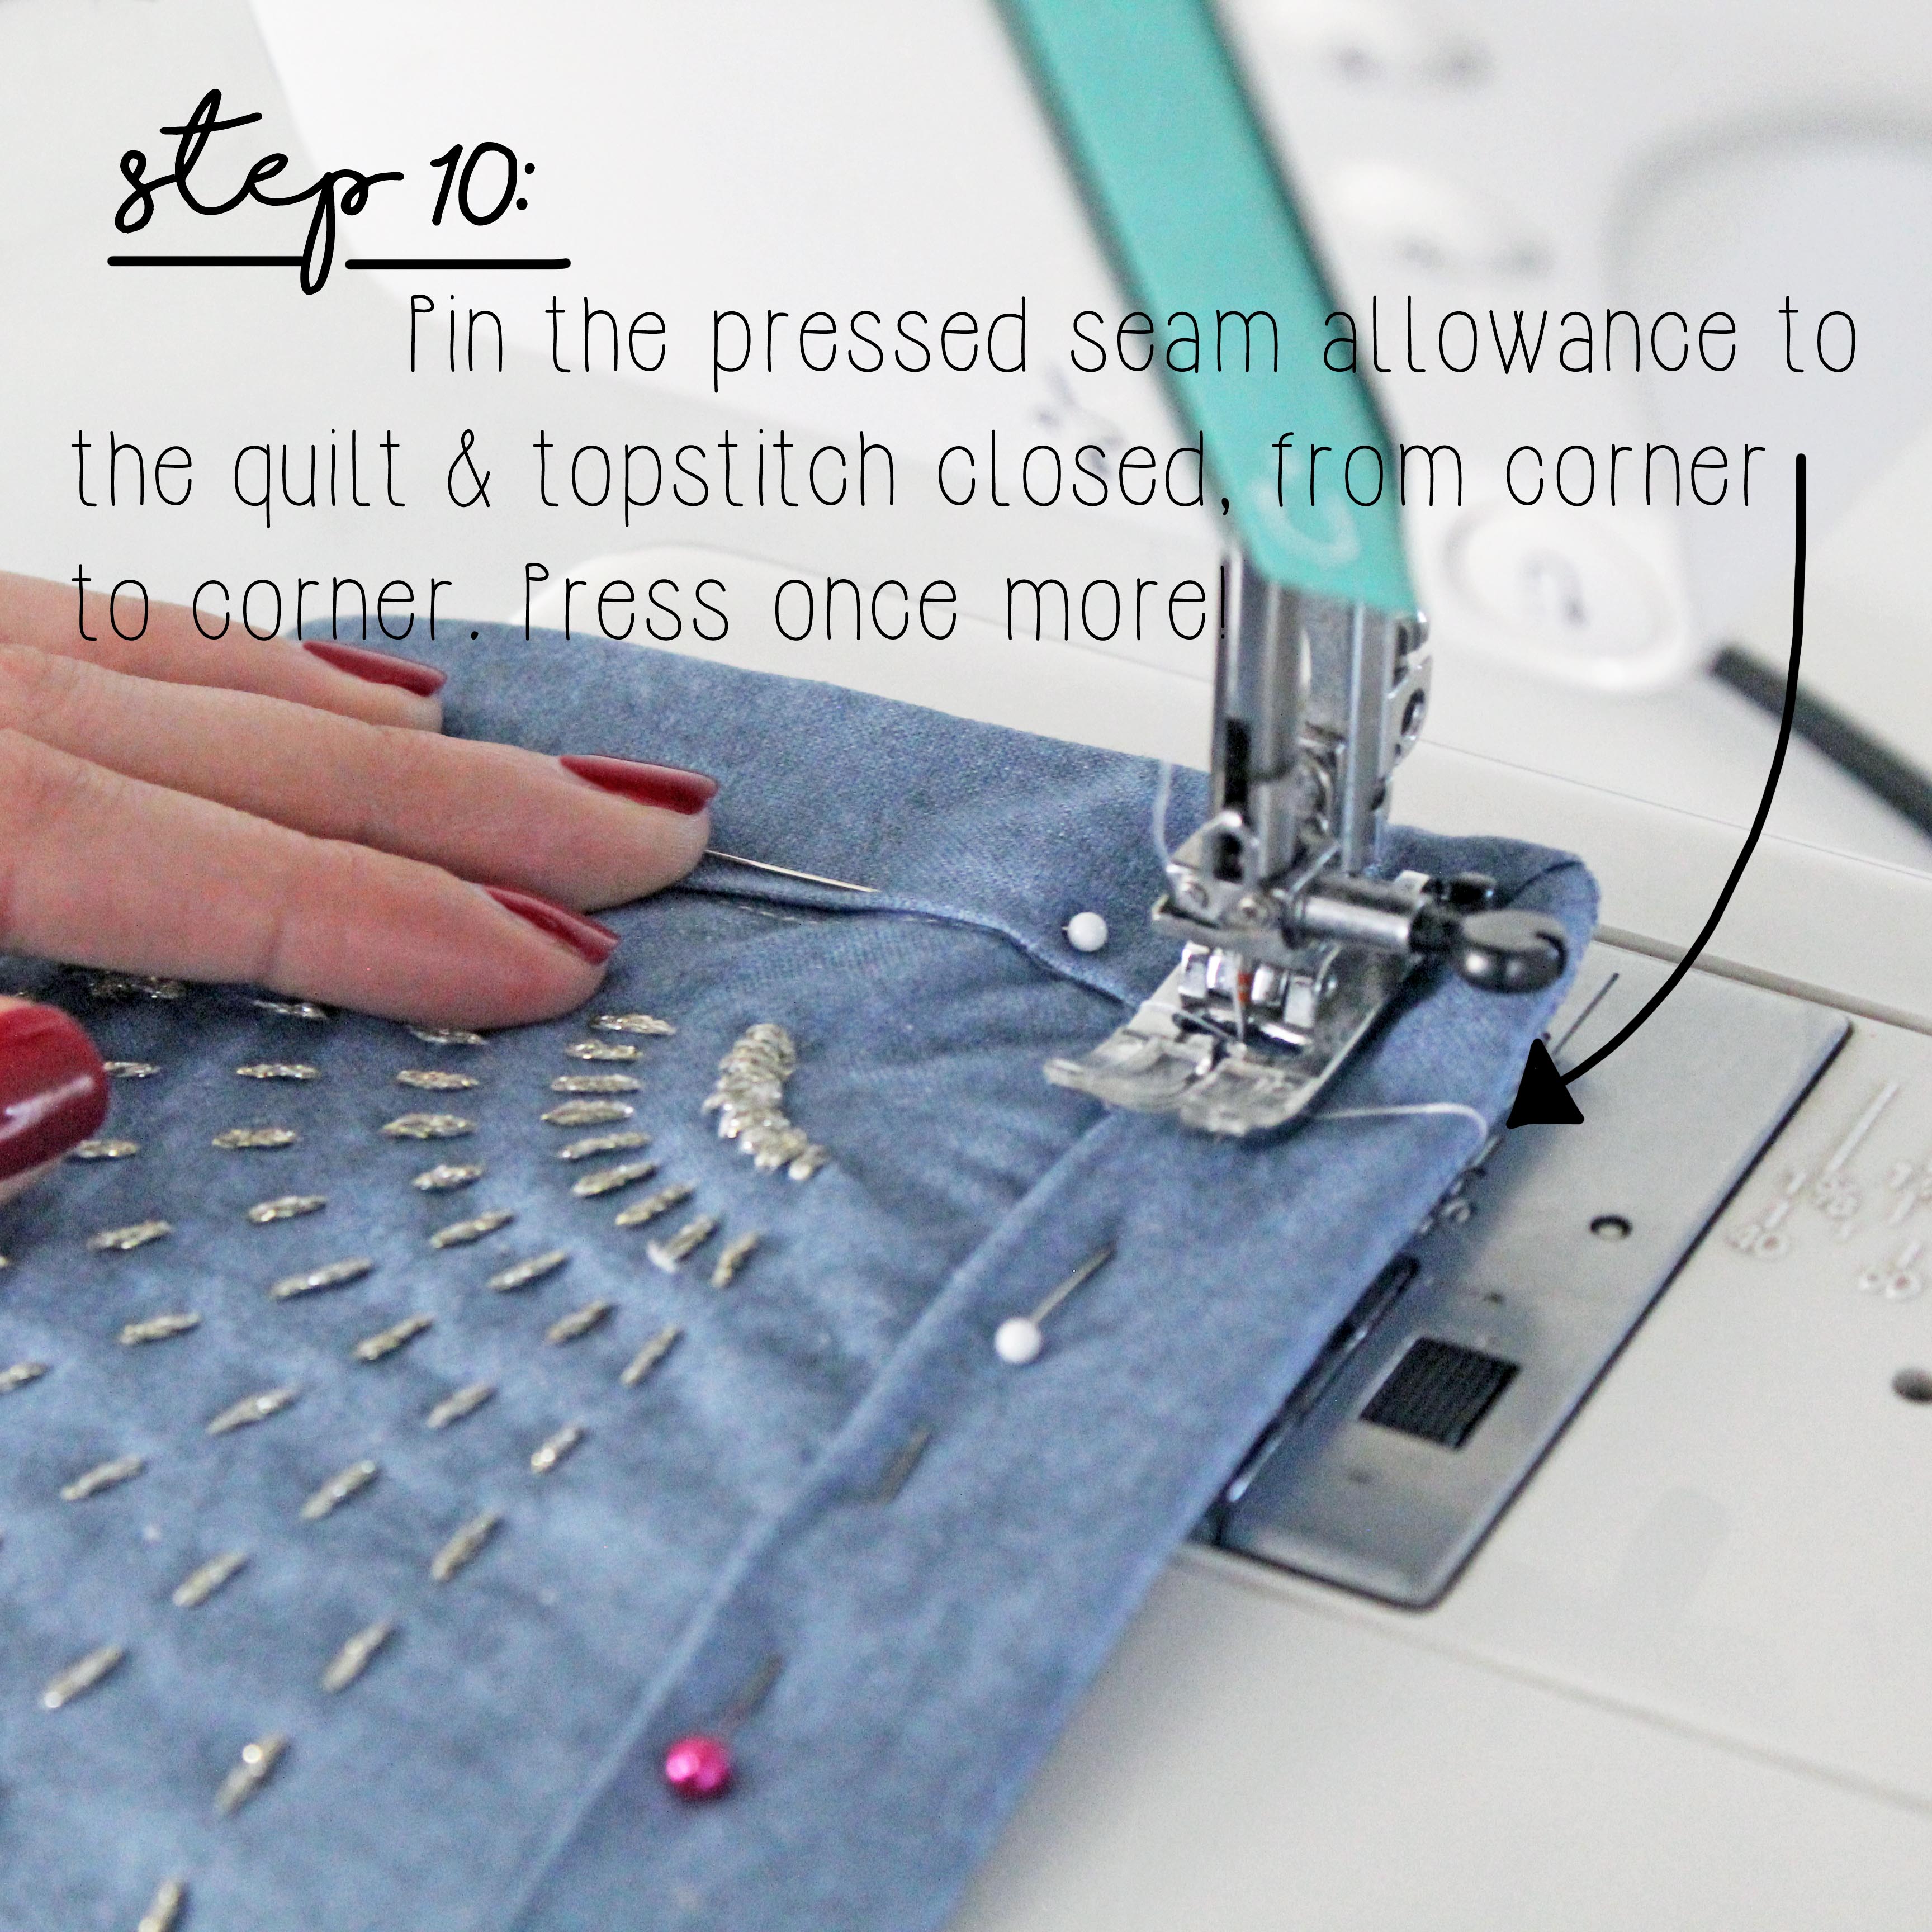
And finally, to close the quilt.
Because we pressed this final seam allowance earlier in step 6, all you need to do is pin the pressed seam to the quilt. Topstitch closed, from corner to corner.
Again, this is so much easier said than done. Especially if working with twisted binding strips, like I was. But again, that's all there really is to it.
Press one final time, once the entire length of the binding is attached. Repeat the process for all 4 sides, and you have yourself a finished quilt!
Quilting for beginners: That's a wrap!


And with that, our series on quilting for beginners is officially complete. I hope you guys have loved this project as much as I did. And that all of the posts have been helpful, in one way or another. If you need/want to catch up on the full series, you can check out all of the posts below:
- My First DIY Constellation Quilt, PART ONE
- DIY Constellation Quilt Embroidery Stitches Tutorial, PART TWO
- DIY Constellation Quilt Tips & Tricks, PART THREE
And finally, the question that people keep asking me when they see the quilt:

At this moment, having only just finished the quilt binding a few hours ago.. I want to say no. When I started this project, I expected it to only take the stated 60 hours to complete.. And as I mentioned in part three of the series, it took me at least triple that. (Not including the time for the quilt binding.)
And NO, I am not exaggerating that number.
By the end of this project, I really just wanted to be done with it. And by that point, it wasn't even enjoyable anymore. I think that if I didn't have the stress of being my own boss, of depending solely on myself to keep my blog and business going.. If I was just doing this project for fun, and from the beginning expected it to take 6 months to finish.. Then MAYBE, maybe I would feel different about it.
But that being said.. This DIY constellation quilt of mine is a literal work of art. If I had a spare wall in our tiny home to hang it, I 1,000% would. It's that beautiful, and that special. So. Worth it? I think I have to say yes.
(Ready to learn how to sew a quilt binding, and FINISH that quilt once and for all? Grab your free, printable tutorial below and learn from all of my mistakes!)


![]()
![]()
![]()


Julia Russ — February 19 2021
¡Muchas gracias María! Espero que algún día puedas tener en tus manos el patrón … ¡es un buen proyecto que consume mucho tiempo!
María felix — February 19 2021
Es fantástico como te ha quedado .
Necesitaría hacer uno para mi .pero es difícil conseguir el patron.