How To Sew On A Patch: The Deandra Knit Sewing Tutorial


And now it's time for our very first sewing tutorial of the year! I'm pretty excited for this one, because it's incredibly easy. (Like, potentially the easiest sewing tutorial we've ever done.) This week's tutorial is all about how to sew on a patch!
And I'm not talking about those cheap-o iron-on patches. No, no, no.
I really don't like those things. I have never had an iron-on patch that actually stayed on. Seriously. I follow the directions, step-by-step, yet somehow, they always fall off. And I just end up having to sew them on to the garment ANYWAYS.
Now, when an iron-on patch falls off, most of the time you can just stitch over it with a simple machine stitch. Because chances are, when choosing to use an iron-on patch, the garment it is being attached to is a pretty casual one. Right?
You aren't going to attach an iron-on patch to a beautiful, one-of-a-kind felt coat. Or a hand knit sweater. Because you don't want to take the chances of ruining said beautiful garment with a cheap iron-on.

I don't really work with patches too often, so creating this tutorial was actually a bit of a learning curve for myself as well. I pulled out a few of my sewing books from FIDM and read up on the recommended methods for attaching sew on patches.
And I pretty much disregarded them all.
Why? Because the methods that they were encouraging me to use looked pretty horrid with the floral patches I had purchased.
I'm not sure what types of patches they were envisioning using in that textbook, but their methods did not work in real time. At all. Which just encouraged me more to create this sewing tutorial on how to sew on a patch.
(Looking to dress up a simple, easy sewing project with some floral patchwork? Look no further, friend. This month's sewing tutorial is all about how to sew on a patch, so make sure to grab your printable step-by-step tutorial below!)


But first, let me say. I do think that the floral patches I purchased are pretty unusual. They are hand embroidered beauties that I got from a London based studio, Sixth Craft. The flowers are absolutely stunning, with varying shades of pinks & greens.
The flowers themselves are attached to a thin layer of netting, which surrounds the embroidery about 1/4" past the stitching lines. I feel like most patches have a hard edge, but these ones really don't. Which is partially what I love about them, they just seem so organic and beautiful.
BTW: Have you checked out this month's sewing project, the Deandra Knit? It is seriously one of my favorite projects that we have done here on the blog, and the floral patches are what make it. Truly.
It is kind of amazing how a few patches can completely transform a garment. I was a bit hesitant about the sweater after I had sewn it up and tried it on. I loved the color, and it was so incredibly soft and comfortable..

Then I put those floral patches on.. And the sweater was completely transformed. It went from some boring, basic sweater to the stunning floral knit you see before you. So patches can definitely be useful in that respect: Jazzing up something that was once a bit dull.
But, of course, not only do the patches themselves need to be done well (none of those cheap Chinese iron-ons here) they also need to be attached well. Because there is nothing worse than a patch that wasn't attached properly, and is falling off of a garment.
While patches can completely transform a garment, they can also completely cheapen one. (IMHO at least.) So. Let's learn how to sew on a patch the proper way, shall we?
(Looking to dress up a simple, easy sewing project with some floral patchwork? Look no further, friend. This month's sewing tutorial is all about how to sew on a patch, so make sure to grab your printable step-by-step tutorial below!)
How to sew on a patch: Will this sewing tutorial work for your patch?

There are SO many different types of patches out there, the possibilities are kind of endless. But mainly, there are two general categories:
- Sew on patches: Patches that are sewn on to the garment. (What we will be covering with this sewing tutorial)
- Iron-on patches: Patches that are ironed on to the garment. These patches have a sticky film on the back side that melts to the garment when heat from an iron is pressed on to it.
According to my sewing textbooks, most sew on patches are attached to the garment along the outer edge of the patch. The overall method is the same, but the stitching technique varies.

As I mentioned above, sewing on a patch by stitching along the edge really only works for patches that have a hard edge. (i.e. A design that is enclosed within a circle, square, etc.) Since the floral patches that I used for the Deandra Knit do not have a hard edge, we will be using a different method for how to sew on a patch.

For this sewing tutorial to work effectively for YOUR patch, then your patch should meet the following criteria:
- Be a sew on patch, not an iron-on patch. (Obvi)
- NOT have a hard outer edge along the patch.
- Rough, uneven stitching on the patch is ideal for this method. (Even stitching will also work, you will just need to be a bit more careful.)
As long as your patch meets all of the above, then we are ready to get started!
(Looking to dress up a simple, easy sewing project with some floral patchwork? Look no further, friend. This month's sewing tutorial is all about how to sew on a patch, so make sure to grab your printable step-by-step tutorial below!)
How to sew on a patch sewing tutorial: Step 1

First, you will need to determine the placement of the patches.
Lay out the garment that the patches will be attached to, so that it is completely flat on a table. Arrange and rearrange the placement of the patches until you have the perfect placement.
TIP: Try out a few different placements before deciding on a final one. You may be surprised by the placement you like the best!
How to sew on a patch sewing tutorial: Step 2


Next, pin the patches in place.
Pinning the patches securely ensures that they stay put during the sewing process. There is nothing worse than a patch slipping while sewing, which will result in puckering. And we do not want that.
NOTE: If sewing multiple patches, make sure to pin EVERY patch in place, from the beginning. Not just one at a time.
(Looking to dress up a simple, easy sewing project with some floral patchwork? Look no further, friend. This month's sewing tutorial is all about how to sew on a patch, so make sure to grab your printable step-by-step tutorial below!)
How to sew on a patch sewing tutorial: Step 3


Now it's time to actually sew the patch on to the garment.
First, on the back side of the garment, sew a small back stitch to keep the thread in place. (Not sure how to sew a back stitch? No worries! Check out our first hand stitching tutorial post.)
Push the needle back up to the right side of the garment, along the outer edge of the patch, but still INSIDE the border of the patch. This is where things will vary a bit. If your patch has rough & thick stitching (like with my patch) then your stitching method can be a bit more forgiving. But if working with a patch that has thin, even stitching, then you will need to be very precise with your own stitching.
Moving the needle back towards the center of the patch, reinsert the needle through both the patch and the fabric, back to the wrong side of the garment. We are essentially retracing the thread of the patch, to secure it in place.
Repeat the process for 2-3 stitches, then move counterclockwise to the next set of stitches.
How to sew on a patch sewing tutorial: Step 4

Once the entire patch is secure, make sure to securely back stitch the thread on the wrong side of the garment.
Again, this will ensure that the thread stays secure, and won't unravel. Which we definitely don't want, because your patch would eventually just fall right off.
(Looking to dress up a simple, easy sewing project with some floral patchwork? Look no further, friend. This month's sewing tutorial is all about how to sew on a patch, so make sure to grab your printable step-by-step tutorial below!)
How to sew on a patch sewing tutorial: Step 5
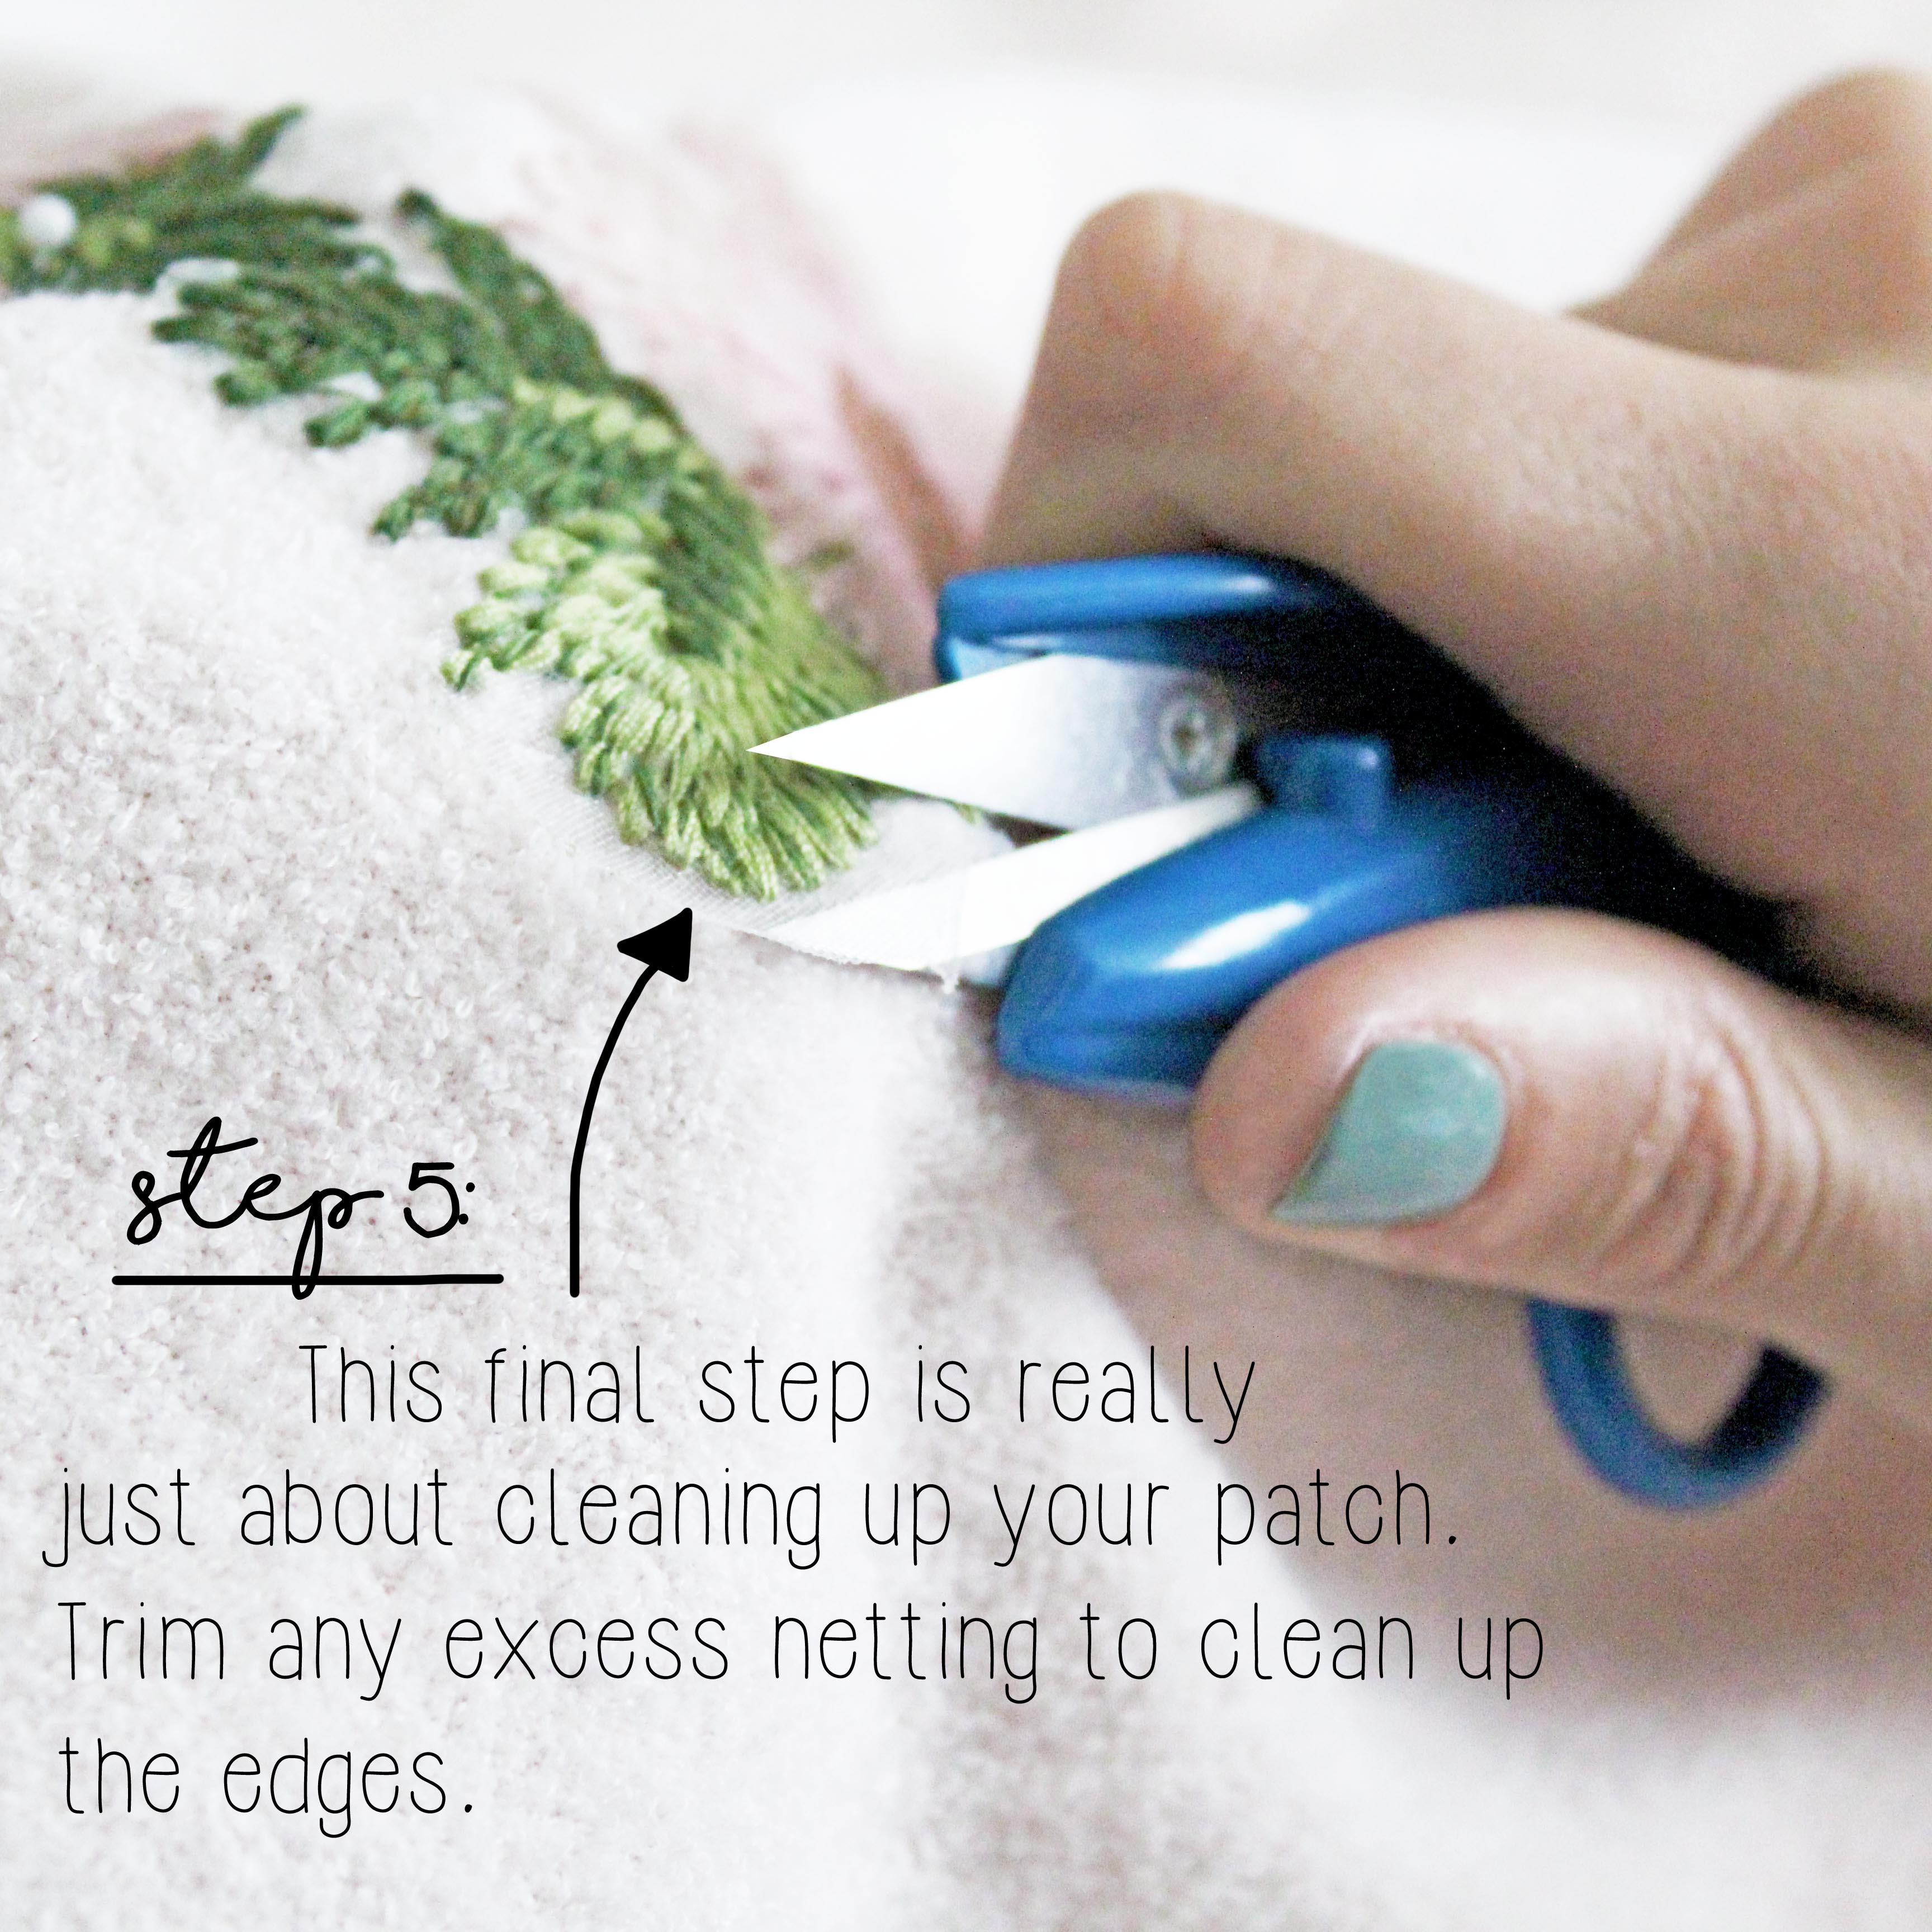
Because this sewing tutorial is tailored for patches that do not have a hard edge, your patch will most likely have some sort of netting along the edge of the patch.
As I mentioned above, the netting that holds my embroidered patch together extends about 1/4" from the edge of the flower. I decided to keep the netting untouched while I sewed on my patches, to ensure that the patches stayed completely together during the sewing process.
And it just so happens that once I had the patches attached to my sweater, it was pretty much impossible to see the light netting.

So, for this particular sweater with these particular patches, I decided to pretty much leave the netting untouched. I did trim a few corners that were a bit long, but for the most part, I left it as is.
I think this will ultimately help with holding the patch together, but the choice is yours really. If working with a dark fabric, you will definitely want to trim the edges of the patch, so that you aren't able to see the netting. Simply grab a pair of tiny scissors and trim.
NOTE: You can also complete this step before pinning your patches, the choice is completely up to you.
(Looking to dress up a simple, easy sewing project with some floral patchwork? Look no further, friend. This month's sewing tutorial is all about how to sew on a patch, so make sure to grab your printable step-by-step tutorial below!)
How to sew on a patch: A few more tips

So, pretty easy, right? Like I said, I think this is our easiest sewing tutorial yet. I wanted to go over a few more tips that I thought of while writing out this post, that I think will help:
- Start from one point on the patch, then move counterclockwise around the entire thing. Do not sew one part of the patch, then move on to a section on the other side. This will result in puckering. If your patch is multiple colors (as mine is) simply change out your thread as you hit the different colors. Work around the patch in a circle, and you will be happy.
- After pinning the patches in place (step 2) try the garment on to make sure the placement is right. I did not do this, and I really wish I would have because I probably would have adjusted the placement slightly.
- Sewing on patches is not a quick process. Each floral patch took me about an hour an 15 minutes EACH. Which means it took me over 6 hours to just sew on the patches for the Deandra Knit.. Yah. So just keep that in mind.
- Make sure to completely finish a patch before moving on to the next one. (If you are working with multiple patches!)
And I think that's it, really!
Let me know if you guys have any questions on how to sew a patch. And I would love love to see any sewing projects involving patches that you may be working on!
(Looking to dress up a simple, easy sewing project with some floral patchwork? Look no further, friend. This month's sewing tutorial is all about how to sew on a patch, so make sure to grab your printable step-by-step tutorial below!)


![]()
![]()
![]()


