How To Sew Easy Curtains: DIY Sewing Tutorial


Looking for perhaps the easiest / completely space transformative / incredibly useful / most requested DIY sewing tutorial EVER? Well girl, the wait is over--our tutorial on how to sew easy curtains is here!
Maybe because I love textiles and fashion, but I've always been a curtains-kind-of-girl. While yes, blinds and shades are wonderful--and help a lot with the heat--I'll take curtains any day of the week.
Why? Because curtains can completely transform a space. When it comes to updating or reinventing a room in your home, textiles are perhaps the easiest (and least expensive) way to go about it. (Especially if you are renters like us and can really only focus on surface level updates--no major reno projects here.)
Curtains--like all textiles--also allow you to show a bit of personality. Between choosing a color, pattern, texture, and weight (do you want some soft sunlight filtering into the room or to completely block the light?) the possibilities are endless.

You can have some up for a few years, and when you tire of the print or color, you can switch them out incredibly easily. Not so much when it comes to shutters and blinds--updating those is not only a major project, but can be incredibly expensive. Curtains also happen to be pretty easy to sew. (Major bonus, right?) Even if you have never sewn a single project in your life, I guarantee you can sew curtains.
So. This week's post is going to walk you through how to sew easy curtains. I'm also going to show you how I'm hanging my curtains--not only because it's so incredibly easy, but also because I think it could work for a lot of individual home spaces.
One final note--while there are a variety of ways to hang curtains (with hooks, rings, etc.)--we are going the easy route and creating curtains that hang directly from the rod. I have never really liked curtains that have those giant circles that a curtain rod slides through, or the circle hoops that attach the curtain to the rod. It just screams bathroom shower curtain. #pass
(This post on how to sew easy curtains is the first in our DIY home project series--a full guide with all of the tutorials is coming soon! Get on the list now and be the first to receive the guide straight to your inbox once it's released.)

How to sew easy curtains: What you need

As mentioned above, since our DIY curtains will be hanging directly onto the curtain rod, not much is needed for our curtains. Not only do I not like working with hardware when it comes to sewing (so much can go wrong) but I really just love the look of fresh, minimal curtains.
So. Here's what you need to make our easy DIY curtains:
- Fabric: Because of course. The type of fabric you choose really depends on the room, and what you are looking to achieve. For this project, I chose a really lightweight (basically gauze) fabric that would provide privacy, but also let filtered sunlight through. We went this route because our home is basically a houseplant jungle now--so it was absolutely necessary that light be able to filter in through the windows. Be conscious of what the room needs, then choose a fabric to fit those needs.
- Thread: Because I just went white with our curtains, I decided to just use a matching white thread. But if you want to get a little wild (I mean, why not) you can also use a contrasting color thread, maybe one that could help tie the room together. You do you, girl.
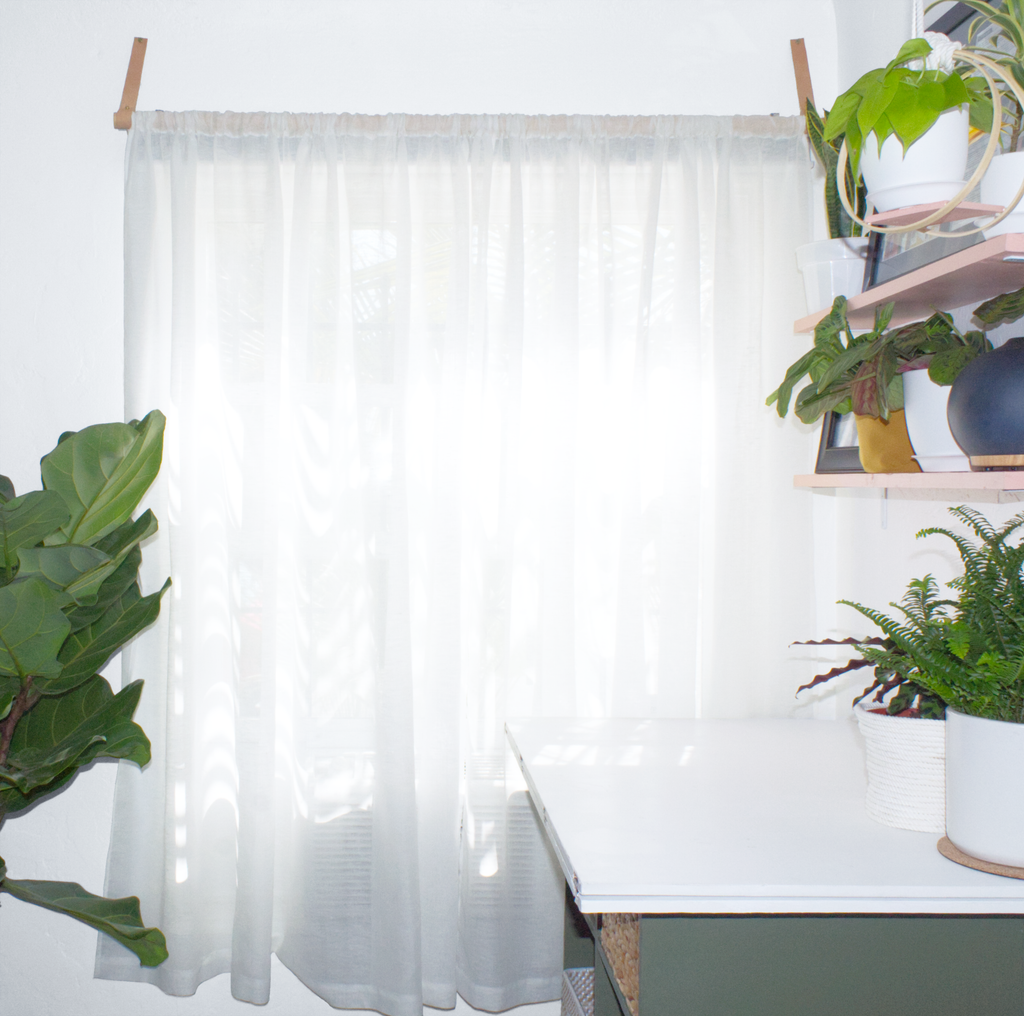
- Curtain Rod: Prior to sewing your curtains, I highly recommend that you already know what you will be hanging them with. (Why? Because what the curtains hang from will ultimately determine your sewing measurements.) In our case, we went with a basic round wooden dowel. I honestly don't believe it gets any simpler than this, and it really works well with our space since we are trying to emphasize the beauty of natural wood.
- Straps: How you will hang the curtains ultimately depends on what you choose for the curtain rod. In our case, we wanted to go really minimal--no metal hardware--so I just used some leather scraps that I had lying around to attach the curtain rod directly to the wall. The rod fits into a loop that the straps make, secured with a little brass pin. (You can also just stitch them closed, if desired.) Cheap, minimal, and chic--yes please.
Whether you go the dowel and strap route or not, just make sure to have both the curtain rod and hanging hardware figured out prior to cutting and sewing your curtains.
(This post on how to sew easy curtains is the first in our DIY home project series--a full guide with all of the tutorials is coming soon! Get on the list now and be the first to receive the guide straight to your inbox once it's released.)
How to sew easy curtains: Prepping the space

The list of materials needed to make our easy DIY curtains is pretty slim, as is the list of tools needed to make them. When prepping to make your own curtains, pull out these tools:
- Sewing machine
- Fabric scissors
- Measuring tape
- Sewing pins
- Leather punch (if making straps like ours)
- Straight ruler (not absolutely necessary, but helpful)
- Iron + ironing board
- Basic screws + drill (to hang the curtains)
All of the tools are pretty basic, and ones that you should have in your sewing kit--potentially with the exception of the leather punch. A basic awl should also get the trick done if you don't feel the need to order your own leather punch.
Because curtains are so big, I would recommend cutting them on a large table if you have one. However--I live in a pretty tiny space and do not have a large table, so I just cut and measured my curtains in chunks, which also worked out just fine. This may take a little longer, but it is absolutely doable.
I would also recommend just pulling out a notebook to take notes of your measurements in future steps--no matter how many times I would repeat them to myself, I would always forget. So it's helpful to have everything written down and in one space!
(This post on how to sew easy curtains is the first in our DIY home project series--a full guide with all of the tutorials is coming soon! Get on the list now and be the first to receive the guide straight to your inbox once it's released.)
How to sew easy curtains DIY sewing tutorial: Step 1

Before cutting anything, you need to measure your windows. Measure both the width and the height, taking note of both.
I prefer to have my curtains a few inches wider on either side of the window, a few inches higher than the window, and maybe 5" lower than the window. Of course, the choice is absolutely up to you--but I feel like adding at least a few inches on all sides of the window will allow for more accurate overall coverage.
NOTE: Make sure to account for any unusual window details when taking note of your measurements. For example, we have black out shades on our windows (to help with the heat during the summer) so I needed to add some length to the height to account for the extra bulk of the shade.
(This post on how to sew easy curtains is the first in our DIY home project series--a full guide with all of the tutorials is coming soon! Get on the list now and be the first to receive the guide straight to your inbox once it's released.)
How to sew easy curtains DIY sewing tutorial: Step 2

With basic measurements in hand, it's time to determine your cutting measurements. I prefer for my curtains to have a gap in the middle, so I sew two curtains for every window. I believe this is pretty normal--it allows for easy access to the window, and is also much easier to sew. Win-win.
Let's start with the width of the window. I think a 1 1/4 overall ratio of the window works well when cutting the individual curtains. For example--if the window is 50" wide, I would cut each of the two individual curtains 62.5" wide. (50" Is the whole width of the window, plus 12.5" which is 1/4 of the width of the window.) Then add seam allowances to either side of the curtain--I usually just use 1/2", so this would add 1" total.
With the width of the curtains figured out, it's time to determine the length. Two measurements need to be added to the length of the curtains: The lower curtain hem and the opening for the curtain rod. A good rule of thumb is to add 2" for the lower hem, which includes a 1/2" seam allowance. This allows for a wide hem, but also allows you to adjust the length of the curtains if you need more or less fabric to create the desired length.
For the curtain rod opening, I added 5", which includes a 1/2" seam allowance. The most important part with this measurement is that it is wide enough for the curtain rod to easily slide through--you don't want it to be too tight.
To summarize, here are the lengths and measurements of my curtains:
- WIDTH: 63"
- The actual width of my window is 44", which I rounded up to 50" (3" extra on either side)
- 1 1/4 of 50" wide is 62" + 1" seam allowance = 63" wide
- LENGTH: 68"
- The actual length of my window is 55", which I rounded up to 61" (3" extra on either end)
- 61" + 5" for the curtain rod opening + 2" for the lower hem = 68" long
Your measurements will most likely be different, but I feel like the overall ratios are pretty general (and aesthetically pleasing) rules of thumb for your basic curtains.
How to sew easy curtains DIY sewing tutorial: Step 3

With final measurements in hand, it's time to cut out the fabric accordingly.
If you have a large table, simply measure out the length and width, marking each with pins. (Or, if you are so bold, you can draw the lines out directly onto the fabric.)
If you are more like me, and have a tiny space, the process is the same--just slightly more difficult. I prefer to start with the length, marking that and then cutting the fabric there. Once the length is cut, mark the width with pins and then cut accordingly. Do this for both curtains.
(This post on how to sew easy curtains is the first in our DIY home project series--a full guide with all of the tutorials is coming soon! Get on the list now and be the first to receive the guide straight to your inbox once it's released.)
How to sew easy curtains DIY sewing tutorial: Step 4


If you are using the same straps as me, then follow this step. If not (i.e. you will be using hardware that came with your curtain rod) then you can go ahead and skip ahead to step 5.
Grab the measuring tape and curtain rod. Hold the rod in the desired position above the window--you will probably need help with this. Grab the measuring tape and loop it around the rod so that it's encased in the loop circling the rod. Measure how long you'd like the strap holding the rod to be--I believe ours was about 11".
NOTE: Make sure to include the width that loops around the rod. You want the WHOLE length of the strap.
Cut the straps accordingly. If closing the straps with little brass pins (like I did) then mark where the loop closes around the rods--you want a little room so that the curtain rod fits in smoothly, but also securely. Punch holes for the brass pins, then screw the pins closed.
How to sew easy curtains DIY sewing tutorial: Step 5

Now it's time to start sewing the curtains. I prefer to start with the sides of the curtains.
Pin the sides of the curtain closed, following your seam allowance. I used 1/2", since I prefer to have thinner seam allowances on the sides of my curtains.
Once the sides of the curtain are fully pinned, stitch closed the entire length of the curtain. Repeat for the other side.
(This post on how to sew easy curtains is the first in our DIY home project series--a full guide with all of the tutorials is coming soon! Get on the list now and be the first to receive the guide straight to your inbox once it's released.)
How to sew easy curtains DIY sewing tutorial: Step 6

Before pinning and stitching the top and bottom of the curtain, I like to double check that both the top and bottom are cut evenly. With such a wide project (my curtains are literally a yard wide each) it's easy for cutting to get a little skewed and uneven. And nobody wants curtains that are unevenly cut and definitely look homemade.
To check this, simply fold the curtain in half so that the stitched sides are together. Place the curtain flat on the table, then grab your ruler and check how straight your cutting is. If it's a bit uneven (as mine was) then draw a straight line and even it out.
Do this for both the top and bottom of the curtains.
How to sew easy curtains DIY sewing tutorial: Step 7

Now it's time to stitch the top of the curtain, the opening in which the curtain rod will slide into. As mentioned above, I allowed for 5" along the top of my curtains--this allows for the rod to slide easily in, without being too tight or hanging too lose.
Since I allowed for 5" total, I am folding the top of the fabric 2.5" down. Your measurements may be slightly different--just cut the amount you need in half. Pin the measurement in place the entire length of the curtain.
Next, pin under the seam allowance--mine is 1/2". Do this the entire length of the curtain, then stitch closed. Repeat on the other curtain!
NOTE: Prior to stitching, I highly recommend inserting the curtain rod just to make sure that the opening isn't too tight. There's nothing worse than having to rip that long stitch out and make it wider for the curtain rod. Double check prior to stitching!
(This post on how to sew easy curtains is the first in our DIY home project series--a full guide with all of the tutorials is coming soon! Get on the list now and be the first to receive the guide straight to your inbox once it's released.)
How to sew easy curtains DIY sewing tutorial: Step 8

Prior to hemming the curtains, I like to have them hanging to ensure the length is right. This means that you will need to hang the curtain rod itself at this point, if it isn't hanging already. If your rod is hanging and ready, simply hang your curtains now and move on to the next step.
If you are using our method for the curtain rod and straps, then simply drill the straps into the wall where previously noted in step 4. Insert the rod into the straps, with the curtains hanging from it.
How to sew easy curtains DIY sewing tutorial: Step 9

With the curtains hanging, pin the lower hem according to your previously noted measurements.
As long as the length is where you want it and both of the curtains are even--you're good to go! If you want the hem to be a little shorter, mark the adjustment. Or if one of the sides is longer than the other, note that and trim the longer curtain so that both sides are even.
Take the curtains off the rod, pin the seam allowance under (again, I used 1/2"), and then stitch closed. I also prefer to do a little double topstitch along the outer hem edges, just to fully close the hem.
(This post on how to sew easy curtains is the first in our DIY home project series--a full guide with all of the tutorials is coming soon! Get on the list now and be the first to receive the guide straight to your inbox once it's released.)
How to sew easy curtains DIY sewing tutorial: Step 10

Lastly.. press your curtains flat!
There is nothing worse than wrinkled curtains, and it truly makes a world of difference. Spend the time to iron your curtains before hanging them, and you will be so thankful.
Once your curtains are pressed beautifully flat, hang them up! Then marvel at your beautifully transformed space.
So. Ready to make your own DIY curtains?

As I have mentioned in some recent Instagram posts, my husband and I have really been working on our home space these last few months. With not being able to travel this year (which is normally a really big part of our lives) we have decided to put our energy into controlling our own little home space and making it the best home it can be.
That means we have a ton of DIY home projects coming to the blog in the upcoming months--including a massive DIY home guide that I will be releasing at the end of the year. The guide will include all of the upcoming DIY home projects and each individual sewing tutorial.

I decided to start with curtains because they are absolutely the easiest DIY home project--without question. And it's kind of amazing how transformative they can be, with how simple they are. I truly think it's the perfect place to start if looking to give your place a bit of a facelift.
Also--if you are working on your own home space, I highly recommend the book Home Is Where You Make It by Geneva Vanderzeil. I have pulled a ton of projects and inspo from this book--even tweaking a few and making them my own.
Are there any DIY home projects you are really looking forward to making? Let me know below--maybe we will be covering it in a future post..? And show me your curtains, I can't wait to see how your transform your sweet little space!
(This post on how to sew easy curtains is the first in our DIY home project series--a full guide with all of the tutorials is coming soon! Get on the list now and be the first to receive the guide straight to your inbox once it's released.)


![]()
![]()
![]()