How To Sew 5 Different Types Of Hand Stitches, Part One

This week we are going back and recreating one of our very first (and perhaps one of our most useful!) sewing tutorials here on the blog. Why? Because learning how to sew different types of hand stitches is such an important piece of the sewing education puzzle.
Hand sewing truly is a skill that every seamstress (ahem, modiste) should know and practice. Yet, somehow (and maybe this is just me, but I don't think it is) we end up using the same, boring ol' hand stitching technique. For every. single. project. (I am particularly guilty of using the slip stitch for pretty much anything and everything.)
While using the same technique over and over again is certainly good practice, and will probably get the job done.. There are different types of hand stitches that work better for different projects. One hand stitching technique may be best for hemming. While another may be best for finishing off a zipper.

I know that not every sewing project out there requires hand stitching. But sometimes there are certain parts of a project that are just too delicate or small to sew up with a machine, and need to be stitched up by hand. Or maybe you need to repair an older piece of clothing? Almost all repairs that I have ever done use hand stitching. (Btw, we have a pretty awesome repair guide here on the blog.)
Whatever the reasoning is, knowing the different types of hand stitching is a must. This post is going to walk you through how to sew five basic (but very important!) hand stitches that you can use on every day sewing projects.
Whether you're new to hand sewing or you've been using the same ol' boring hand stitch for years.. This lesson is going to be invaluable for you. So let's get started, shall we?
(This post is part one of two in our series on how to sew different types of hand stitches. Make sure to download our complete hand stitching tutorial below that walks you through how to sew a total of EIGHT unique hand stitches!)

How to sew different types of hand stitches: #1. The slip stitch

The slip stitch is a nearly invisible small stitch that is often used for hemming. It can be used to hem dresses, pants, skirts--Whatever your heart desires. This is actually my very favorite hand stitch simply because it can pretty much be used for any type of sewing project out there.
Follow these steps to hand sew the slip stitch:
- Before starting, make sure to secure the thread with a tiny back stitch.
- Moving to the left, stitch up 1/4" of fabric, keeping the needle and thread hidden in the folded hem's edge.
- Moving diagonally up, pick a tiny stitch about 1/4" from the hem's edge.
- Move diagonally to the left, back down to the hem, and repeat!
A small note: The length of the bottom stitch should be longer than the above stitch. (At least 2-3 times longer.) My upper stitches are a bit larger than typical--This is for demonstrative purposes, so that you can see the stitch itself clearly.


But really.. That's it. The slip stitch is a durable way to hem a garment, all while using a near invisible stitch.
Because you can see the tiny little pinpricks of a slip stitch on the right side of the garment, you do have to be very careful that the pricks are evenly spaced. Hand stitching is often seen as a sign of quality, since it takes much longer than any type of sewing on an actual machine. And since you are able to see the little pricks of a slip stitch, this would be an ideal hand stitch when finishing up a higher quality piece.
(This post is part one of two in our series on how to sew different types of hand stitches. Make sure to download our complete hand stitching tutorial below that walks you through how to sew a total of EIGHT unique hand stitches!)
How to sew different types of hand stitches: #2. The pick stitch

The pick stitch is a small (but durable) back stitch that is often used to finish a hem or zipper.
Follow these steps to hand sew the pick stitch:
- Before starting, make sure to secure the thread with a tiny back stitch at the hem. (Check out stitch #4 if you aren't sure how to sew a back stitch.)
- Starting from the back, above the hem, push the needle to the front.
- Move the needle down and diagonally to the left, picking 1/4" inside the hem.
- Move the needle back up and diagonally to the right, then pick 1/4" to the left.
- Repeat the process!
And again--Really, that's it.


You may be asking: Why would you use this stitch for a hem, instead of the slip stitch? In my experience, the pick stitch is often used for garments that have a lining in them.
The right side (the side that everyone sees when you are wearing the garment) of the pick stitch is much more visible than that of the slip stitch. (Which is what makes it an ideal hand stitch to use when you have a lining.) The pick stitch isn't as clean as the slip stitch, but it is quicker and easier, which may make it a more desirable option for those that are less experienced with hand stitching.
(This post is part one of two in our series on how to sew different types of hand stitches. Make sure to download our complete hand stitching tutorial below that walks you through how to sew a total of EIGHT unique hand stitches!)
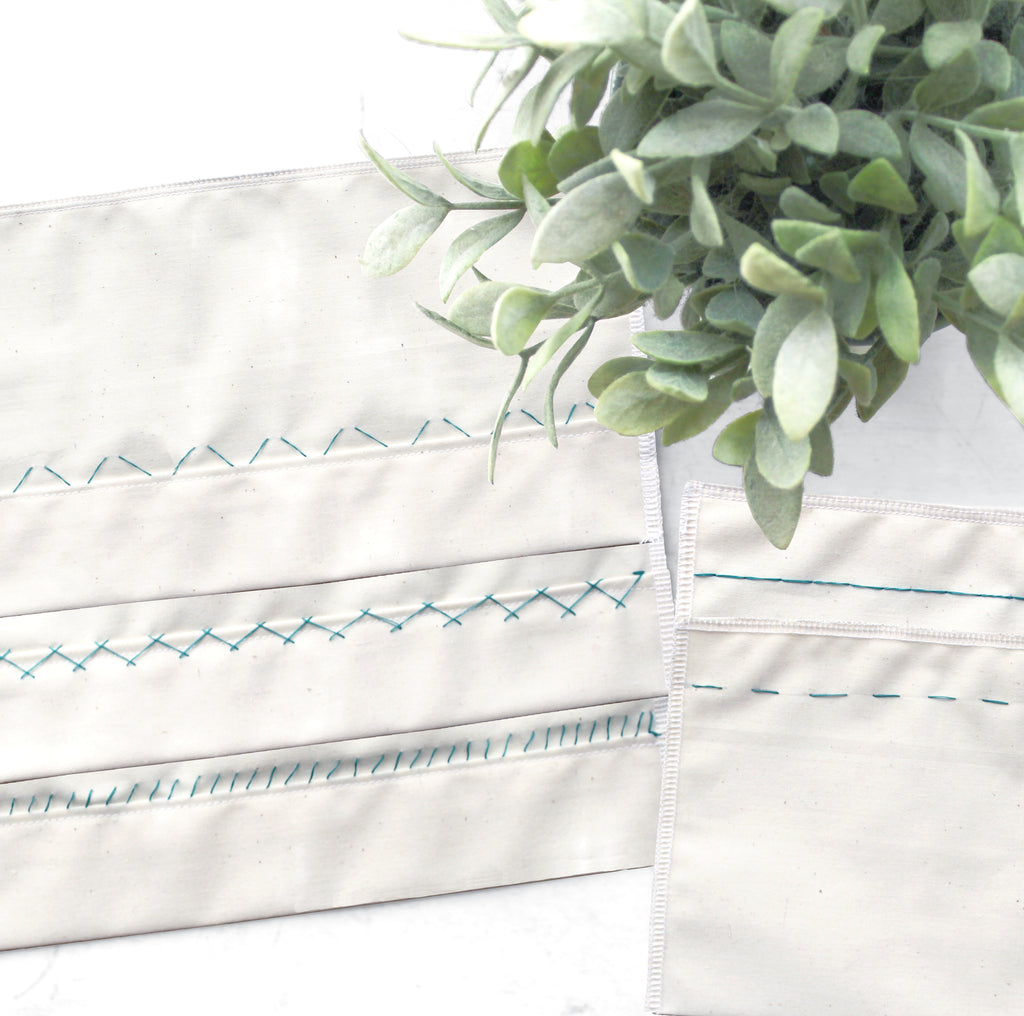
How to sew different types of hand stitches: #3. The catch stitch

The catch stitch is most often used for hemming and is stitched from left to right. It can also be used for allowing some stretch in knit fabrics and bias cuts.
Follow these steps to hand sew the catch stitch:
- As with previous stitches, before starting, make sure to secure the thread with a tiny back stitch.
- Moving from left to right, pick a small 1/4" stitch.
- Next, move the needle up & diagonally to the right, picking a small 1/4" stitch to the left.
- Move the needle diagonally across the previous stitch, to the right. Pick a small 1/4" stitch to the left.
- And repeat!
Again, so simple. And it looks so pretty!


As with the slip stitch, the pick marks are slightly noticeable on the right side of the fabric, but not nearly as much.
This stitch takes a bit more time than the others.. But it really looks incredible on the back side of the fabric when done properly. (Of all the different types of hand stitches covered in this post, this one is definitely the most decorative!)
The catch stitch is definitely an excellent stitch option if you're looking to impress.
(This post is part one of two in our series on how to sew different types of hand stitches. Make sure to download our complete hand stitching tutorial below that walks you through how to sew a total of EIGHT unique hand stitches!)
How to sew different types of hand stitches: #4. The back stitch

The back stitch is one of the most common and strongest hand stitches around. I don't think I have ever hand sewn a project that didn't involve the back stitch--It's that useful. The back stitch essentially copies the look of a machine stitch, but is actually a hand stitch.
Follow these steps to hand sew the back stitch:
- Push the needle to the back of the fabric, then move the needle 1/4" to the left and push back to the right side.
- Take the needle back to the beginning of the last stitch, and push through to the back side.
- And repeat! Over and over.
On both the front and back side of the garment the stitch is fully visible--Similar to a machine stitch.


Before and after hand sewing, I ALWAYS secure my thread with a back stitch.
No matter what the hand stitching technique is. Why, you may ask? In case your hand stitching comes undone (for any number of reasons this could happen) the beginning and end of your stitching will be secure. (Since you have used one of the strongest hand stitches to secure it!)
This ensures that even if your stitching is compromised, it won't completely unravel, and you can repair it. #yesplease
(This post is part one of two in our series on how to sew different types of hand stitches. Make sure to download our complete hand stitching tutorial below that walks you through how to sew a total of EIGHT unique hand stitches!)
How to sew different types of stitches: #5. The stab stitch

The stab stitch is most often used as additional support. It can be used when sewing pockets, zippers, shoulder pads, and buttonholes. Because sometimes you just need a little bit more support, am I right? Using this stitch is essentially a precaution. It helps keep things in place and to ensure that you don't have to sew something up twice.
Follow these steps to hand sew the stab stitch:
- Start by securing your thread with a back stitch.
- Push the needle down to the under side of all fabric/trim layers.
- Move the needle 1/4" to the left, then push back to the right side of the fabric.
- And repeat!
Keep in mind: The stab stitch line will appear the same both on the front and back side of the fabric.


Depending on what you are using this stitch for, you can either take the stitching out once what you needed to secure is actually secure, or you can leave it in. It really just depends what you are working on, if you can (or want to) see the stitching once the garment is fully finished.
If you can see it (like on a buttonhole) then I would probably take the stitching out. But if you can't see it (like on a shoulder pad in a coat) then I wouldn't worry about taking it out.. Since you won't see it once the lining is closed up.
(This post is part one of two in our series on how to sew different types of hand stitches. Make sure to download our complete hand stitching tutorial below that walks you through how to sew a total of EIGHT unique hand stitches!)
Ready to learn how to hand sew?

So. Ready to knock out hand sewing? I knew you would be.
Once you learn how to use these stitches, I promise you won't forget. Your fingers will just know what to do. There is nothing worse than needing to know how to hand sew something when you're right in the middle of a project.. And not being able to.
Lucky for you, this post covers some pretty basic hand stitches that should get you through most sewing projects. However, if you're looking to hand sew some more decorative stitches, make sure to check out part two in our hand stitching series!
That post covers some slightly more advanced hand stitching techniques, including:
- The Blanket Stitch
- The Whipstitch
- The Overcasting Stitch
We also just so happen to have a hand sewing needle guide up on the blog. This post walks you through which needles work best for which projects.. Because YES, it does matter which needle you use.
Are there any other hand stitches you guys have been wanting to learn? Let me know below!
(This post is part one of two in our series on how to sew different types of hand stitches. Make sure to download our complete hand stitching tutorial below that walks you through how to sew a total of EIGHT unique hand stitches!)


![]()
![]()
![]()


Julia Russ — April 2 2021
Marlene, that is so wonderful! I love that you are looking to pick up the art and that you have found the tutorials helpful. I also love seeing a piece of fabric come to life — it’s kind of amazing. So happy to have you here! xx
Marlene Vega — April 2 2021
I watched my grandma for years. She was a professional seamstress and I was always fascinated seeing a piece of ordinary fabric come to fruition after it’s finished. I am trying to sew and be just as good as her and your tutorials are very helpful. Thank you!